Видеокамеры Sony CCD-TRV58E / CCD-TRV59E - инструкция пользователя по применению, эксплуатации и установке на русском языке. Мы надеемся, она поможет вам решить возникшие у вас вопросы при эксплуатации техники.
Если остались вопросы, задайте их в комментариях после инструкции.
"Загружаем инструкцию", означает, что нужно подождать пока файл загрузится и можно будет его читать онлайн. Некоторые инструкции очень большие и время их появления зависит от вашей скорости интернета.


71
C
us
tomizing Your C
amc
order
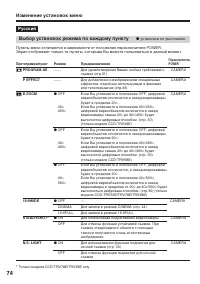
Выполнение индивидуальных установок на видеокамере
Icon/ it em
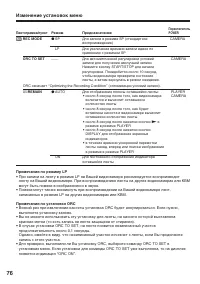
REC M ODE
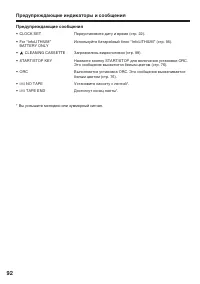
ORC TO SET
ORC stands for “Optimizing the Recording Condition”.
q
REM AIN
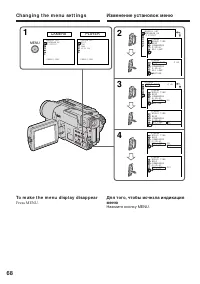
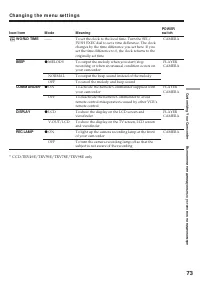
Ch a n g i n g t h e m e n u se t t i n g s
M ode
z
SP
LP
——
z
AUTO
ON
M eaning
To record in SP (Standard Play) mode
To increase the recording time to twice the SP mode
To automatically adjust the recording condition to
get the best possible recording. Press START/STOP
to start adjustment. Your camcorder takes about 10
seconds to check the tape condition and then
returns to the standby mode.
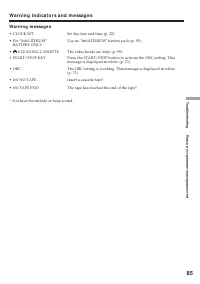
To display the remaining tape bar:
• for about 8 seconds after your camcorder is
turned on and calculates the remaining amount
of tape
• for about 8 seconds after a cassette is inserted and
your camcorder calculates the remaining amount
of tape
• for about 8 seconds after
N
is pressed in
PLAYER mode
• for about 8 seconds after DISPLAY is pressed to
display the screen indicators
• for the period of tape rewinding, forwarding or
picture search in the PLAYER mode
To always display the remaining tape bar
POW ER
sw it ch
CAMERA
PLAYER
CAMERA
CAMERA
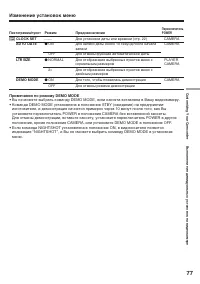
Not es on t he LP mode
• When you record a tape in the LP mode on your camcorder, we recommend playing back the tape on
your camcorder. When you play back the tape on other camcorders or VCRs, noise may occur in
pictures or sound.
• Noise may occur also when you play on your camcorder tapes recorded in the LP mode on other
camcorders or VCRs.
Not es on ORC set t ing
• Each time you eject the cassette, the ORC setting will be canceled. If necessary, reset the setting.
• You cannot use this setting on a tape with the red mark on the cassette exposed.
(i. e. the tape is write-protected)
• When you set ORC TO SET, a non-recorded section of about 0.1 seconds appears on the tape.
However, note that this non-recorded section disappears from the tape when you continue recording
from this section.
• To check if you have already set the ORC setting, select ORC TO SET in the menu settings. “ORC
ON” is displayed if ORC TO SET is already set.
Содержание
- 2 En g l i sh; camcorder. With your; W ARNING; or; Русский; ПРЕДУПРЕЖДЕНИЕ
- 4 Функции для использования при монтаже (в режиме записи); Основные функции
- 6 Оглавление; Подготовка к эксплуатации
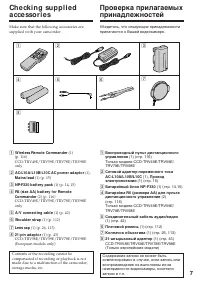
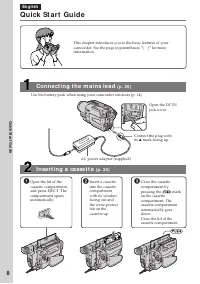
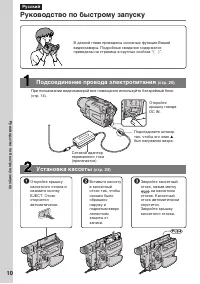
- 10 Подсоединение провода электропитания; Сетевой адаптер; Установка кассеты; на кассетном; Руководство по быстрому запуску
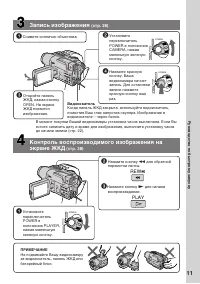
- 11 Запись изображения; ПРИМЕЧАНИЕ; Видоискатель
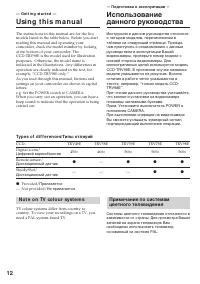
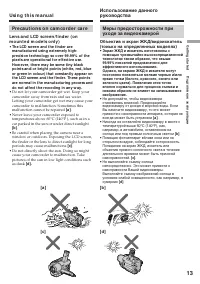
- 12 — Ge t t i n g st a r t e d —; Usi n g t h i s m a n u a l; — Подготовка к эксплуатации —; Ty p e s o f d i f f e r e n ce s/; Цифровой вариообъектив; N o t e o n TV co l o u r sy st e m s
- 13 • Do not let your camcorder get wet. Keep your
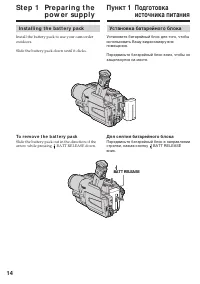
- 14 I n st a l l i n g t h e b a t t e r y p a ck; Slide the battery pack down until it clicks.; To r e m o v e t h e b a t t e r y p a ck; St e p 1 Pre p a r i n g t h e; Установка батарейного блока; Для снятия батарейного блока; Пункт 1 Подготовка; BATT RELEASE
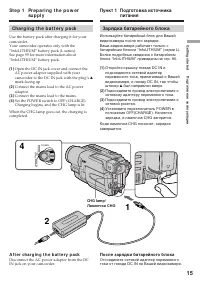
- 15 St e p 1 Pr e p a r i n g t h e p o w e r; Connect the mains lead to the mains.; Зарядка батарейного блока; был направлен вверх.; A f t e r ch a r g i n g t h e b a t t e r y p a ck; Лампочка CHG; После зарядки батарейного блока; Пункт 1
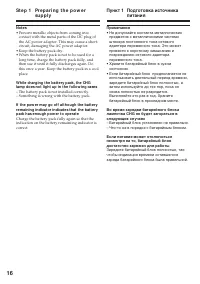
- 16 Not es; • Prevent metallic objects from coming into; Примечания; • Не допускайте контакта металлических
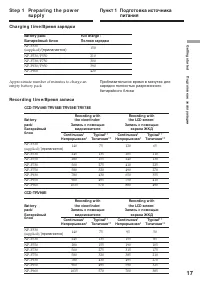
- 17 Ch a r g i n g t i m e /; Батарейный блок
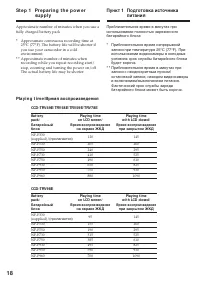
- 18 Pl a y i n g t i m e /
- 19 Что такое “InfoLITHIUM”?
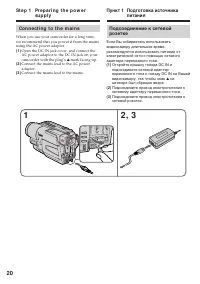
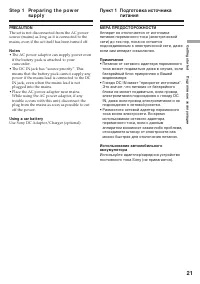
- 20 Co n n e ct i n g t o t h e m a i n s
- 21 PRECAUTION; • The AC power adaptor can supply power even; Using a car bat t ery; • Питание от сетевого адаптера переменного
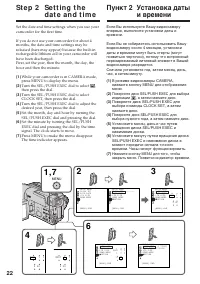
- 22 Turn the SEL/PUSH EXEC dial to select; Пункт 2; St e p 2 Se t t i n g t h e
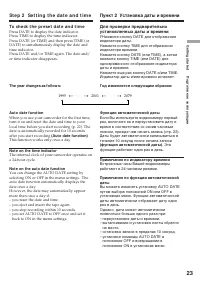
- 23 To ch e ck t h e p r e se t d a t e a n d t i m e; The year changes as f ollow s:; This function works only once a day.; Not e on t he t ime indicat or; back to ON in the menu settings.; Год изменяется следующим образом:; функция работает один раз в день.; Примечание по индикатору времени; Пункт 2 Установка даты и времени
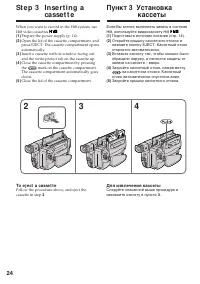
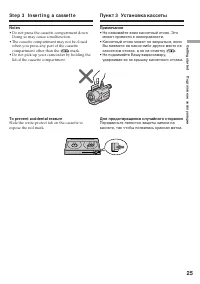
- 24 Для извлечения кассеты; mark on the cassette compartment.; To e j e ct a ca sse t t e; St e p 3 I n se r t i n g a
- 25 • Do not press the cassette compartment down.; To prevent accident al erasure; St e p 3 I n se r t i n g a ca sse t t e; • Не нажимайте вниз кассетный отсек. Это; Для предотвращения случайного стирания
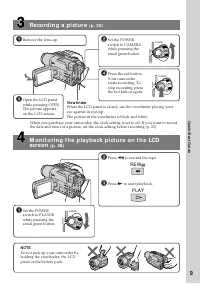
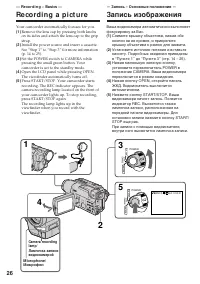
- 26 — Re co r d i n g – Ba si cs —; Re co rd i n g a p i ct u re; Your camcorder automatically focuses for you.; Микрофон
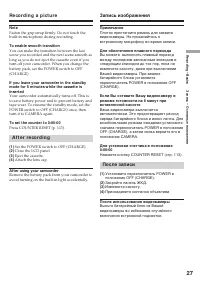
- 27 Not e; A f t e r r e co r d i n g; Attach the lens cap; Af t er using your camcorder; После записи; Присоедините колпачок объектива; После использования видеокамеры
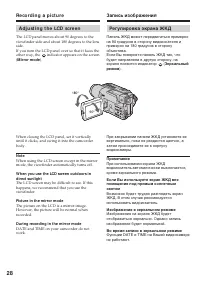
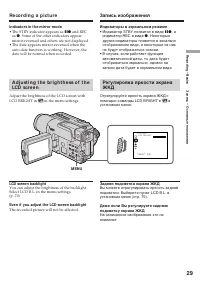
- 28 indicator appears on the screen; M irror mode; Зеркальный
- 29 Indicat ors in t he mirror mode; Xz; LCD screen backlight; M ENU; • Индикатор STBY появится в виде; Задняя подсветка экрана ЖКД
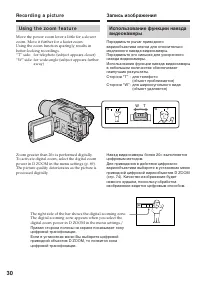
- 30 Usi n g t h e zo o m f e a t u r e; Zoom greater than 20
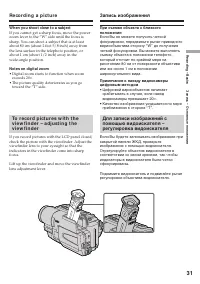
- 31 W hen you shoot close t o a subject; • Digital zoom starts to function when zoom
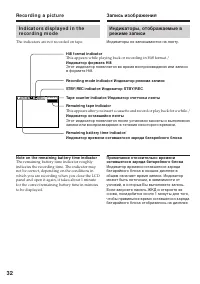
- 32 This appears while playing back or recording in Hi8 format./; Индикатор формата Hi8; Этот индикатор появляется во время воспроизведения или записи; Индикатор режима записи; The indicators are not recorded on tape.
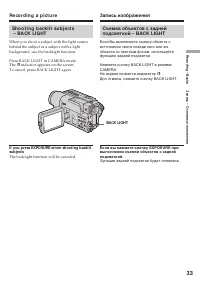
- 33 indicator appears on the screen.; BACK LIGHT; Функция задней подсветки будет отменена.
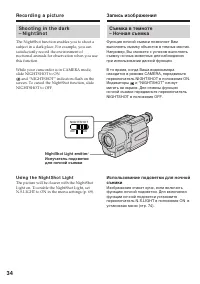
- 34 and “NIGHTSHOT” indicators flash on the; Usi n g t h e N i g h t Sh o t Li g h t; Night Shot Light emit t er/
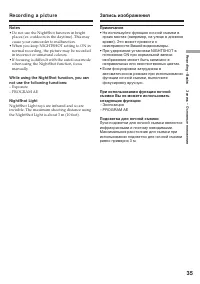
- 35 • Do not use the NightShot function in bright; Night Shot Light; • Не используйте функцию ночной съемки в; Подсветка для ночной съемки
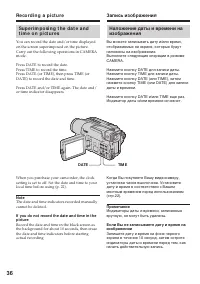
- 36 DATE
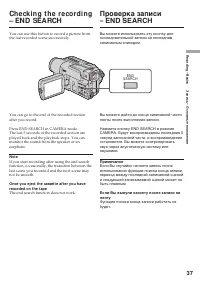
- 37 The end search function does not work.; Примечание; END
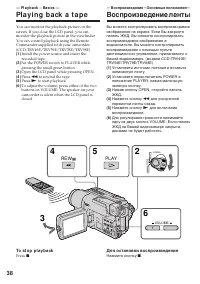
- 38 — Pl a y b a ck – Ba si cs —; Pl a y i n g b a ck a t a p e; Open the LCD panel while pressing OPEN.; — Воспроизведение – Основные положения—; Воспроизведение ленты; To st o p p l a y b a ck; Для остановки воспроизведения
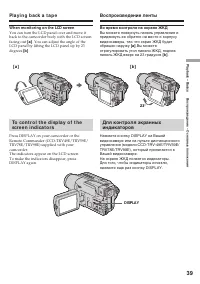
- 39 DISPLAY; W hen monit oring on t he LCD screen; . You can adjust the angle of the; Во время контроля на экране ЖКД
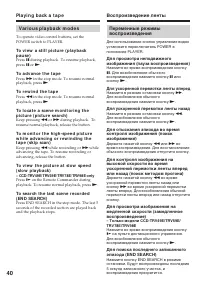
- 40 V a r i o u s p l a y b a ck m o d e s; To a d v a n ce t h e t a p e; Для ускоренной перемотки ленты вперед
- 41 In t he various playback modes; Звук будет приглушен.; При воспроизведении записанной ленты
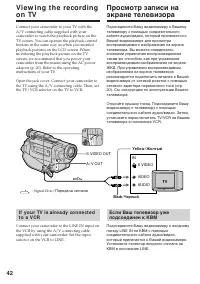
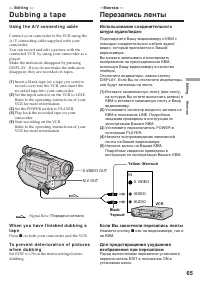
- 42 Желтый
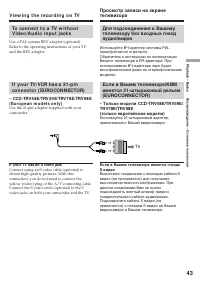
- 43 If your TV has an S video jack; V i e w i n g t h e r e co r d i n g o n TV; TV
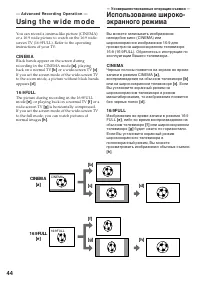
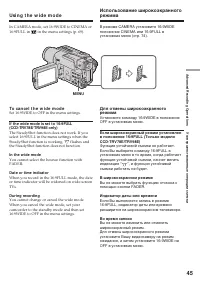
- 44 CI N EM A; back on a normal TV; — A d v a n ce d Re co r d i n g Op e r a t i o n —; Usi n g t h e w i d e m o d e; — Усовершенствованные операции съемки —; CINEM A
- 45 To ca n ce l t h e w i d e m o d e; Set 16:9WIDE to OFF in the menu settings.; In t he w ide mode; ”, и функция устойчивой; В широкоэкранном режиме
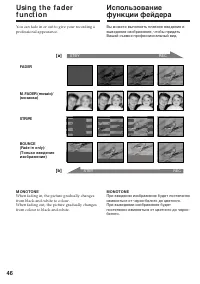
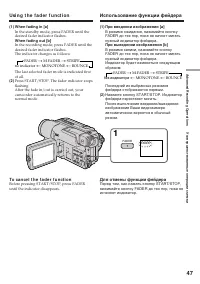
- 47 Usi n g t h e f a d e r f u n ct i o n; To ca n ce l t h e f a d e r f u n ct i o n; Использование функции фейдера; При введении изображения; Для отмены функции фейдера
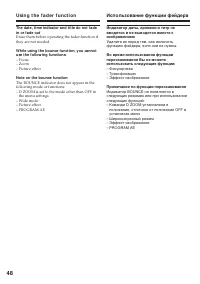
- 48 Not e on t he bounce f unct ion; the menu settings; Примечание по функции перескакивания
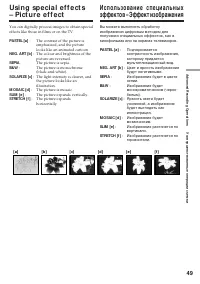
- 49 : The colour and brightness of the; The picture is sepia.; SEPIA; : Яркость света будет
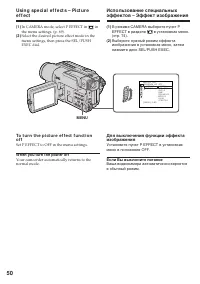
- 50 In CAMERA mode, select P EFFECT in; W hen you t urn t he pow er of f
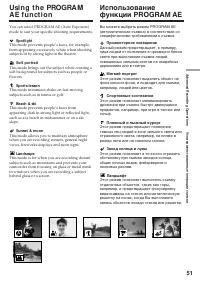
- 51 Spot light
- 53 • In the spotlight, sports lesson and beach & ski; • В режимах прожекторного освещения,
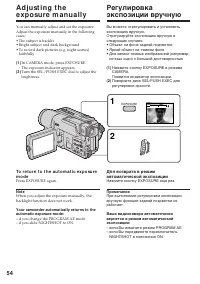
- 54 ночных сцен) с большой достоверностью; NIGHTSHOT в положение ON
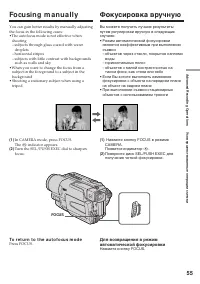
- 55 droplets; To r e t u r n t o t h e a u t o f o cu s m o d e; Fo cu si n g m a n u a l l y; FOCUS
- 56 Для точной фокусировки; Фокусировка вручную; When recording a distant subject.
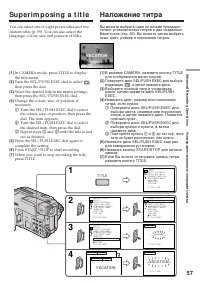
- 57 Su p e r i m p o si n g a t i t l e; Наложение титра; VACATION; T I TLE
- 60 To ch a n g e a t i t l e y o u h a v e st o r e d; To delet e t he t it le; M a k i n g y o u r o w n t i t l e s; Если Вы выбрали команду [; вернуться к предыдущему экрану.; Для удаления титра
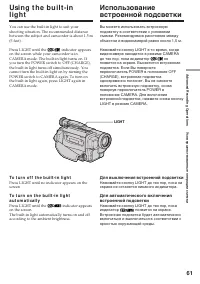
- 61 To t u r n o f f t h e b u i l t -i n l i g h t; Press LIGHT until the; LIGHT; не; Для выключения встроенной подсветки
- 62 При нажатии кнопки LIGHT; CA UTI ON; W hen you press LIGHT; Usi n g t h e b u i l t -i n l i g h t
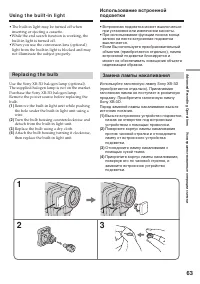
- 63 • The built-in light may be turned off when; Re p l a ci n g t h e b u l b; Replace the bulb using a dry cloth.; • Встроенная подсветка может выключаться; Замена лампы накаливания
- 64 • When replacing the bulb, use only the Sony; ВНИМАНИЕ; • При замене лампы накаливания
- 65 S VIDEO OUT; — Ed i t i n g —; D u b b i n g a t a p e; Usi n g t h e A /V co n n e ct i n g ca b l e; Set the POWER switch to PLAYER.; —Монтаж —; Перезапись ленты; Передача сигнала; Если Вы закончили перезапись ленты; Нажмите кнопку
- 66 mini DV or; mini DV или
- 67 — Cu st o m i zi n g Y o u r Ca m co r d e r —
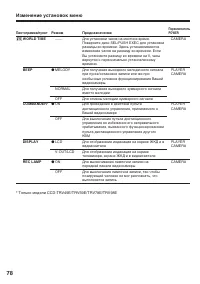
- 74 Предназначение; Выбор установок режима по каждому пункту; установки по умолчанию.
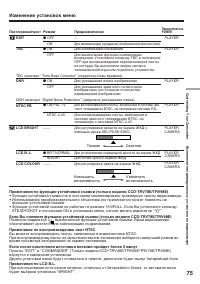
- 75 Примечание по воспроизведению лент NTSC
- 76 REC MODE; Примечания по режиму LP; записанных в режиме LP на других видеокамерах или КВМ.; Примечания по установке ORC; выполните установку заново.
- 77 Примечания по режиму DEMO MODE; CLOCK SET
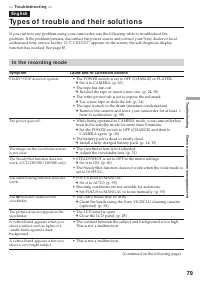
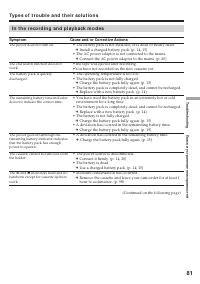
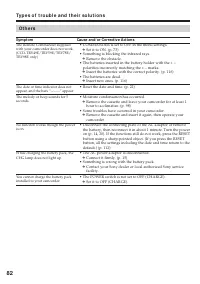
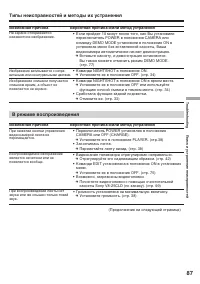
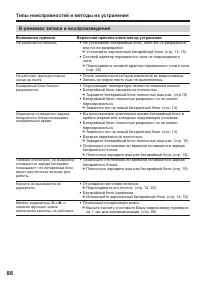
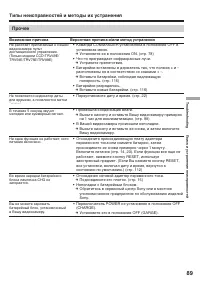
- 86 В режиме записи; Возможная неисправность; Типы неисправностей и методы их решения
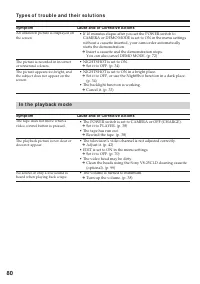
- 87 Типы неисправностей и методы их устранения; В режиме воспроизведения; Возможная причина
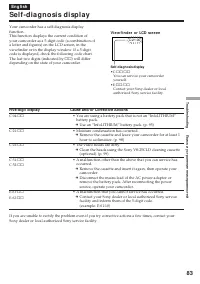
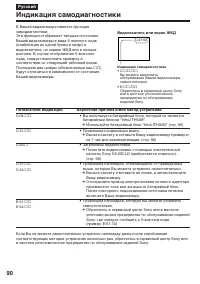
- 90 Видоискатель или экран ЖКД; Индикация самодиагностики
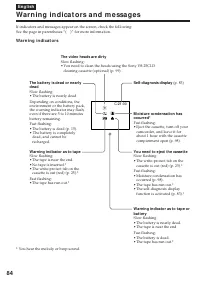
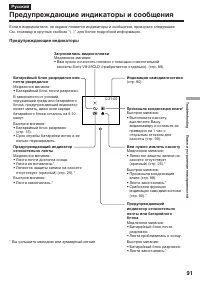
- 91 Предупреждающие индикаторы и сообщения; * Вы услышите мелодию или зуммерный сигнал.; Предупреждающие индикаторы; • Срок службы батарейки истек и ее; Загрязнились видеоголовки; Лента приблизилась к концу.
- 92 Предупреждающие сообщения
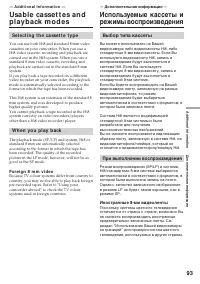
- 93 — A d d i t i o n a l I n f o r m a t i o n —; Se l e ct i n g t h e ca sse t t e t y p e; Fo r e i g n 8 m m v i d e o; — Дополнительная информация —; Выбор типа кассеты; Иностранные 8-мм видеоленты
- 94 Playing back an NTSC-recorded t ape; • During playback, a black band appears on the
- 95 W h a t i s t h e “ I n f o LI THI UM ” b a t t e r y ?
- 96 A b o u t “ I n f o LI THI UM ” b a t t e r y; Re m a i n i n g b a t t e r y t i m e i n d i ca t o r; О батарейном блоке “InfoLITHIUM”; Как хранить батарейный блок
- 97 Usi n g y o u r ca m co r d e r a b r o a d; PAL syst em; Brazil; NTSC syst em; Бразилия; Система NTSC
- 98 M o i st u r e co n d e n sa t i o n; I f m o i st u r e co n d e n sa t i o n o ccu r s; Not e on moist ure condensat ion; Конденсация влаги; Если произойдет конденсация влаги; Примечание по конденсации влаги
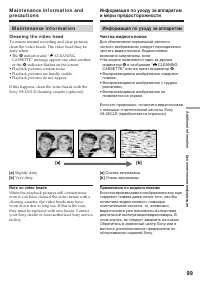
- 99 M a i n t e n a n ce i n f o r m a t i o n; Cl e a n i n g t h e v i d e o h e a d; indicator and “; Not e on video heads; Информация по уходу за аппаратом; Чистка видеоголовок; Примечание по видеоголовкам
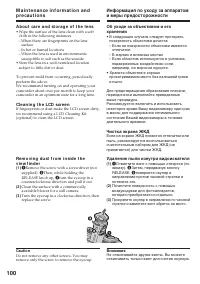
- 100 Caut ion; Чистка экрана ЖКД; Внимание
- 101 Charging t he rechargeable lit hium cell:; • Connect your camcorder to the mains using the
- 102 Pr e ca u t i o n s; Ca m co r d e r o p e r a t i o n; Меры предосторожности; Эксплуатация видеокамеры
- 103 Bu i l t -i n l i g h t
- 105 Ba t t e r y p a ck; If bat t eries are leaking
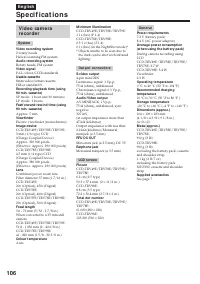
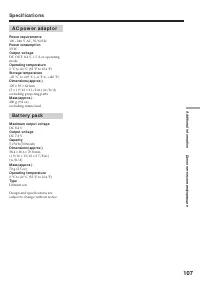
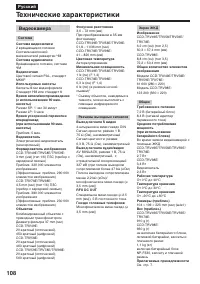
- 108 Технические характеристики; Видеокамера
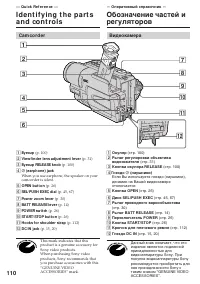
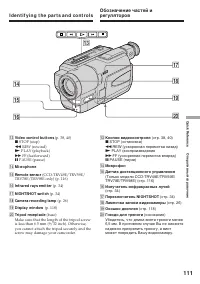
- 110 Ca m co r d e r; qa
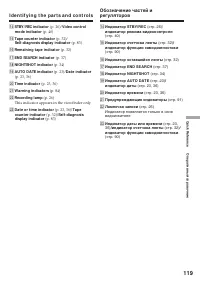
- 111 I d e n t i f y i n g t h e p a r t s a n d co n t r o l s; PLAY (воспроизведение
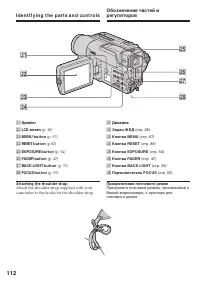
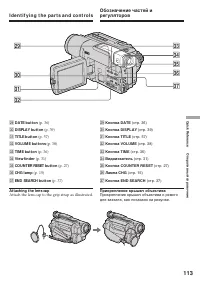
- 113 Attach the lens cap to the grip strap as illustrated.
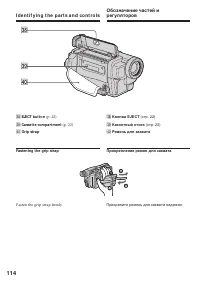
- 114 Кнопка EJECT; Fasten the grip strap firmly.; Прикрепление ремня для захвата; Прикрепите ремень для захвата надежно.; EJECT but t on; ek
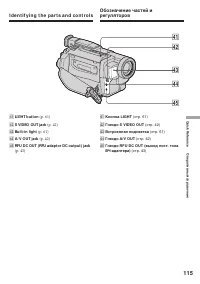
- 115 Кнопка LIGHT; rd
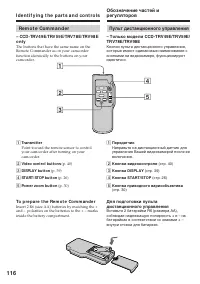
- 116 Transmit t er; To p r e p a r e t h e Re m o t e Co m m a n d e r; Пульт дистанционного управления; Передатчик
- 117 Not es on t he Remot e Commander; • Point the remote sensor away from strong light
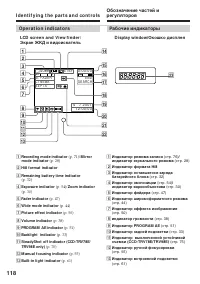
- 118 LCD scr e e n a n d V i e w f i n d e r /
- 119 This indicator appears in the viewfinder only
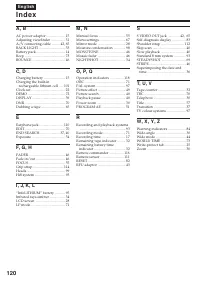
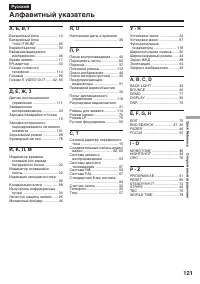
- 121 Алфавитный указатель


