Велокомпьютеры VDO HC12 6 - инструкция пользователя по применению, эксплуатации и установке на русском языке. Мы надеемся, она поможет вам решить возникшие у вас вопросы при эксплуатации техники.
Если остались вопросы, задайте их в комментариях после инструкции.
"Загружаем инструкцию", означает, что нужно подождать пока файл загрузится и можно будет его читать онлайн. Некоторые инструкции очень большие и время их появления зависит от вашей скорости интернета.


Preface
Thank you very much for buying a VDO HC 12.6 bicycle computer featuring heart rate / pulse functions. The more familiar you get with this model,
the more enjoyable your trips are going to be.
Hence, our urgent request:
Please read thoroughly all the information provided in this manual. You are getting important and useful hints for operation to make you fully benefit
from all the technical features of your VDO HC 12.6.
We wish you enjoyable trips and rides on your bike with VDO
CYCLE PARTS GMBH
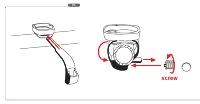
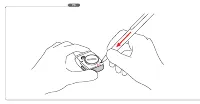
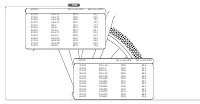
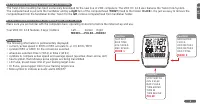
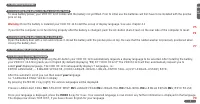
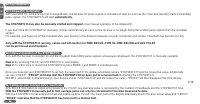
1.Mounting
1.1 Mounting the handlebar holder
The handlebar holder fits handlebars of any diameter. Before mounting the system, decide if you will be using your left or right hand to operate
the computer and then mount the handlebar holder on the respective side. Position the handlebar holder, insert the strap and adjust it by tightening
the screw.
Warning:
Before tightening the handlebar holder, make sure to adjust the position of the computer head (inclination) when the LCD-display is best visible
for you. Only when you find the best position tighten the screw.
P1
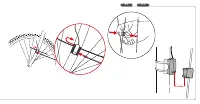
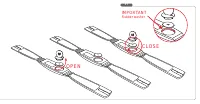
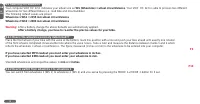
1.2 Mounting the speed transmitter / sensor
The sensor should be mounted on the same side of the fork as the holder is on the handlebar. While mounting, be sure that there is ample cable
left for left and right turns of your handlebar, do not lay the cable too tight.
P2
Important:
Do not tighten the cable ties yet. Accurately position the sensor and the spoke magnet first, then tighten the cable ties.
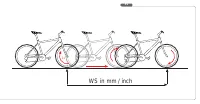
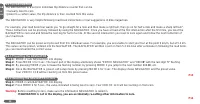
1.3 Mounting the spoke magnet
Distance between magnet and sensor should be approx. 1-5 mm. In case this distance is not achievable in the current position, slide the sensor
and the magnet on the fork or spoke accordingly.
P3
GB
HC
12.6
2

