
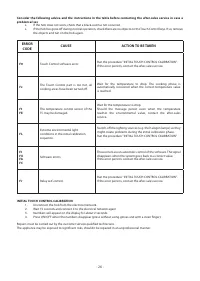
Варочная панель Zigmund Shtain CNS 147.30 BX - инструкция пользователя по применению, эксплуатации и установке на русском языке. Мы надеемся, она поможет вам решить возникшие у вас вопросы при эксплуатации техники.
Если остались вопросы, задайте их в комментариях после инструкции.
"Загружаем инструкцию", означает, что нужно подождать пока файл загрузится и можно будет его читать онлайн. Некоторые инструкции очень большие и время их появления зависит от вашей скорости интернета.

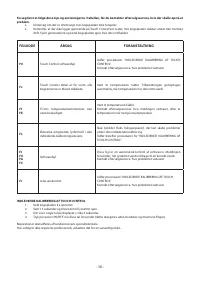
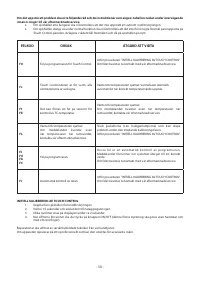

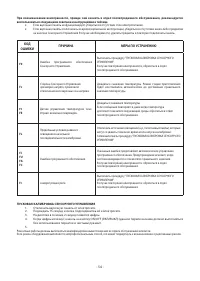


APPLIANCE (oven) AND THE GLASS-CERAMIC COOKTOP
MUST BE SUITABLY INSULATED in such a way that the heat
generated by the oven, measured on the bottom right of
the cooktop, does not exceed 60°C. Failure to respect this
precaution may determine improper functioning of the
TOUCHCONTROL system.
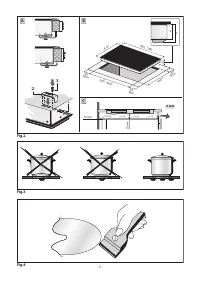
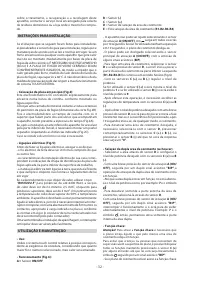
• Positioning (Fig.2):
The domestic appliance is designed to be built into a worktop
as illustrated in the specific figure. Apply sealant around
the entire perimeter (cut-out dimensions Fig.2B). Fix the
domestic appliance on the worktop by means of the 4 brackets
provided, taking the thickness of the worktop into account
(Fig.2A). If the lower part of the appliance, after installation, is
accessible via the lower part of the cabinet then it is necessary
to mount a separator panel respecting the distances indicated
(Fig.2C). If the appliance is installed with an oven underneath
then the separator is not necessary.
• Electrical connections (Fig.5):
Before making the electrical connections, check that:
- the ground cable is 2cm longer than the other cables;
- the system ratings meet the ratings indicated on the
identification plate fixed on the lower part of the worktop;
- the system is fitted with efficient earthing compliant to the
laws and regulations in force.
If the appliance is not fitted with a cable, use type:
“
H05V2V2-F
” for a power level of up to 6400 Watts. The
cross-section of the cable should be at least 2.5 mm², or 4
mm² for greater power levels. The cable should never reach
a temperature which is 50°C above the temperature of the
room in which it is installed. The appliance is designed for
permanent connection to the electricity supply and should
therefore be fitted with an omnipolar switch which has a
minimum opening of 3mm between contacts. The switch
should be suitable for the charge indicated on the appliance
data plate and must conform to all current legislation (the
yellow/green earth wire must not be interrupted by the
switch). The omnipolar switch must be easy to reach once
the installation process has been completed.
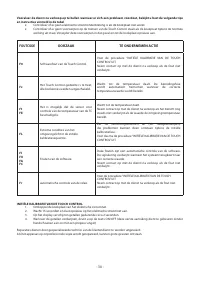
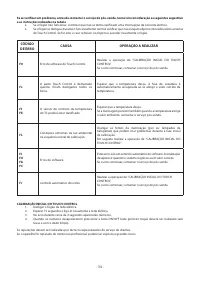
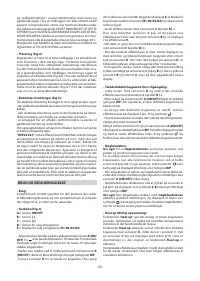
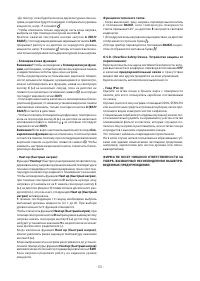
USE AND MAINTENANCE
• Use:
Use the touch control system for the position that corresponds
to cooking needs, keeping in mind that higher the selected
number is and the more heat is given off.
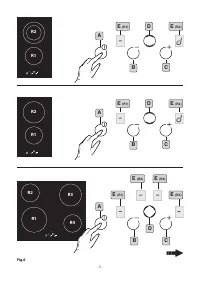
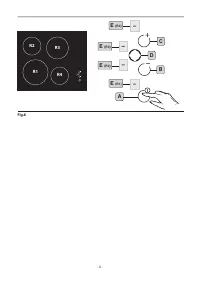
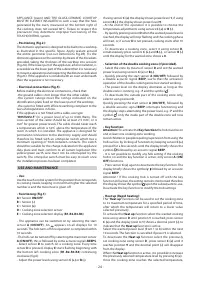
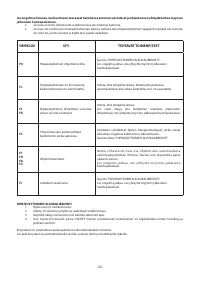
• Functioning (Fig.1):
A =
Sensor
ON/OFF
B
= Sensor
(-)
C
= Sensor
(+)
D
= Cooking zone selection sensor
E
= Cooking zone selection display (
R1-R2-R3-R4
)
- The appliance can be switched on by selecting the start
sensor
A
(
ON/OFF
). An appears on all displays for 10
seconds. The hob turns off if no operation is completed within
10 seconds.
- The hob can be turned off by selecting the main start sensor
A
(
ON/OFF
), this is followed by some acoustic signals
BEEPS
.
- Select sensor
D
to switch on a cooking zone. Every time
sensor
D
is pressed, display
E
starts flashing beginning with
the bottom left cooking zone (
R1-R2-R3-R4
) continuing
clockwise (fig.6).
- Adjust the power levels using sensors
C (+)
or
B (-)
.
If using sensor
C (+)
the display shows power level
1
, if using
sensor
B (-)
the display shows power level
9
.
- At the end of this operation it is possible to choose the
temperature adjustments using sensors
C (+)
or
B (-)
.
- By quickly pressing sensor
D
when the wanted power level is
reached, the display will stop flashing and the cooking phase
will start, or, if sensor
D
is not pressed, cooking starts after 10
seconds.
- To deactivate a cooking zone, select it using sensor
D
,
simultaneously press sensors
C (+)
and
B (-)
, or sensor
B (-)
until the display for the wanted zone shows a
0
.
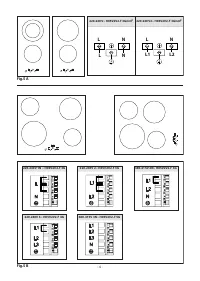
• Selection of the double cooking zone (if provided).
- Select the zone by means of sensor
D
and set the wanted
power level using sensors
C (+)
or
B (-)
.
- Quickly pressing the start sensor
A
(
ON/OFF
) followed by
a double acoustic signal
BEEP
, warns that the activation
operation of the double cooking zone has started working.
- The power level on the display alternates as long as the
double zone is running, e.g.:
7
and the symbol .
- To deactivate the outside part of the cooking zone only,
select it using sensor
D
.
Quickly pressing the start sensor
A
(
ON/OFF
), followed by
a double acoustic signal
BEEP
, interrupts functioning and
the display stops alternating the power level, e.g.:
7
and the
symbol , only the inside part of the double zone will now
remain active.
• Key function:
Attention !
To activate the
Key function
the hob must be on
and at least one cooking zone working.
Avoid children or people requiring supervision from using the
hob surface by locking all functions by keeping sensor
C (+)
pressed for a few seconds until the display briefly shows the
symbol followed by an acoustic signal
BEEP
.
- It is not possible to modify any hob setting if the cooking
hob is on and the key function is active; only sensor
A
(
ON/
OFF
) functions.
- Press sensor
C (+)
again to deactivate the key function. The
display briefly shows the symbol followed by an acoustic
signal
BEEP
.
Attention ! If the cooking hob is turned off with the key
function still active, the setting remains memorised therefore
the display shows the symbol upon the subsequent re-use.
Deactivate the key function to modify the hob settings.
• Heat up (Rapid heating):
The “
Heat up
” function can be used to set the cooking zone
to its maximum temperature for a specified period of time,
after which the temperature will return to a lower value
selected previously.
To activate the
Heat up
function select the wanted cooking
zone using sensor
D
until position 9 is reached, press sensor
C (+)
and the display (next to 9) shows a decimal point
(•)
, to
indicate that the
Heat up
function is active.
Select the wanted power level (from 1 to 8) within the next
10 seconds. The function is cancelled if power 9 is selected.
To deactivate the
Heat up
function select the previously
set cooking zone using sensor
D
, press sensor
C (+)
until it
reaches position
9
and the decimal point
(•)
will disappear
from the display.
When the
Heat up
function is active, it is possible to increase
the previously selected temperature level by pressing
C (+)
.
Once the cooking zone reaches the selected temperature,
- 24 -
Характеристики

Остались вопросы?Не нашли свой ответ в руководстве или возникли другие проблемы? Задайте свой вопрос в форме ниже с подробным описанием вашей ситуации, чтобы другие люди и специалисты смогли дать на него ответ. Если вы знаете как решить проблему другого человека, пожалуйста, подскажите ему :)


