
Варочная панель Bertazzoni CB36 6 00 X - инструкция пользователя по применению, эксплуатации и установке на русском языке. Мы надеемся, она поможет вам решить возникшие у вас вопросы при эксплуатации техники.
Если остались вопросы, задайте их в комментариях после инструкции.
"Загружаем инструкцию", означает, что нужно подождать пока файл загрузится и можно будет его читать онлайн. Некоторые инструкции очень большие и время их появления зависит от вашей скорости интернета.


9
EGULATION OF BURNERS:
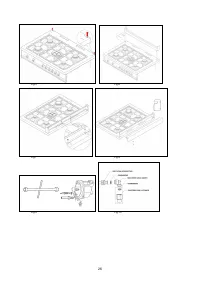
1) Regulation of the "MINIMUM" on the burners
To regulate the minimum on the burners carry out the following procedure indicated below:
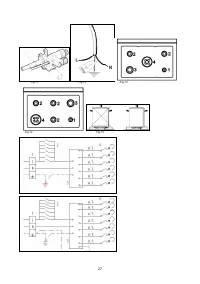
1) Turn on the burner and put the knob onto position MINIMUM ( small flame ).
2) Remove the knob ( Fig. 11) of the tap which is set for standard pressure. The knob is found on the bar of the tap itself.
3) Beside the tap bar on the work top, use a small screwdriver that fits the screw (gold) found on the lower part of the tap (Fig. 11) and
turn the fixing screw to the right or left until the flame of the burner is regulated in the most suitable way to MINIMUM.
4) Make sure that that the flame does not go out when changing the position quickly from MAXIMUM to the MINIMUM position.
ATTENTION: The regulation described above can be carried out only with burners using methane gas and city gas ( where
available), while with burners using liquid gas the screw must be fully screwed in, in a clockwise direction.
CONNECTION OF THE APPLIANCE TO THE ELECTRICITY SUPPLY:
Connection to the electricity supply must be carried out according to the norms and indications of the law in force.
Before carrying out the connection check that:
- The electric charge of the system and the sockets are suitable for the maximum power of the appliance ( see label on the lower part of
the case ).
- The socket or system is equipped with an efficient earth connection according to the norms and indications of the law currently in force.
No responsibility can be held if these indications are not respected.
When the connection to the electricity supply is made with a socket.
Fit onto the electric cable a standard plug ( if it is not provided ) which is appropriate for the charge indicated on the label. Connect up
the wires according to the diagram in Fig. 12 taking care to respect the corresponding pairs listed below:
letter L (phase) = brown coloured wire;
letter N (neutral) = blue coloured wire;
symbol”
”
earth = green-yellow coloured wire;
-
The electric cable must be positioned so that it cannot reach a temperature of over 75 K at any point.
- Do not use reducers, adapters or shunts for the connection as they could cause false contacts and subsequent dangerous
overheating.
When the connection is made directly with the electricity supply:
- Place a single-pole switch between the appliance and the electricity supply. The switch must be of a suitable charge for the appliance
with a minimum opening between the contacts of 3 mm.
- Remember that the earth wire must not be interrupted by the switch.
- Alternatively the electrical connection can also be protected by a differential switch of high sensitivity.
- You are strongly advised to fix the special yellow-green earth wire to an efficient earthing system
ATTENTION: The appliance conforms with the regulations of directives 90/396EEC (Gas Directive) regarding gas appliances for domestic use
and the like, 93/68 and 73/23 (Low Voltage Directive) regarding electrical safety and 2004/108/CE, 93/68 and 89/336 (EMC Directive) regarding
electromagnetic compatibility.
MAINTENANCE OF THE MACHINE
CHANGING THE PARTS
Before carrying out any maintenance work, disconnect the appliance from the gas and electric supply.
To replace different components such as burners, taps and electrical parts you must take out the hob from the kitchen unit by releasing
the fixing hooks, unscrew the fixing screws of the burners on the work top, unscrew the fixing nuts of the electric plates which are visible
on the lower part of the hob and remove the worktop in order to carry out the replacement of the defective parts
.
NOTE: If the taps need replacing you also need to unscrew the two fixing screws of the gas ramp at the bottom of the hob which are
found on the upper part of the latter.
For appliances equipped with automatic “ON” switches you must dismantle the “ON” switch chain before replacing the taps.
You are advised to change the seal on the tap every time you replace a tap in order to ensure a perfect hold between the body and
ramp.
WARNING
: The electric cable which is provided with the appliance is connected to the appliance with a type
X
connection and thus can
be replaced with the same type of cable as that installed without using special tools.
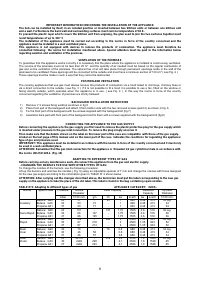
In the event of wear or damage to the mains cable, replace it following the indications shown below in table n°3:
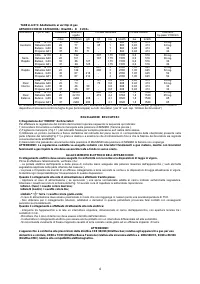
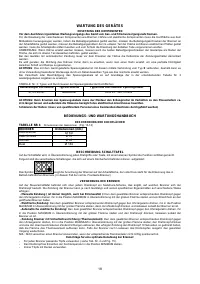
Table N°3: Type and section of the electric main cable for hob
Dimension of hob
Type of hob
Type/ section of main cable
91,5x64 cm.
Gas burners
H05VV-F 3 x 0,75 mm2
WARNING: If you replace the electric mains cable the installer must have the earth conductor about 2 cm longer than the phase
conductors and must also take heed of the warnings regarding electric connection.
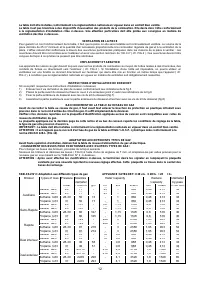
USE AND MAINTENANCE MANUAL
DESCRIPTION OF HOBS
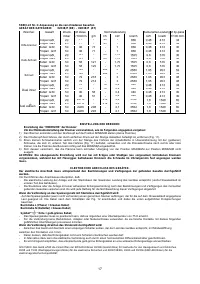
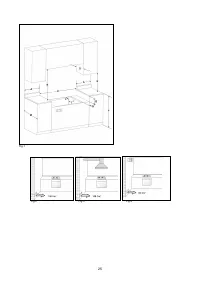
Table 4 GAS BURNER DIMENSION (fig.13-14)
Burner Dimension
(mm)
Auxiliary Ø
50
Semi-rapid Ø
70
Rapid Ø
95
Dual Ø
140
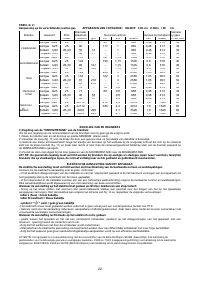
Характеристики

Остались вопросы?Не нашли свой ответ в руководстве или возникли другие проблемы? Задайте свой вопрос в форме ниже с подробным описанием вашей ситуации, чтобы другие люди и специалисты смогли дать на него ответ. Если вы знаете как решить проблему другого человека, пожалуйста, подскажите ему :)


