
Варочная панель Teka IZ 6420 - инструкция пользователя по применению, эксплуатации и установке на русском языке. Мы надеемся, она поможет вам решить возникшие у вас вопросы при эксплуатации техники.
Если остались вопросы, задайте их в комментариях после инструкции.
"Загружаем инструкцию", означает, что нужно подождать пока файл загрузится и можно будет его читать онлайн. Некоторые инструкции очень большие и время их появления зависит от вашей скорости интернета.


EN
30
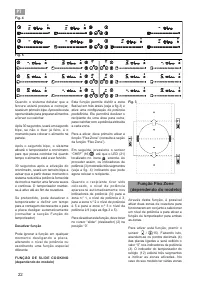
series of beeps for several seconds.
To turn off the audible signal, touch
any sensor.The timer indicator (12)
will display a flashing 00 beside of
the decimal dot (4) of the selected
zone. If the heating zone turned off is
hot, its power indicator (3) will display
alternately the H symbol and a “-“.
If you wish to time another hotplate
at the same time, repeat steps 1 to 3.
If one or more zones are already
timed, the timer indicator (12) will
show by default the shortest remaining
time to finish, showing a “t” on the
related zone. Rest of timed zones will
show on their corresponding indicator
zones the decimal dot blinking. When
cursor ”slider” of another timed zone
is pressed, the timer will show the
remaining time of that zone for a few
seconds and its indicator will show
its power level and the “t” alternately.
Changing the programmed time.
For modifying programmed time,
cursor “slider” (2) of timed zone has
to be pressed. Then it will be possible
to read and modify the time.
Through sensors (10) and (11),
you can modify the programmed time.
Disconnecting the clock
If you wish to stop the clock before the
programmed time is up, this can be
done at any time by simply adjusting
its value to ‘--’.
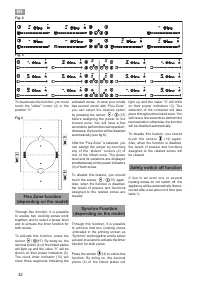
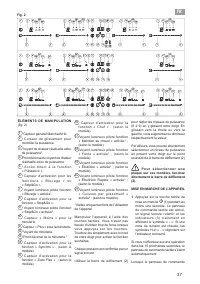
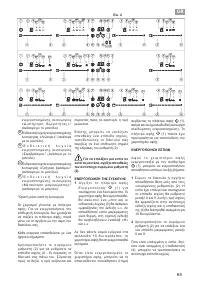
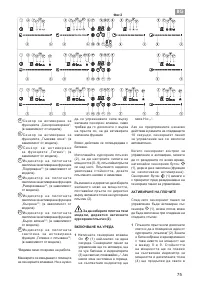
1
Select the desired plate.
2
Adjust the value of the clock to “00”
by using the sensor (10). The
clock is cancelled. This can also be
done more quickly by pushing the
“sensors
(10) and (11) at the
same time.
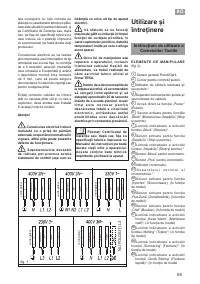
Power Management function
(depending on model)
Some models are equipped with
a power limiting function (Power
Management). This function allows
the total power generated by the hob
to be set to different values selected by
the user. To do this, for the first minute
after having connected the hob to the
power supply, it is possible to access
the power limiting menu.
1
Press the (11) touch key for
three seconds. The letter PL will
appear on the timer indicator (12)
2
Press the locking touch key (6).
The different power values to which
the hob can be limited will appear
and these can be changed using
the (11) and (10) sensors.
3
Once the value has been selected,
once again press the locking touch
key (6). The hob will be limited
to the chosen power value.
If you want to change the value again,
you must unplug the hob and plug it in
again after a few seconds. Thus you
will again be able to enter the power
limiting menu.
Every time the power level of a
hotplate is changed, the power limiter
will calculate the total power the hob
is generating. If you have reached the
total power limit, the touch control will
not allow you to increase the power
level of that hotplate. The hob will beep
and the power indicator (3) will blink
at the level that cannot be exceeded.
If you wish to exceed that value, you
must lower the power of the other
hotplates. Sometimes it will not be
enough to lower another by a single
level as this depends on the power of
each hotplate and the level it is set at.
It is possible that to raise the level of
a large hotplate that of several smaller
ones must be turned down.
If you use the quick switch-on at
maximum power function and the
said value is above the value set by
the limit, the hotplate will be set to the
maximum possible level. The hob will
beep and the said power value will
blink twice on the indicator (3).
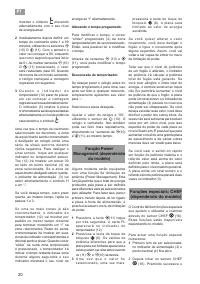
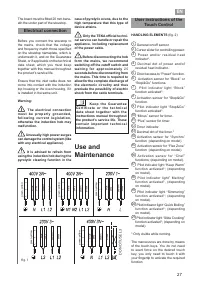
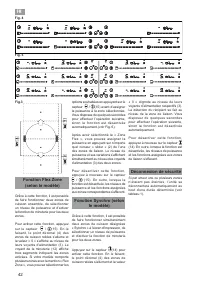
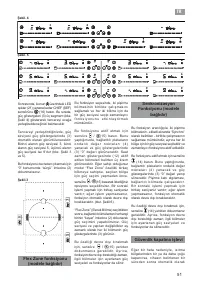
Special functions: CHEF
(depending on the model)
The Touch Control has special features
that help the user to cook through the
CHEF sensor
(16). These functions
are available depending on the model.
To activate a special feature on a zone:
1
First it should be selected; and then,
the decimal point (4) will be active
on the power indicator (3).
2
Now click on the CHEF sensor
(16). The sequentially successive
presses will go over all the CHEF
functions available in each zone
one by one. These functions
will show the activation with the
corresponding leds (17), (18), (19),
(20) and (21).
If you want to cancel a special active
function at any time, you should touch
the “slider” cursor sensor (2) of the
related zone to select it. The decimal
point (4) of the power indicator (3)
will light up. Then, touch again the
“slider” (2) cursor to set a new power
level or to power off the zone, or you
can choose a different special function
touching again on the CHEF sensor
(16).
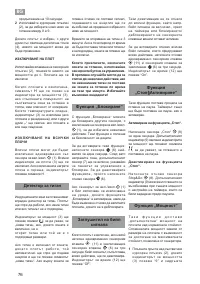
K E E P W A R M F U N C T I O N
(depending on the model)
This function automatically sets an
appropriate power level to keep the
cooked food hot.
To activate it, select the plate, and
press on the CHEF sensor (16)
until the led (17) located on the icon
/
lights up. Once the function
is activated, the symbol will appear
on the power indicator (3).
You can override the function at
any time by turning off the plate,
by changing the power level or by
choosing a different special function.
MELTING FUNCTION (depending
on the model)
T h i s f u n c t i o n m a i n t a i n s a l o w
temperature in the cooking zone.
Ideal for defrosting food or for slowly
melting other food types as chocolate,
butter, etc.
To activate it, select the plate, and
press on the CHEF sensor (16)
until the led (18) located on the icon
/
lights up. Once the function
is activated, the symbol will appear
on the power indicator (3).
You can override the function at
Характеристики

Остались вопросы?Не нашли свой ответ в руководстве или возникли другие проблемы? Задайте свой вопрос в форме ниже с подробным описанием вашей ситуации, чтобы другие люди и специалисты смогли дать на него ответ. Если вы знаете как решить проблему другого человека, пожалуйста, подскажите ему :)


