
Варочная панель Korting HI 6450 RI - инструкция пользователя по применению, эксплуатации и установке на русском языке. Мы надеемся, она поможет вам решить возникшие у вас вопросы при эксплуатации техники.
Если остались вопросы, задайте их в комментариях после инструкции.
"Загружаем инструкцию", означает, что нужно подождать пока файл загрузится и можно будет его читать онлайн. Некоторые инструкции очень большие и время их появления зависит от вашей скорости интернета.


• Magnetic sensor:
- The hob is equipped with a pan sensor; when the pan is
removed or badly positioned, the symbol will appear.
If, on the other hand, the surface of the glass is still hot, the
symbol will appear alternating with the .
• O.S.D. (Overflow Safety Device):
The hob is equipped with a safety system which moves all
hotplates to the
OFF
position and activates the
safety lock
when liquids or items are detected on the control panel.
These symbols will flash on the display:
. They can
be deactivated by removing the item or the liquid. The hob
will switch off automatically.
• Attention!
When the hob switches on, the timer display
Q
stays on at the
value
. If the function is not activated, after a few seconds
the display
Q
shows nothing.
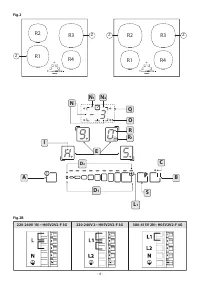
• Timer (Fig.2 - Fig.3 (Q)):
Note:
the
Timer
can be activated on all the cooking zones
simultaneously.
This function allows to establish the time (from 1 to 99
minutes) or automatic switch-off of the cooking zone selected.
Activation:
1- Select the cooking zone (
E
).
2- Set the cooking level (from 1 to 9) desired, by acting on the
SLIDER
control (
D1
).
3- Press the
Timer
button (
N
), the display will show
, At
this point, the hob indicator (
O
) with the timer function active,
starts to flash.
4- Set the
unit
time (
N2
) desired from 0 to 9 by acting on the
SLIDER
control (
D1
) e.g.
.
5- After a few seconds the
unit
value (
N2
) and the
tenths
(
N1
)
will appear fixed on the display
;
- if you want to set a time exceeding 9 minutes e.g:
,
just run your finger over the
SLIDER
control (
D1
).
- if, on the contrary, no operation is performed, it stops
flashing after a few seconds and the
Timer
display (
Q
) will
show the cooking time previously set
.
6- At the end of the programmed time, the
timer
display (
Q
)
and the hob indicator (
O
) will start to flash followed by an
acoustic sound.
To deactivate the acoustic signal just press the timer button
N
, otherwise it will deactivate automatically after 2 minutes.
To deactivate the timer function before the set time:
- Select the
cooking
zone
(
E
) and press one of the two buttons
(
N
). When the zone indicator (
R
) on display (
E
) stops flashing,
the function is no longer active.
Note:
to display the residual cooking time, just press the
cooking
zone
(
E
) of interest selection button.
• Minute Minder (Countdown):
Attention! This function can only be used if no cooking
zone (E) has the Timer inserted.
- The
Minute Minder
allows to set an established countdown
that goes from 1 to 99 minutes.
On expiry of the time, the hob emits an acoustic signal without
changing the active functions.
- The function activates only if the cooking level is set at “
0
”
on all displays (
R
).
- Press the
Timer
button (
N
) and set the time with the same
procedure as the Timer function, with the unique exception
that the indicators (
O
) do not switch on.
Note:
whenever the
Timer
is to be activated on at least one
zone, the
Minute Minder
deactivates automatically.
To activate the Timer instead of the Minute Minder,
proceed as follows:
1- Use one of the buttons to select (
E
) the cooking zone where
the timer function is to be activated.
2- Set the cooking level by acting on the
SLIDER
control (
D1
).
3- Select the
Timer
button (
N
).
4- Select the button (
E
) again where the timer function is to
be activated.
5- Select the
Timer
button (
N
).
6- Set the cooking time by acting on the
SLIDER
control (
D1
).
• Booster (Fig.2 - Fig.3 (S)):
Depending on the appliance model, it may be fitted with a
Booster
system which can be used to speed up cooking times
through the application of a power level which is greater than
the nominal value, within a defined period of time.
The cooking areas provided with this function are indicated
by a letter (
Z
).
To activate the Booster, switch the interested cooking area on
at any power level and press key
S
(Fig.2 - Fig.3). This allows
to reach higher temperatures in a short time disbursing the
maximum power possible.
The letter
P
on the display indicates that the function is active.
This will be displayed for about 10 minutes, then the cooking
area will automatically turn back to power level
9
.
- The
Booster
may not activate if, the cooking zone (with the
letter
Z
) has been previously activated with high temperature
levels.
- In order to use the
Booster
function, wait for the
P
on the
display
R
to stop flashing and the temperature inside the
cooking surface to decrease.
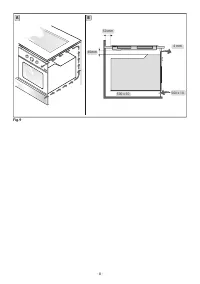
• Integrated power control (Fig.4):
Each phase (this is divided into two zones in a vertical line:
F1
e
F2
) is capable of using a maximum power of 3,700W.
If this is exceeded for example by activating the Booster,
the software automatically lowers power of the previously
selected zone until it reaches the allowed power level.
The display of the zone with limited power will begin to flash
for about 3 seconds. During this time it is possible to modify
the power level.
• Heat up (Fig.2 - Fig.3 (L1)) (Rapid heating):
The Heat up function can be used to set the cooking zone
to its maximum temperature for a specified period of time,
after which the temperature will return to a lower value set
previously.
To activate the
Heat up
function, select one of the
cooking
zones
(
E
).
Set the cooking level at “
9
” by acting on the
SLIDER control
(
D1
), press
Heat
up
(
L1
)and the
cooking
zone
will show the
letter “
A
”. This means that the (
Heat
up
) function is active.
Set the desired
cooking level
(between 1 and 8); the
cooking
zone
display will now show the letter “
A
” and the desired
cooking level (e.g.
6
) alternately.
- If no
cooking
level
variation is made, the indicator (
D2
)
switches off.
Note:
it is possible ONLY to increase the previously-set
cooking level:
1- Select the
cooking
zone
(
E
) where the
Heat
up
function is
active.
2- Increase the desired temperature by running your finger
over the
SLIDER
control
(
D1
).
When the
Heat up
function has finished running, the hob will
emit a sound signal or
BEEP
; the relevant
cooking zone
will
- 31 -
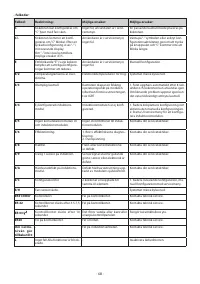
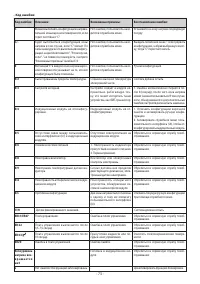
Характеристики

Остались вопросы?Не нашли свой ответ в руководстве или возникли другие проблемы? Задайте свой вопрос в форме ниже с подробным описанием вашей ситуации, чтобы другие люди и специалисты смогли дать на него ответ. Если вы знаете как решить проблему другого человека, пожалуйста, подскажите ему :)


