Триммеры Oleo-Mac TR 111Е - инструкция пользователя по применению, эксплуатации и установке на русском языке. Мы надеемся, она поможет вам решить возникшие у вас вопросы при эксплуатации техники.
Если остались вопросы, задайте их в комментариях после инструкции.
"Загружаем инструкцию", означает, что нужно подождать пока файл загрузится и можно будет его читать онлайн. Некоторые инструкции очень большие и время их появления зависит от вашей скорости интернета.


10
Italiano
ASSEMBLAGGIO
English
ASSEMBLY
1 A
1 B
2
3
4
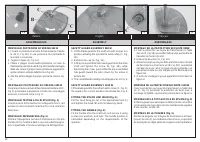
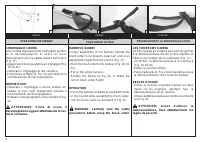
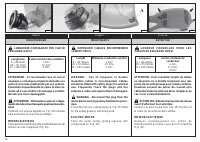
MONTAGGIO PROTEZIONE SICUREZZA 900 W
1. Fissare la protezione al tubo di trasmissione tramite
le viti (C, Fig. 1B), in una posizione che permetta di
lavorare in sicurezza.
2. Togliere il tappo (A, Fig. 1A).
3. Infilare il gruppo mozzo-testina-protezione nel tubo di
trasmissione e serrare la vite (B, Fig. 1B); durante il serraggio
della vite, tenere il gruppo mozzo-protezione leggermente
spinto nel senso indicato dalla freccia in Fig. 1B.
4. Alla fine del montaggio il gruppo si presenta come in Fig.
2.
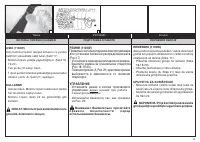
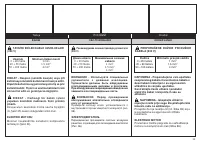
MONTAGGIO PROTEZIONE SICUREZZA 1100 W
Fissare la protezione al tubo di trasmissione tramite le viti (C,
Fig. 3); posizionare la protezione in modo che, a montaggio
avvenuto, si presenti come in Fig. 4.
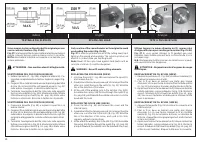
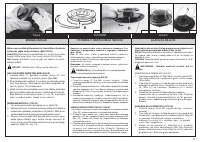
MONTAGGIO TESTINA A FILI DI NYLON (Fig. 5)
Inserire il perno fermo testina (H) nell'apposito foro (L) ed
avvitare in senso antiorario la testina (N) con la sola forza
delle mani.
MONTAGGIO IMPUGNATURA (Fig. 6)
Montare l'impugnatura sul tubo di trasmissione e fissarla
tramite viti (A), rondelle e dadi. La posizione dell'impugna-
tura è registrabile in funzione all'esigenza dell'operatore.
ASSEMBLAGE
SAFETY GUARD ASSEMBLY 900 W
1. Fit the blade guard to the shaft arm with screws in a
position allowing the operator to work safely (C, Fig.
1B).
2. Remove the cap (A, Fig. 1A).
3. Fit the pre-assembled hub-head-guard onto the drive
shaft and tighten the screw (B, Fig. 1B); while
tightening the screw, push a little the pre-assembled
hub-guard toward the side shown by the arrow in
picture 1B.
4. The completed assembly should appear as in Fig. 2.
SAFETY GUARD ASSEMBLY 1100 W
Fit the blade guard to the saft arm with screws (C, Fig. 3);
the guard in the correct position should look like Fig. 4.
FITTING THE NYLON LINE HEAD (Fig. 5)
Put the head fixing pin (H) in the appropriate hole (L)
and tighten the head (N) anti-clockwise by hand.
FITTING THE HANDLE (Fig. 6)
Fit the handle onto the shaft arm and secure it using
screws (A), washers, and nuts. The handle position is
calculated depending on the requirements of the
operator.
MONTAGE DE LA PROTECTION SECURITÉ 900W
1. Fixer la protection au tuyau de transmission à l'aide
des vis (C, Fig. 1B) en position telle à vous permettre de
travailler en toute sécurité.
2. Enlever le bouchon (A, Fig. 1A).
3. Aboucher le group moyen-tête-protection dans le tube
de transmission et serrer la vis (B, Fig. 1B); pendant le
serrage de la vis, tenir le group moyen-protection un
peu poussé dans le sens indiqué par la flèche dans la
figure 1B.
4. À la fin du montage le group apparâit comme dans la
figure 2.
MONTAGE DE LA PROTECTION SECURITÉ 1100 W
Fixer la protection au tuyau de transmission à l’aide des
vis (C, Fig. 3); positioner la protection de façon pue, à
montage completé, se presente comme dans la figure 4.
MONTAGE DE LA TETE AUX FILS DE NYLON (Fig. 5)
Enfilez le goujon qui va bloquer la tête (H) dans son orifice
(L) et vissez à la main, dans le sens contraire des aiguilles
d'une montre, la tête (N).
MONTAGE DE LA POIGNEE (Fig. 6)
Montez la poignée sur le tuyau de transmission et fixez-
la avec les vis (A), les rondelles et les écrous. La position
de la poignée se règle selon les exigences de l'opérateur.
Français
Содержание
- 3 - Moteur électrique; COMPOSANTS DE LA DEBROUSSAILLEUSE; ELEKTR‹KL‹ TIRPAN PARÇALARI; Нож для обрезки лески; ЧАСТИ ЭЛЕКТРОКОСЫ
- 6 Elektrikli tırpanı ottan baflka bir fley kesmeyin.; РУССКИЙ; ВНИМАНИЕ
- 7 SIGURNOSNI PROPISI
- 11 Hrvatski; SKLAPANJE DIJELOVA; MONTAJ; GÜVENL‹K KORUYUCU MONTAJI 900 W; Türkçe; ПОДГОТОВКА; УСТАНОВКА ЗАЩИТЫ 900 W; Установите рабочую головку с защитным кожухом на
- 13 UKLJUâIVANJE / OBUSTAVA; UKLJU·IVANJE; - T e r m i ã k a s e s k l o p k a u k l j u ã u j e; OBUSTAVA MOTORA; nastavlja s kruÏenjem; ÇALIfiTIRMA / DURDURULMASI; ÇALIfiTIRMA; РАБОТЕ; ОСТАНОВКА; Режущий инструмент продолжает
- 15 obrezivaãa grmlja bude pravilna.; UPUTSTVA ZA KORI·TENJE; - Navucite remene i drÏite uvijek obje ruke na; NAPOMENA: Prije kori‰tenja obrezivaãa; PRIPREMNE RADNJE; KULLANIMI; MOTORLU TIRPANIN ÇALIfiMASI; УПРАВЛЕНИЕ; двумя руками при работе; - Используйте бензокосу так, как показано; Внимание! Внимательно прочитайте; ПОДГОТОВКА К РАБОТЕ
- 17 GLAVA ZA NAJLON; NAPOMENA - Nemojte montirati metalni alat za; ГОЛОВКА С НЕЙЛОНОВОЙ ЛЕСКОЙ; M‹S‹NALI BAfiLIK
- 19 ODRÎAVANJE; PREPORU·ENE DUÎINE PRODUÎNIH; ОБСЛУЖИВАНИЕ; BAKIM; TAVS‹YE ED‹LEN KABLO UZUNLUKLARI; NAPOMENA - Iskopãajte utikaã iz
- 21 SERIJSKI BROJ; GARANTNI LIST; УСЛОВИЯ ГАРАНТИИ; SERIAL No
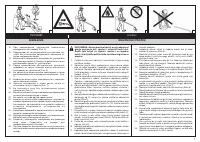
- 24 SPIEGAZIONE SIMBOLI E AVVERTENZE DI SICUREZZA; - Motorlu tırpanı kullanmadan önce kullanım kılavuzunu okuyun.; particulièrement humide.; ‹nsanlardan 15 m kadar uzakta çalıflın; EXPLANATION OF SYMBOLS AND SAFETY WARNINGS; Обратите внимание на метание предметов.; ОПИСАНИЕ СИМВОЛОВ И ЗНАКОВ БЕЗОПАСНОСТИ; D‹KKAT; 2011 BAGNOLO IN PIANO (REGGIO EMILIA) ITALY
- 25 Сайт техники и электроники; Наш сайт
Характеристики

Остались вопросы?Не нашли свой ответ в руководстве или возникли другие проблемы? Задайте свой вопрос в форме ниже с подробным описанием вашей ситуации, чтобы другие люди и специалисты смогли дать на него ответ. Если вы знаете как решить проблему другого человека, пожалуйста, подскажите ему :)
