Триммеры Einhell X-Change GE-CC 18 Li Solo - инструкция пользователя по применению, эксплуатации и установке на русском языке. Мы надеемся, она поможет вам решить возникшие у вас вопросы при эксплуатации техники.
Если остались вопросы, задайте их в комментариях после инструкции.
"Загружаем инструкцию", означает, что нужно подождать пока файл загрузится и можно будет его читать онлайн. Некоторые инструкции очень большие и время их появления зависит от вашей скорости интернета.


GB
- 18 -
manufacturer will be liable for any damage or inju-
ries of any kind caused as a result of this.
Please note that our equipment has not been de-
signed for use in commercial, trade or industrial
applications. Our warranty will be voided if the
machine is used in commercial, trade or industrial
businesses or for equivalent purposes.
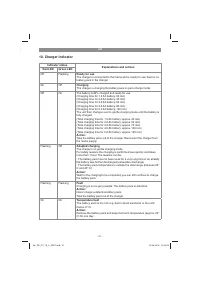
4. Technical data
Speed n0 ............................................ 1,200 min
-1
May brush diameter ................................ 100 mm
Safety class .......................................................III
Sound power level L
WA
................................. 77 dB
Sound pressure level L
pA
............................. 57 dB
Uncertainty K ................................................ 3 dB
Interchangeable battery ...... 18 V d. c. / 1500 mAh
............................. (optional 18 V d.c. / 2000 mAh)
............................. (optional 18 V d.c. / 3000 mAh)
............................. (optional 18 V d.c. / 4000 mAh)
............................. (optional 18 V d.c. / 5200 mAh)
Vibration ..............................................
≤
2.5 m/s
2
Uncertainty K ..........................................1.5 m/s
2
Weight.......................................................1.85 kg
Sound pressure level
at the operator’s ear .............................. 64 dB (A)
Uncertainty K ................................................ 3 dB
Charger
Mains voltage ....................200-250 V ~ 50-60 Hz
Output
Rated voltage ..........................................21 V d.c.
Rated current ........................................ 3,000 mA
The machine noise might exceed 85 dB (A). The
operator will require noise protection measures if
this is the case. The noise was measured in ac-
cordance with prEN ISO 10518. The value of the
vibrations emitted by the handle was determined
in accordance with prEN ISO 10518.
Important!
The vibration value changes according to the
area of application of the electric equipment and
may exceed the speci
fi
ed value in exceptional
circumstances.
Keep the noise emissions and vibrations to a
minimum.
•
Only use appliances which are in perfect wor-
king order.
•
Service and clean the appliance regularly.
•
Adapt your working style to suit the appliance.
•
Do not overload the appliance.
•
Have the appliance serviced whenever ne-
cessary.
•
Switch the appliance off when it is not in use.
•
Wear protective gloves.
Caution!
Residual risks
Even if you use this electric power tool in
accordance with instructions, certain resi-
dual risks cannot be rules out. The following
hazards may arise in connection with the
equipment’s construction and layout:
1. Lung damage if no suitable protective dust
mask is used.
2. Damage to hearing if no suitable ear protec-
tion is used.
3. Health damage caused by hand-arm vib-
rations if the equipment is used over a pro-
longed period or is not properly guided and
maintained.
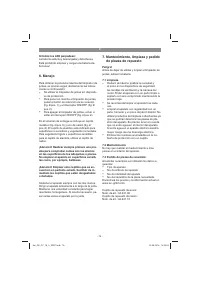
5. Before starting the equipment
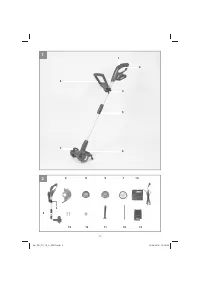
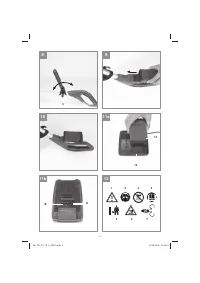
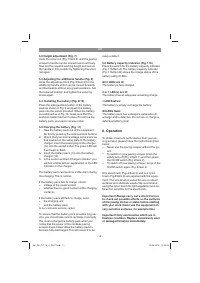
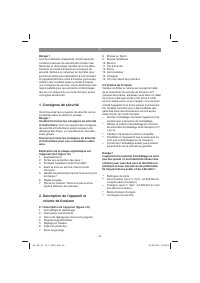
5.1 Assembly (Fig. 3-6b)
Connect the upper part of the housing and the
bottom part of the housing together (Fig. 3).
Slot the guide wheel (Fig. 4/Item 7 into the guide
on the housing (Fig. 4/Item A). Make sure that the-
re is an audible click when they engage.
Fit the guard hood (Fig. 5/Item 6) as shown in Fi-
gure 5 and secure with 2 screws (Fig. 5/Item. 15).
Fit the brush (Fig. 6a/Item A) onto the drive axle
(Fig. 6a/Item B). Make sure that the brush
fi
ts ac-
curately into the mount (Fig. 6a/Item C). The shaft
must be
fi
xed in order to fasten the brush. To do
so, insert the pin (Fig. 2/Item 10) into the recess
on the shaft (Fig. 6b) and hold with one hand.
Using the open-ended wrench (Fig. 2/Item 11),
tighten the nut (Fig. 6b/Item 12).
Important! Be sure to remove the pin again
from the shaft.
To dismantle the equipment for changing the
brush proceed in reverse order.
Anl_GE_CC_18_Li_SPK7.indb 18
Anl_GE_CC_18_Li_SPK7.indb 18
25.08.2016 14:59:44
25.08.2016 14:59:44
Характеристики

Остались вопросы?Не нашли свой ответ в руководстве или возникли другие проблемы? Задайте свой вопрос в форме ниже с подробным описанием вашей ситуации, чтобы другие люди и специалисты смогли дать на него ответ. Если вы знаете как решить проблему другого человека, пожалуйста, подскажите ему :)


