Триммеры Decker GL7033 - инструкция пользователя по применению, эксплуатации и установке на русском языке. Мы надеемся, она поможет вам решить возникшие у вас вопросы при эксплуатации техники.
Если остались вопросы, задайте их в комментариях после инструкции.
"Загружаем инструкцию", означает, что нужно подождать пока файл загрузится и можно будет его читать онлайн. Некоторые инструкции очень большие и время их появления зависит от вашей скорости интернета.


9
ENGLISH
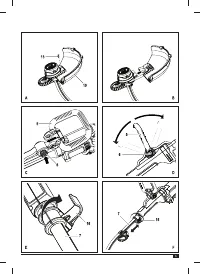
Setting the tool to trimming or edging
mode (
fi
g. I & J)
The tool can be used in trimming mode as shown
in
fi
g. I or in edging mode to trim overhanging grass
along lawn edges and
fl
ower beds as shown in
fi
g. J.
Trimming mode (
fi
g. I)
For trimming, the trimmer head should be in the
position shown in
fi
g. I. If it is not:
♦
Release the height adjust locking clamp (16).
♦
Rotate the tube (7) clockwise.
♦
When the head is in position, close the height
adjust locking clamp (16).
Note:
The tube will only rotate in one direction.
Note:
The HDL spool may be used in trimming
mode.
Edging mode (
fi
g. J)
For edging, the trimmer head should be in the posi-
tion shown in
fi
g. J. If it is not:
♦
Release the height adjust locking clamp (16).
♦
Rotate the tube (7) anti-clockwise.
♦
When the head is in position, close the height
adjust locking clamp (16).
Note:
The tube will only rotate in one direction.
Switching on and off
♦
To switch the tool on, squeeze the on/off switch
(1).
♦
To switch the tool off, release the trigger lever.
Warning!
Never attempt to lock the trigger lever in
the on position.
Hints for optimum use
General
♦
In order to achieve optimum cutting results, only
cut dry grass.
Trimming
♦
Hold the tool as shown in
fi
g. K.
♦
Gently swing the trimmer from side to side.
♦
When cutting long grass, work in stages from
the top. Take small cuts.
♦
Keep the tool away from hard objects and deli-
cate plants.
♦
Cutting line will wear faster and require more
feeding if the cutting is done along pavements
or other abrasive surfaces or heavier weeds are
being cut.
♦
If the tool starts running slowly, reduce the load.
Edging
Optimum cutting results are achieved on edges
deeper than 50 mm.
♦
Do not use the tool to create edges. To create
edges, use an edging spade.
♦
Guide the tool on its wheel as shown in
fi
g. L.
♦
To make a closer cut, slightly tilt the tool.
Fitting a new spool of cutting line (
fi
g. M
& N)
Replacement spools of cutting line are available
from your Black & Decker dealer (cat. no. A6482).
Packs containing 3 spools of cutting line are also
available (cat. no. A6486).
♦
Unplug the tool.
♦
Keep the tabs (17) depressed and remove the
spool cover (21) from the housing (12) (
fi
g. M).
♦
Remove the empty spool (22) from the spool
cover.
♦
Remove any dirt and grass from the spool cover
and housing.
♦
Unclip the end of of the cutting line and guide the
line into the eyelet (23) (
fi
g. M). The line should
protrude approx. 11 cm from the spool cover.
Note:
Take care not to allow the the line on the spool
to unravel. Hold it
fi
rmly with one hand at all times.
♦
Take the new spool and push it onto the boss in
the spool cover. Rotate the spool slightly until it
is seated.
♦
Align the tabs (17) on the spool cover with the
cut outs (24) in the housing (12).
♦
Push the cover onto the housing until it snaps
securely into place.
Warning!
If the cutting lines protrude beyond the
trimming blade (11), cut it off so that it just reaches
the blade.
Fitting a new piece of heavy duty cutting
line (
fi
g. O & P)
Replacement packs of 10 heavy duty cutting lines
are available from your Black & Decker dealer (cat.
no. A6489). To
fi
t a new piece of cutting line, proceed
as follows:.
♦
Unplug the tool.
♦
Keep the tabs (17) depressed and remove the
HDL cap (9) from the housing (12).
♦
Remove any dirt and grass from the HDL cap
(9) and housing.
♦
Remove the used piece of line from the HDL
cap (9).
♦
Thread a new piece of line (20) through the
eyelets (27) in either side of the HDL cap.
♦
Put the central ferrule (28) in the indicated posi-
tion (Fig. P).
♦
Re-
fi
t the HDL cap.
W a r n i n g !
O n l y u s e t h e a p p r o p r i a t e t y p e o f
Black & Decker cutting line.
Характеристики

Остались вопросы?Не нашли свой ответ в руководстве или возникли другие проблемы? Задайте свой вопрос в форме ниже с подробным описанием вашей ситуации, чтобы другие люди и специалисты смогли дать на него ответ. Если вы знаете как решить проблему другого человека, пожалуйста, подскажите ему :)


