
Шуруповерты DEWALT 12 В XR DCF601D2-QW - инструкция пользователя по применению, эксплуатации и установке на русском языке. Мы надеемся, она поможет вам решить возникшие у вас вопросы при эксплуатации техники.
Если остались вопросы, задайте их в комментариях после инструкции.
"Загружаем инструкцию", означает, что нужно подождать пока файл загрузится и можно будет его читать онлайн. Некоторые инструкции очень большие и время их появления зависит от вашей скорости интернета.


9
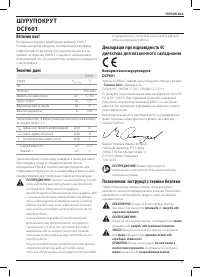
English
OPERATION
Instructions for Use
WARNING:
Always observe the safety instructions and
applicable regulations.
WARNING:
To reduce the risk of serious personal
injury, turn tool off and disconnect battery pack
before making any adjustments or removing/
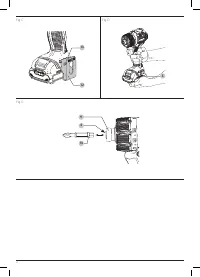
Belt Hook (Fig. C)
Included with Some Models
WARNING: To reduce the risk of serious personal
injury, DO NOT
suspend tool overhead or suspend
objects from the belt hook.
ONLY
hang tool’s belt hook
from a work belt.
WARNING: To reduce the risk of serious personal
injury,
ensure the screw holding the belt hook is secure.
iMPORTAnT:
When attaching or replacing a belt hook, use only
the screw that is provided. Be sure to securely tighten the screw.
A belt hook
12
can be be attached to either side of the tool
using only the screw
13
provided, to accommodate left‑ or
right‑handed users. If the belt hook is not desired at all, it can be
removed from the tool.
To move the belt hook, remove the screw
13
that holds it in
place then reassemble on the opposite side. Be sure to securely
tighten the screw.
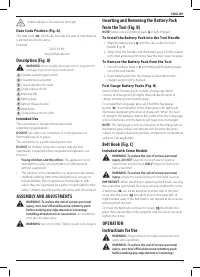
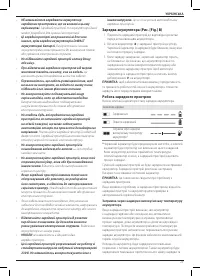
Inserting and Removing the Battery Pack
from the Tool (Fig. B)
nOTE:
Make sure your battery pack
6
is fully charged.
To Install the Battery Pack into the Tool Handle
1. Align the battery pack
6
with the rails inside the tool’s
handle (Fig. B).
2. Slide it into the handle until the battery pack is firmly seated
in the tool and ensure that you hear the lock snap into place.
To Remove the Battery Pack from the Tool
1. Press the release button
7
and firmly pull the battery pack
out of the tool handle.
2. Insert battery pack into the charger as described in the
charger section of this manual.
Fuel Gauge Battery Packs (Fig. B)
Some
D
e
WALT
battery packs include a fuel gauge which
consists of three green LED lights that indicate the level of
charge remaining in the battery pack.
To actuate the fuel gauge, press and hold the fuel gauge
button
11
. A combination of the three green LED lights will
illuminate designating the level of charge left. When the level
of charge in the battery is below the usable limit, the fuel gauge
will not illuminate and the battery will need to be recharged.
nOTE:
The fuel gauge is only an indication of the charge left on
the battery pack. It does not indicate tool functionality and is
subject to variation based on product components, temperature
and end‑user application.
ASSEMBLY AND ADJUSTMENTS
WARNING: To reduce the risk of serious personal
injury, turn tool off and disconnect battery pack
before making any adjustments or removing/
installing attachments or accessories.
An accidental
start‑up can cause injury.
WARNING:
Use only
D
e
WALT
battery packs and chargers.
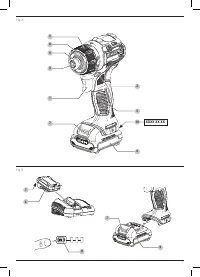
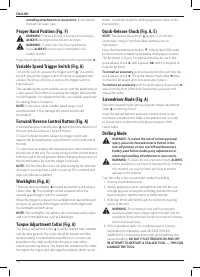
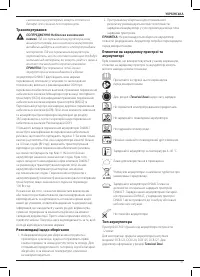
Description (Fig. A)
WARNING:
Never modify the power tool or any part of it.
Damage or personal injury could result.
1
Variable speed trigger switch
2
Forward/reverse button
3
Torque adjustment collar
4
Quick‑release chuck
5
Main handle
6
Battery pack
7
Battery release button
8
Worklights
9
Quick‑release chuck collar
Intended Use
This screwdriver is designed for professional
screwdriving applications.
DO nOT
use under wet conditions or in the presence of
flammable liquids or gases.
This screwdriver is a professional power tool.
DO nOT
let children come into contact with the tool.
Supervision is required when inexperienced operators use
this tool.
•
Young children and the infirm.
This appliance is not
intended for use by young children or infirm persons
without supervision.
• This product is not intended for use by persons (including
children) suffering from diminished physical, sensory or
mental abilities; lack of experience, knowledge or skills
unless they are supervised by a person responsible for their
safety. Children should never be left alone with this product.
Date Code Position (Fig. A)
The date code
10
, which also includes
the year of manufacture,
is printed into the housing.
Example:
2020 XX XX
Year of Manufacture
n
Visible radiation. Do not stare into light.
Содержание
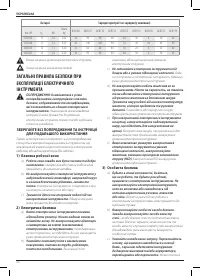
- 15 ОБЩИЕ ПРАВИЛА ТЕХНИКИ; Батареи
- 16 ) Использование аккумуляторных; ) Эксплуатация электроинструмента и уход
- 17 Зарядные устройства; Электробезопасность; Использование удлинительного кабеля; Остаточные риски; СОХРАНИТЕ НАСТОЯЩЕЕ РУКОВОДСТВО; Дополнительные правила техники
- 19 Аккумуляторные батареи; ВНИМАТЕЛЬНО ПРОЧТИТЕ ВСЕ ИНСТРУКЦИИ; Инструкции по очистке зарядного устройства; Работа с зарядным устройством; Температурная задержка; Крепление на стену
- 20 Рекомендации по хранению; Транспортировка
- 21 Назначение; НЕ исПОЛЬЗуйТЕ; Маркировка на инструменте; Комплектация поставки; Тип батареи
- 22 Правильное положение рук во время; Установка и извлечение аккумуляторной; Установка батареи в рукоятку инструмента; СБОРКА И РЕГУЛИРОВКА; НЕ РАЗРЕШАйТЕ
- 23 Муфта установки крутящего момента; Чтобы установить насадку; Режим сверления; Курковый пусковой выключатель с
- 24 НЕ НАЖиМАйТЕ НА


