
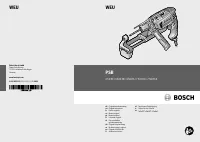
Шуруповерты Bosch PSB 750 RCE 0.603.128.503 - инструкция пользователя по применению, эксплуатации и установке на русском языке. Мы надеемся, она поможет вам решить возникшие у вас вопросы при эксплуатации техники.
Если остались вопросы, задайте их в комментариях после инструкции.
"Загружаем инструкцию", означает, что нужно подождать пока файл загрузится и можно будет его читать онлайн. Некоторые инструкции очень большие и время их появления зависит от вашей скорости интернета.


18
| English
2 609 005 110 | (30.5.11)
Bosch Power Tools
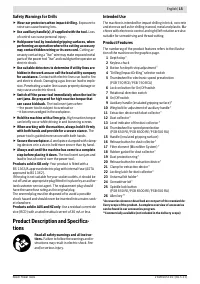
Press on the holder of the filter element
17
and pull it out. Re-
place the filter element
17
including the holder. When placing
on the holder again, make sure that the rubber gasket
18
is in-
serted.
Reattach the dust collector
12
again and lock it by pressing
against the smooth surface of the release button
16
.
Removing the Extraction Device (see figure E)
For disassembly of the extraction device
11
, press release
button
20
and pull off the extraction device
11
toward the
front.
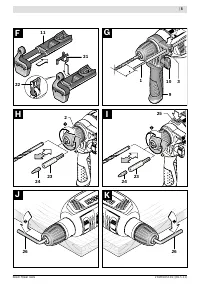
Stowing the Extraction Device (see figure F)
For stowing the extraction device
11
in the case, remove the
extraction device
11
, slide it together and attach clamp
21
.
Attach the locking latch
22
or empty the dust collector
12
be-
fore placing down the extraction device.
Auxiliary Handle
f
Operate your machine only with the auxiliary handle 9.
The auxiliary handle
9
can be set to any position for a secure
and low-fatigue working posture.
Turn the wing bolt for adjustment of the auxiliary handle
10
in
anticlockwise direction and set the auxiliary handle
9
to the
required position. Then tighten the wing bolt
10
again in
clockwise direction.
Adjusting the Drilling Depth (see figure G)
The required drilling depth
X
can be set with the depth stop
1
.
Press the button for the depth stop adjustment
3
and insert
the depth stop into the auxiliary handle
9
.
The knurled surface of the depth stop
1
must face downward.
Pull out the depth stop until the distance between the tip of
the drill bit and the tip of the depth stop correspond with the
desired drilling depth
X
.
Changing the Tool
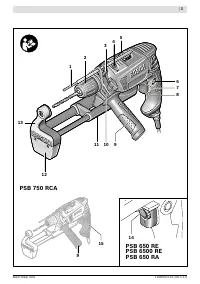
Keyless Chuck (PSB 750 RCE / PSB 750 RCA)
(see figure H)
The drill spindle is locked when the On/Off switch
8
is not
pressed. This makes quick, convenient and easy changing of
the tool in the drill chuck possible.
Open the keyless chuck
2
by turning in rotation direction
n
,
until the tool can be inserted. Insert the tool.
Firmly tighten the collar of the keyless chuck
2
by hand in ro-
tation direction
o
until the locking action (“click”) is no longer
heard. This automatically locks the chuck.
The locking is released again to remove the tool when the col-
lar is turned in the opposite direction.
Keyless Chuck (PSB 650 RE / PSB 6500 RE / PSB 650 RA)
(see figure I)
f
Press the spindle lock button 25 only when the ma-
chine is at a standstill.
The drill spindle is locked by pressing the spindle lock button
25
. This makes quick and easy changing of the tool in the drill
chuck possible.
Open the keyless chuck
2
by turning in rotation direction
n
,
until the tool can be inserted. Insert the tool.
Firmly tighten the collar of the keyless chuck
2
by hand in ro-
tation direction
o
until the locking action (“click”) is no longer
heard. This automatically locks the chuck.
The locking is released again to remove the tool when the col-
lar is turned in the opposite direction.
Screwdriver Tools
When working with screwdriver bits
24
, a universal bit holder
23
should always be used. Use only screwdriver bits that fit
the screw head.
For driving screws, always position the “Drilling/Impact Drill-
ing” selector switch
4
to the “Drilling” symbol.
Replacing the Drill Chuck (PSB 750 RCE /
PSB 750 RCA)
Removing the Drill Chuck (see figure J)
Clamp the short end of an Allen key
26
into the keyless chuck
2
.
Place the machine on a stable surface, e. g. a workbench.
Hold the machine firmly and loosen the keyless chuck
2
by
turning the Allen key
26
in rotation direction
n
. Loosen a
tight seated keyless chuck by giving the long end of the Allen
key
26
a light blow. Remove the Allen key from the keyless
chuck and completely unscrew the keyless chuck.
Mounting the Drill Chuck (see figure K)
The keyless chuck is mounted in reverse order.
The drill chuck must be tightened with a tightening
torque of approx. 25 – 35 Nm.
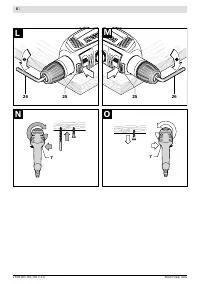
Replacing the Drill Chuck (PSB 650 RE /
PSB 6500 RE / PSB 650 RA)
Removing the Drill Chuck (see figure L)
Clamp the short end of an Allen key
26
into the keyless chuck
2
.
Place the machine on a firm surface, e. g. a workbench. Hold
the machine firmly, press the spindle lock button
25
and loos-
en the keyless chuck
2
by turning the Allen key
26
in rotation
direction
n
. Loosen a tight keyless chuck by giving the long
end of the Allen key
26
a light blow. Remove the Allen key
from the keyless chuck and completely unscrew the keyless
chuck.
Mounting the Drill Chuck (see figure M)
The keyless chuck is mounted in reverse order.
The drill chuck must be tightened with a tightening
torque of approx. 25 – 35 Nm.
Operation
Starting Operation
f
Observe correct mains voltage! The voltage of the pow-
er source must agree with the voltage specified on the
nameplate of the machine. Power tools marked with
230 V can also be operated with 220 V.


