
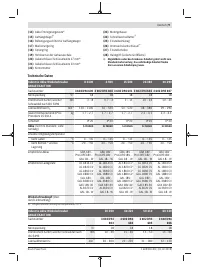
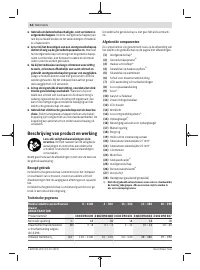
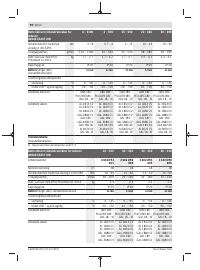
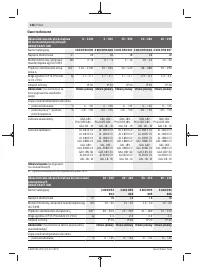
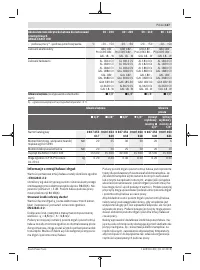
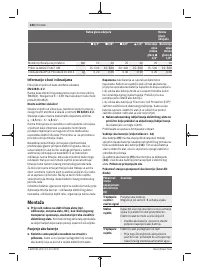
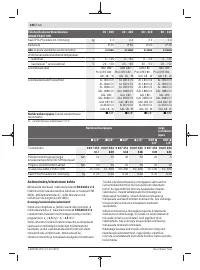
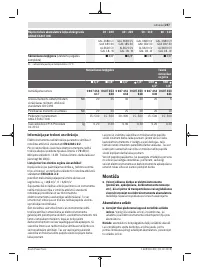
Шуруповерты Bosch ANGLE EXACT ION 15-500 0.602.494.601 - инструкция пользователя по применению, эксплуатации и установке на русском языке. Мы надеемся, она поможет вам решить возникшие у вас вопросы при эксплуатации техники.
Если остались вопросы, задайте их в комментариях после инструкции.
"Загружаем инструкцию", означает, что нужно подождать пока файл загрузится и можно будет его читать онлайн. Некоторые инструкции очень большие и время их появления зависит от вашей скорости интернета.


English |
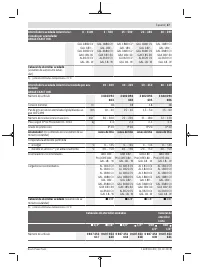
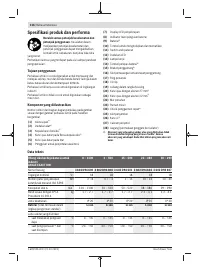
21
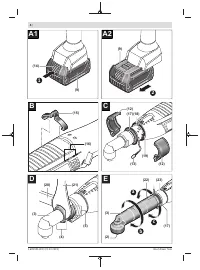
(3)
by 45° accordingly to the required position and use
the open-ended spanner
(20)
on the spanner flat
(5)
of
the cap nut to tighten it again.
While doing this, use the open-ended spanner
(21)
on the
angled head flange to provide resistance.
Adjusting and removing the angled screw head
(see figure E)
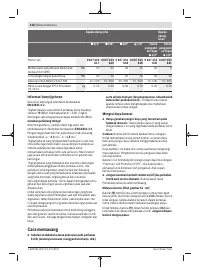
Applies to the following models:
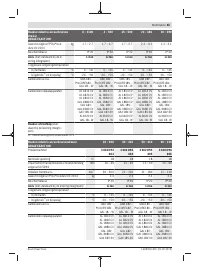
ANGLE EXACT ION 30-300 | 40-220 | 50-210 | 60-120
The angled screw head
(3)
with tool holder
(2)
can be con-
tinuously adjusted by 360°.
– Loosen the lock nut
(22)
by hooking into an opening on
the lock nut using a suitable tool and turning in the direc-
tion of the arrow
a
(left-hand thread).
– Fix the angled screw head
(3)
in this position by turning
the lock nut
(22)
in the direction of the arrow
c
against
the angled screw head. Retighten the lock nut
(22)
with a
tightening torque of max. 50 Nm.
– Turn the angled screw head
(3)
in the direction of the ar-
row
b
until the required working angle is reached; how-
ever, it should only be turned a maximum of one 360° ro-
tation.
The angled screw head
(3)
can also be removed completely
if you wish to replace the marking ring
(17)
with a marking
ring of a different colour or if you wish to adjust the work-
light. Move the worklight to the required position (see
"Switching on the worklight (see figure
before adjusting the angled screw head.
– Loosen the lock nut
(22)
by hooking into an opening on
the lock nut using a suitable tool and turning in the direc-
tion of the arrow
a
(left-hand thread). Turn the angled
screw head
(3)
in the direction of the arrow
b
until you
can remove it. Turn the lock nut
(22)
in the direction of
the arrow
a
of the motor housing
(23)
.
Now you can replace the marking ring or adjust the work-
light.
– Turn the lock nut
(22)
in the direction of the arrow
c
on
the motor housing
(23)
and screw the angled screw head
back on in the opposite direction of the arrow
b
.
– Fix the angled screw head by turning the lock nut
(22)
in
the direction of the arrow
c
.
– Retighten the lock nut
(22)
with a tightening torque of ap-
prox. 50 Nm.
Configuring the power tool
You can configure various settings on the power tool (e.g. ro-
tational speed, screwing stage, repeat protection) using
BOSCH EXACT Configurator
software. The power tool must
be connected to a PC via its USB port in order to do this.
Note:
Follow all the safety instructions and information in
the software manual.
Changing the tool at the screw head with
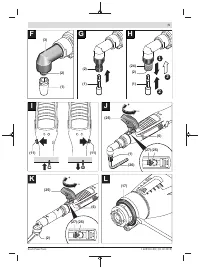
external square (see figure F)
Inserting the application tool
– Press the pin into the square of the tool holder
(2)
, e.g.
using a narrow screwdriver, and slide the application tool
(1)
over the square. Ensure that the pin engages in the re-
cess of the application tool.
Removing the application tool
– Press the pin into the recess of the application tool
(1)
and pull the application tool off of the tool holder
(2)
.
Changing the tool at the screw head with
internal hexagon (see figure G)
Inserting the application tool
– Insert the application tool
(1)
into the internal hexagon of
the tool holder
(2)
until it audibly engages.
Removing the application tool
– Pull the application tool
(1)
off of the tool holder
(2)
, us-
ing pliers if necessary.
Changing the tool at the screw head with quick-
change chuck (see figure H)
Inserting the application tool
Only use application tools with the matching shank (1/4"
hexagon).
– Pull the sleeve of the quick-change chuck
(24)
forwards.
– Place the application tool
(1)
into the tool holder
(2)
and
release the quick-change chuck again.
Removing the application tool
– Pull the sleeve of the quick-change chuck
(24)
forwards.
– Take the application tool
(1)
out of the tool holder
(2)
and
release the quick-change chuck again.
Operation
Starting Operation
Always set the rotational direction using the rotational direc-
tion switch
(11)
before starting the power tool:
The power tool will not start if the rotational direction switch
(11)
is in the centre (lock-off button).
Setting the rotational direction (see figure I)
–
Clockwise:
To drive in screws, press the rotational direc-
tion switch
(11)
through as far as possible to the left.
–
Anti-clockwise:
To loosen or unscrew screws, press the
rotational direction switch
(11)
through as far as possible
to the right.
Switching on the worklight
The worklight
(13)
illuminates the work area in poor lighting
conditions. Switch on the worklight
(13)
by lightly pressing
the on/off switch
(10)
. If you press down harder on the on/
off switch, the power tool will switch on and the worklight
will remain illuminated.
Bosch Power Tools
1 609 92A 4R1 | (21.02.2019)


