
Шуруповерты Black Decker KR 50 RE - инструкция пользователя по применению, эксплуатации и установке на русском языке. Мы надеемся, она поможет вам решить возникшие у вас вопросы при эксплуатации техники.
Если остались вопросы, задайте их в комментариях после инструкции.
"Загружаем инструкцию", означает, что нужно подождать пока файл загрузится и можно будет его читать онлайн. Некоторые инструкции очень большие и время их появления зависит от вашей скорости интернета.


5
ENGLISH
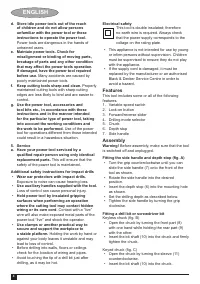
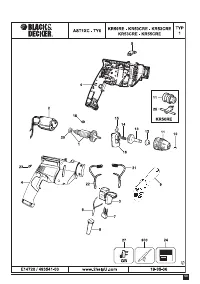
• Insert the chuck key (12) into each hole (13) in
the side of the chuck and turn clockwise until
tight.
Removing and refi tting the chuck (fi g. D)
• Open the chuck as far as possible.
• Remove the chuck retaining screw, located
in the chuck, by turning it clockwise using
a screwdriver.
• Tighten an Allen key into the chuck and strike it
with a hammer as shown.
• Remove the Allen key.
• Remove the chuck by turning it
counterclockwise.
• To refi t the chuck, screw it onto the spindle and
secure it with the chuck retaining screw.
Use
Warning!
Let the tool work at its own pace. Do not
overload.
Warning!
Before drilling into walls, fl oors or
ceilings, check for the location of wiring and pipes.
Selecting the direction of rotation (fi g. E)
For drilling and for tightening screws, use forward
(clockwise) rotation. For loosening screws
or removing a jammed drill bit, use reverse
(counterclockwise) rotation.
• To select forward rotation, push the forward/
reverse slider (3) to the centre position.
• To select reverse rotation, push the forward/
reverse slider to the left.
Warning!
Never change the direction of rotation
while the motor is running.
Selecting the drilling mode
• For drilling in masonry, set the drilling mode
selector (4) to the position.
• For drilling in other materials and for
screwdriving, set the drilling mode selector to
the position.
Setting the drilling depth (fi g. F)
• Slacken the side handle (7) by turning the grip
counterclockwise.
• Set the depth stop (6) to the desired position.
The maximum drilling depth is equal to the
distance between the tip of the drill bit and the
front end of the depth stop.
• Tighten the side handle by turning the grip
clockwise.
Switching on and off
• To switch the tool on, press the variable speed
switch (1). The tool speed depends on how far
you press the switch. As a general rule, use
low speeds for large diameter drill bits and high
speeds for smaller diameter drill bits.
• For continuous operation, press the lock-on
button (2) and release the variable speed
switch. This option is available only at full
speed. This option does not work in reverse
rotation.
• To switch the tool off, release the variable
speed switch. To switch the tool off when in
continuous operation, press the variable speed
switch once more and release it.
Accessories
The performance of your tool depends on
the accessory used. Black & Decker and
Piranha accessories are engineered to high
quality standards and designed to enhance
the performance of your tool. By using these
accessories you will get the very best from your
tool.
Maintenance
Your tool has been designed to operate over a long
period of time with a minimum of maintenance.
Continuous satisfactory operation depends upon
proper tool care and regular cleaning.
Warning!
Before performing any maintenance,
switch off and unplug the tool.
• Regularly clean the ventilation slots in your tool
using a soft brush or dry cloth.
• Regularly clean the motor housing using
a damp cloth. Do not use any abrasive or
solvent-based cleaner.
Mains plug replacement (U.K. & Ireland only)
If a new mains plug needs to be fi tted:
• Safely dispose of the old plug.
• Connect the brown lead to the live terminal in
the new plug.
• Connect the blue lead to the neutral terminal.
Warning!
No connection is to be made to the earth
terminal. Follow the fi tting instructions supplied
with good quality plugs. Recommended fuse: 5 A.
Protecting the environment
Separate collection. This product must
not be disposed of with normal household
waste.


