
Шуруповерты Black+DECKER EPC128BK - инструкция пользователя по применению, эксплуатации и установке на русском языке. Мы надеемся, она поможет вам решить возникшие у вас вопросы при эксплуатации техники.
Если остались вопросы, задайте их в комментариях после инструкции.
"Загружаем инструкцию", означает, что нужно подождать пока файл загрузится и можно будет его читать онлайн. Некоторые инструкции очень большие и время их появления зависит от вашей скорости интернета.


8
ENGLISH
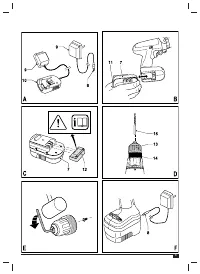
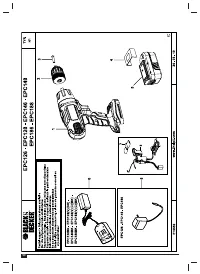
Fitting and removing the battery (fi g. B & C)
♦
To fi t the battery (7), line it up with the
receptacle on the tool. Slide the battery into
the receptacle and push until the battery snaps
into place.
♦
To remove the battery, push the release button
(11) while at the same time pulling the battery
out of the receptacle.
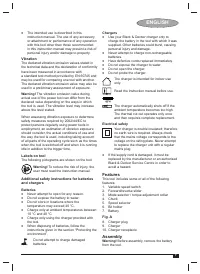
Fitting the battery cap (fi g. C)
Warning!
Fit the cap (12) to the battery (7) for
transportation and storage.
Fitting and removing a drill bit or screwdriver
bit (fi g. D)
This tool is fi tted with a keyless chuck to allow for
an easy exchange of bits.
♦
Lock the tool by setting the forward/reverse
slider (2) to the centre position.
♦
Open the chuck by turning the front part (13)
with one hand while holding the rear part (14)
with the other.
♦
Insert the bit shaft (15) into the chuck and
fi rmly tighten the chuck.
This tool is supplied with a double-ended
screwdriver bit in the bit holder (6).
♦
To remove the screwdriver bit from the bit
holder, lift the bit from the recess.
♦
To store the screwdriver bit, fi rmly push it into
the holder.
Removing and refi tting the chuck (fi g. E)
♦
Open the chuck as far as possible.
♦
Remove the chuck retaining screw by turning it
clockwise using a screwdriver.
♦
Tighten an Allen key into the chuck and strike it
with a hammer as shown.
♦
Remove the Allen key.
♦
Remove the chuck by turning it
counterclockwise.
♦
To refi t the chuck, screw it onto the spindle and
secure it with the chuck retaining screw.
Residual risks.
Additional residual risks may arise when using the
tool which may not be included in the enclosed
safety warnings. These risks can arise from
misuse, prolonged use etc.
Even with the application of the relevant safety
regulations and the implementation of safety
devices, certain residual risks can not be avoided.
These include:
♦
Injuries caused by touching any rotating/
moving parts.
♦
Injuries caused when changing any parts,
blades or accessories.
♦
Injuries caused by prolonged use of a tool.
When using any tool for prolonged periods
ensure you take regular breaks.
♦
Impairment of hearing.
♦
Health hazards caused by breathing dust
developed when using your tool (example:-
working with wood, especially oak, beech
and MDF.)
Use
Warning!
Let the tool work at its own pace. Do not
overload.
Warning!
Before drilling into walls, fl oors or
ceilings, check for the location of wiring and pipes.
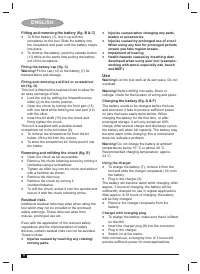
Charging the battery (fi g. A & F)
The battery needs to be charged before fi rst use
and whenever it fails to produce suffi cient power
on jobs that were easily done before. When
charging the battery for the fi rst time, or after
prolonged storage, it will only accept an 80%
charge. After several charge and discharge cycles,
the battery will attain full capacity. The battery may
become warm while charging; this is normal and
does not indicate a problem.
Warning!
Do not charge the battery at ambient
temperatures below 10 °C or above 40 °C.
Recommended charging temperature: approx.
24 °C.
Using the charger
♦
To charge the battery (7), remove it from the
tool and slide the charger receptacle (10) onto
the battery.
♦
Plug in the charger (9).
The battery will become warm while charging. After
approx. 3 hours of charging, the battery will be
suffi ciently charged for use in regular applications.
After approx. 8-10 hours of charging, the battery
will be fully charged.
♦
Remove the charger receptacle from the
battery.
Charger with charging plug
♦
To charge the battery, make sure that it is fi tted
on the drill.
♦
Insert the charger plug (8) into the connector.
♦
Plug in the charger.
♦
Switch on at the mains.
After normal use, a charging time of 3 hours will
provide suffi cient power for most applications.
Содержание
- 63 РУССКИЙ ЯЗЫК
- 65 Вибрация; Аккумуляторы
- 66 Электробезопасность; Составные части; Остаточные риски
- 67 Использование зарядного устройства
- 68 Заверните первый шуруп.; Сверление/Заворачивание; Техническое обслуживание; Перед любыми видами работ; Защита окружающей среды
- 69 Зарядное устройство; Аккумулятор; Аккумулятор
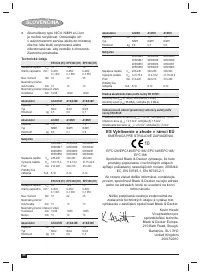
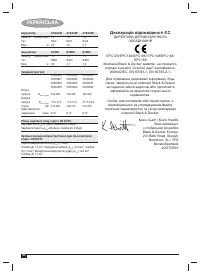
- 70 Уровень звукового давления в соответствии с EN 60745:; Декларация соответствия ЕС


