Шлифмашины Makita BO3710 - инструкция пользователя по применению, эксплуатации и установке на русском языке. Мы надеемся, она поможет вам решить возникшие у вас вопросы при эксплуатации техники.
Если остались вопросы, задайте их в комментариях после инструкции.
"Загружаем инструкцию", означает, что нужно подождать пока файл загрузится и можно будет его читать онлайн. Некоторые инструкции очень большие и время их появления зависит от вашей скорости интернета.


5 ENGLISH
7.
Use of this tool to sand some products, paints and
wood could expose user to dust containing hazardous
substances. Use appropriate respiratory protection.
8.
Be sure that there are no cracks or breakage
on the pad before use. Cracks or breakage
may cause a personal injury.
SAVE THESE INSTRUCTIONS.
WARNING:
DO NOT let comfort or familiar
-
ity with product (gained from repeated use)
replace strict adherence to safety rules for
the subject product. MISUSE or failure to fol
-
low the safety rules stated in this instruction
manual may cause serious personal injury.
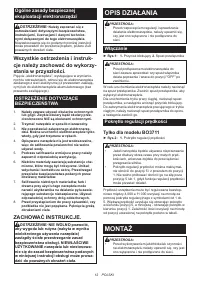
FUNCTIONAL
DESCRIPTION
CAUTION:
•
Always be sure that the tool is switched off and
unplugged before adjusting or checking function
on the tool.
Switch action
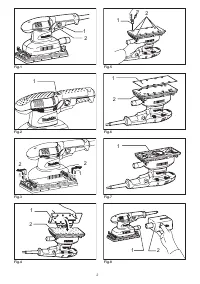
►
Fig.1:
1.
Lock button
2.
Switch trigger
CAUTION:
•
Before plugging in the tool, always check to see
that the switch trigger actuates properly and
returns to the "OFF" position when released.
To start the tool, simply pull the switch trigger. Release
the switch trigger to stop.
For continuous operation, pull the switch trigger and
then push in the lock button.
To stop the tool from the locked position, pull the switch
trigger fully, then release it.
Speed adjusting dial
For BO3711 only
►
Fig.2:
1.
Speed adjusting dial
CAUTION:
•
If the tool is operated continuously at low
speeds, the motor will get overloaded and
heated up.
•
The speed adjusting dial can be turned only as
far as 5 and back to 1. Do not force it past 5 or
1, or the speed adjusting function may no longer
work.
The tool speed can be infinitely adjusted between 4,000
and 11,000 orbits per minute by turning the speed
adjusting dial, which is marked 1 to 5. Higher speed is
obtained when the dial is turned in the direction of num-
ber 5, lower speed is obtained when it is turned in the
direction of number 1. Adjust the desired tool speed for
the kind of work.
ASSEMBLY
CAUTION:
•
Always be sure that the tool is switched off and
unplugged before carrying out any work on the
tool.
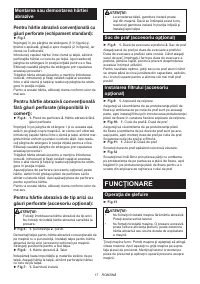
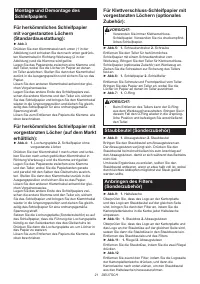
Installing or removing abrasive
paper
For conventional type of abrasive
paper with pre-punched holes
(standard equipment):
►
Fig.3
Press down the clamp lever (1 in the figure) and with
the clamp lever pressed down slide it toward the tool (2
in the figure) and the clamper will be released.
Insert the paper end between a clamper and the pad
aligning the holes in the paper with those in pad. Then
return the clamp lever to the original position to secure
it.
Release the other clamp lever by repeating the same
procedure.
While pulling abrasive paper to maintain the proper
tension, insert and secure the other end of abrasive
paper between another clamper and the pad and return
the clamp lever to the original position.
To remove the paper, release the clamper as stated
above.
For conventional type of abrasive
paper without pre-punched holes
(available on the market):
►
Fig.4:
1.
Punch plate
2.
Abrasive paper without pre-
punched holes
Press down the clamp lever 1 and with the clamp lever
pressed down slide it toward the tool 2 and the clamper
will be released.
Insert the paper end between a clamper and the pad
aligning the paper edges even and parallel with the
sides of the base. Then return the clamp lever to the
original position to secure it.
Release the other clamp lever by repeating the same
procedure.
While pulling abrasive paper to maintain the proper
tension, insert and secure the other end of abrasive
paper between another clamper and the pad and return
the paper clamp lever to the original position.
Place the punch plate (optional accessory) over the
paper so that the guide of the punch plate is flush with
the sides of the base. Then press the punch plate to
make holes in the paper.
To remove the paper, release the clamper as stated
above.
Характеристики

Остались вопросы?Не нашли свой ответ в руководстве или возникли другие проблемы? Задайте свой вопрос в форме ниже с подробным описанием вашей ситуации, чтобы другие люди и специалисты смогли дать на него ответ. Если вы знаете как решить проблему другого человека, пожалуйста, подскажите ему :)


