Шлифмашины Bosch GSS 23 AE - инструкция пользователя по применению, эксплуатации и установке на русском языке. Мы надеемся, она поможет вам решить возникшие у вас вопросы при эксплуатации техники.
Если остались вопросы, задайте их в комментариях после инструкции.
"Загружаем инструкцию", означает, что нужно подождать пока файл загрузится и можно будет его читать онлайн. Некоторые инструкции очень большие и время их появления зависит от вашей скорости интернета.


English |
13
Bosch Power Tools
1 609 92A 15N | (18.2.15)
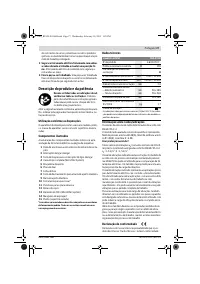
Identify additional safety measures to protect the operator
from the effects of vibration such as: maintain the tool and the
accessories, keep the hands warm, organisation of work pat-
terns.
Declaration of Conformity
We declare under our sole responsibility that the product de-
scribed under “Technical Data” is in conformity with all rele-
vant provisions of the directives 2011/65/EU, until
19 April 2016: 2004/108/EC, from 20 April 2016 on:
2014/30/EU, 2006/42/EC including their amendments and
complies with the following standards:
EN 60745-1, EN 60745-2-4.
Technical file (2006/42/EC) at:
Robert Bosch GmbH, PT/ETM9,
70764 Leinfelden-Echterdingen, GERMANY
Robert Bosch GmbH, Power Tools Division
70764 Leinfelden-Echterdingen, GERMANY
Leinfelden, 04.02.2015
Assembly
Before any work on the machine itself, pull the mains
plug.
Dust/Chip Extraction
Dusts from materials such as lead-containing coatings,
some wood types, minerals and metal can be harmful to
one’s health. Touching or breathing-in the dusts can cause
allergic reactions and/or lead to respiratory infections of
the user or bystanders.
Certain dusts, such as oak or beech dust, are considered
as carcinogenic, especially in connection with wood-treat-
ment additives (chromate, wood preservative). Materials
containing asbestos may only be worked by specialists.
– As far as possible, use a dust extraction system suitable
for the material.
– Provide for good ventilation of the working place.
– It is recommended to wear a P2 filter-class respirator.
Observe the relevant regulations in your country for the mate-
rials to be worked.
Prevent dust accumulation at the workplace.
Dusts can
easily ignite.
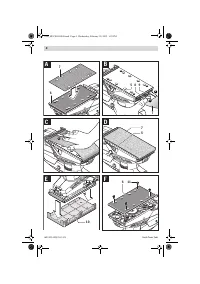
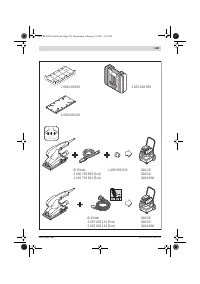
Integrated Dust Extraction with Dust Box
(see figures G1 – G4)
Attach the dust box
4
onto the extraction outlet
12
until it
latches.
To empty the dust box
4
, pull off the dust box downward.
Before opening the dust box
4
, it is recommended to loosen
the dust from the filter element by gently striking it against a
firm support (as shown in the figure).
Grasp the dust box
4
by the recessed grip, fold the filter ele-
ment
13
upward and empty the dust box. Clean the thin
plates of the filter element
13
with a soft brush.
External Dust Extraction (see figure H)
Mount a vacuum hose
14
onto the extraction outlet
12
. Con-
nect the vacuum hose
14
with a vacuum cleaner. An overview
for the connection of various vacuum cleaners can be found at
the end of these instructions.
The vacuum cleaner must be suitable for the material being
worked.
When vacuuming dry dust that is especially detrimental to
health or carcinogenic, use a special vacuum cleaner.
Replacing the Sanding Sheet
When attaching a new sanding sheet, remove any dust or de-
bris from the sanding plate
6
(e. g. with a brush).
To ensure optimum dust extraction, pay attention that the
punched holes in the sanding sheet match with the holes in
the sanding plate.
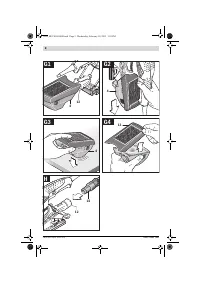
Sanding Sheets with Velcro Backing (see figure A)
The sanding plate
6
is fitted with Velcro backing for quick and
easy fastening of sanding sheets with Velcro adhesion.
Before attaching the sanding sheet
7
, free the Velcro backing
of the sanding plate
6
from any debris by tapping against it in
order to enable optimum adhesion.
Position the sanding sheet
7
flush alongside one edge of the
sanding plate
6
, then lay the sanding sheet onto the sanding
plate and press firmly.
To remove the sanding sheet
7
, grasp it at one of the tips and
pull it off from the sanding plate
6
.
Sanding Sheets without Velcro Backing (see figures B – D)
Press the release button
8
and keep it depressed.
Guide the sanding sheet
7
to the stop under the opened
front clamping bracket
9
and let go of the release button
8
again. Pay attention that the sanding sheet is clamped
centrally.
Press the sanding sheet clamp
5
inward and pivot it to
the stop.
Fold the sanding sheet
7
firmly around the sanding plate.
Guide the other end of the sanding sheet
7
between the
rear clamping bracket and the red roller on the clamping
bracket
5
.
Hold the sanding sheet tensely and press the clamping
bracket
5
toward the sanding plate to lock the sanding
sheet.
Sanding sheets without holes, e. g. from rolls or by the meter,
can be punctured with the perforating tool
10
for use with
dust extraction. For this, press the machine with the mounted
sanding sheet onto the perforating tool (see figure E).
To remove the sanding sheet
7
, loosen the clamping
bracket
5
and pull out the sanding sheet from the rear holding
fixture. Press the release button
8
and completely remove the
sanding sheet.
Henk Becker
Executive Vice President
Engineering
Helmut Heinzelmann
Head of Product Certification
PT/ETM9
OBJ_BUCH-80-004.book Page 13 Wednesday, February 18, 2015 1:29 PM


