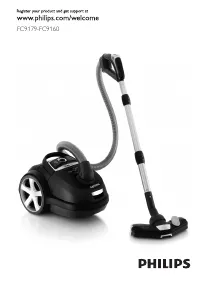
Пылесос Philips FC9177 - инструкция пользователя по применению, эксплуатации и установке на русском языке. Мы надеемся, она поможет вам решить возникшие у вас вопросы при эксплуатации техники.
Если остались вопросы, задайте их в комментариях после инструкции.
"Загружаем инструкцию", означает, что нужно подождать пока файл загрузится и можно будет его читать онлайн. Некоторые инструкции очень большие и время их появления зависит от вашей скорости интернета.


2
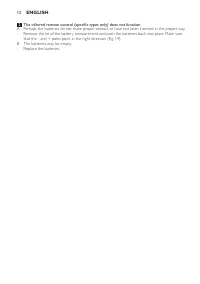
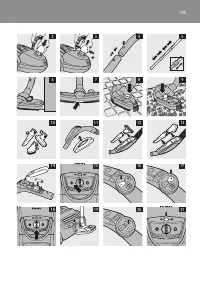
If the appliance is equipped with an infrared remote control (specific types only), press the
standby button to switch off the vacuum cleaner temporarily, for instance when you have to
move some furniture. (Fig. 20)
3
To continue vacuum cleaning, press the standby button again. The appliance then starts
operating at the previously selected suction power setting again.
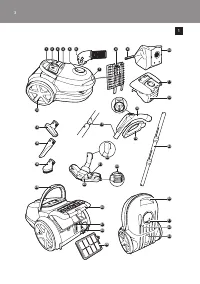
replacing/emptying the dustbag
Always unplug the appliance before you replace the disposable dustbag or empty the reusable
dustbag.
replacing the disposable dustbag
- Replace the dustbag as soon as the dustbag-full indicator has changed colour permanently, i.e.
even when the nozzle is not placed on the floor (Fig. 21).
1
Pull the cover upwards to open it (Fig. 22).
2
Lift the dustbag holder out of the appliance (Fig. 23).
Make sure you hold the dustbag upright when you lift it out of the appliance.
3
Pull at the cardboard tag to remove the full dustbag from the holder (Fig. 24).
,
The dustbag is sealed automatically.
4
Slide the cardboard front of the new dustbag into the two grooves of the dustbag holder as
far as possible. (Fig. 25)
5
Put the dustbag holder back into the vacuum cleaner.
Note: If you have not inserted a dustbag, you cannot close the cover.
Emptying the reusable dustbag (specific countries only)
In some countries, this vacuum cleaner also comes with a reusable dustbag that can be used and
emptied repeatedly. You can use the reusable dustbag instead of disposable dustbags.
1
Remove the reusable dustbag from the appliance and the holder as described in section
‘Replacing the disposable dustbag’ above.
2
Slide the clip off the dustbag sideways.
3
Shake out the contents into a dustbin.
4
To close the dustbag, slide the clip back onto the bottom edge of the dustbag.
5
Reinsert the reusable dustbag into the holder and the appliance as described in
section ‘Replacing the disposable dustbag’ above.
Cleaning/replacing filters
Always unplug the appliance before you clean or replace the filters
Note: Only wipe the body of the appliance with a moist cloth.
Permanent motor protection filter
Clean the permanent motor protection filter ever y time you replace or empty the dustbag.
1
Remove the dustbag holder with the dustbag (Fig. 23).
2
Press the filter holder release tab (1) and take the filter holder out of the appliance (2). Take
the motor protection filter out of the filter holder. (Fig. 26)
English
9
Содержание
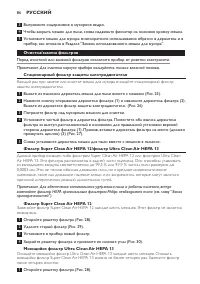
- 83 Подготовка прибора к работе; выньте рукоятку из трубки.
- 84 маневренность пылесоса.; Щелевая насадка, маленькая насадка и маленькая щетка.; Закрепите две насадки в держателе для насадок:; инфракрасный пульт Ду (только у некоторых моделей); Снимите крышку отсека для батарей; Эксплуатация прибора; Во время работы пылесоса можно регулировать силу всасывания.
- 85 работу на выбранной ранее мощности всасывания.; замена/очистка мешка для пыли; Мешок для мусора закрывается автоматически.; Очистка мешка для мусора многократного использования (только в; стандартного одноразового мешка.
- 86 Вытряхните содержимое в мусорное ведро.; Очистка/замена фильтров; защиты электродвигателя.; Фильтр super Clean air hEPa 12/фильтр ultra Clean air hEPa 13; причиной аллергических реакций дыхательных путей.; Фильтр super Clean air hEPa 12; Установите в прибор новый фильтр.; Моющийся фильтр ultra Clean air hEPa 13; после четырех очисток.
- 87 перед повторной установкой в пылесос.; Хранение; Сложите трубку до минимальной длины.; заказ принадлежностей
- 88 Мощность всасывания недостаточна.


