Пылесос Philips FC8913_01 - инструкция пользователя по применению, эксплуатации и установке на русском языке. Мы надеемся, она поможет вам решить возникшие у вас вопросы при эксплуатации техники.
Если остались вопросы, задайте их в комментариях после инструкции.
"Загружаем инструкцию", означает, что нужно подождать пока файл загрузится и можно будет его читать онлайн. Некоторые инструкции очень большие и время их появления зависит от вашей скорости интернета.


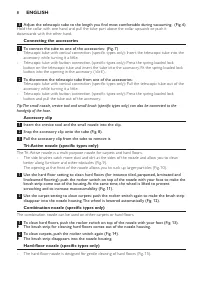


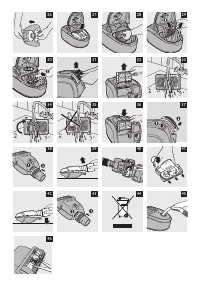


Make sure you hold the dustbag upright when you lift it out of the appliance.
3
Pull at the cardboard tag to remove the full dustbag from the holder (Fig. 25).
,
When you do this, the dustbag is sealed automatically.
4
Slide the cardboard front of the new dustbag into the two grooves of the dustbag holder as
far as possible. (Fig. 26)
5
Put the dustbag holder back into the vacuum cleaner (Fig. 27).
Note: If no dustbag has been inserted, you cannot close the cover.
6
Push the cover downwards to close it (‘click’).
emptying the reusable dustbag (some countries only)
In some countries, this vacuum cleaner also comes with a reusable dustbag that can be used and
emptied repeatedly. You can use the reusable dustbag instead of disposable dustbags.
To remove and inser t the reusable dustbag, simply follow the instructions in ‘Replacing the
disposable dustbag’.
To empty the reusable dustbag:
1
Slide the clip off the dustbag sideways.
2
Shake out the contents into a dustbin.
3
To close the dustbag, slide the clip back onto the bottom edge of the dustbag.
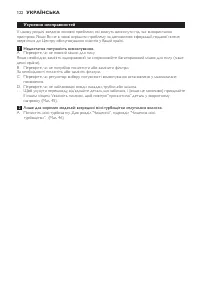
Cleaning and maintenance
The plug must be removed from the socket-outlet before cleaning or maintaining the appliance.
Cleaning the permanent motor protection ilter
Clean the permanent motor protection ilter ever y time you empty the reusable dustbag or replace
the disposable dustbag.
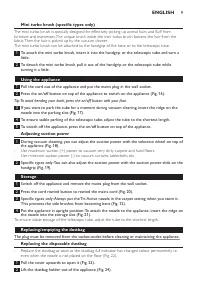
1
Remove the dustbag holder with the dustbag (Fig. 24).
2
Press the tab at the top of the motor protection ilter holder down to release it (Fig. 28).
3
Pull the top of the motor protection ilter holder towards you (1) and lift the ilter holder
out of the dustbag compartment (2). (Fig. 29)
4
Shake the ilter over a dustbin to clean it.
5
Put the clean ilter back into the ilter holder.
6
Fit the two lugs of the ilter holder behind the ridge at the bottom to ensure that it its
properly at the top (1). Then press the ilter holder home (‘click’) (2) (Fig. 30).
7
Place the dustbag holder with the dustbag back into the appliance and close the cover.
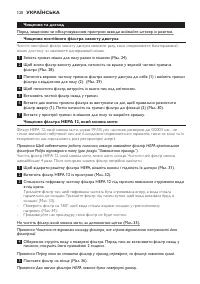
Cleaning the washable HePa 12 ilter
The washable HEPA 12 ilter is able to remove 99.5% of all par ticles down to 0.0003mm in size
from the outlet air. This not only includes normal house dust, but also harmful microscopic vermin
such as dust mites and their excrements, which are well-known causes of respirator y allergies.
Note: To guarantee optimal dust retention and performance of the vacuum cleaner, always replace the
HEPA ilter with an original Philips ilter of the correct type (see chapter ‘Ordering accessories’).
Clean the washable HEPA 12 ilter ever y 6 months. You can clean the washable HEPA 12 ilter max.
4 times. Replace the ilter after it has been cleaned 4 times.
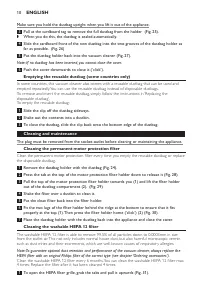
1
To open the HEPA ilter grille, grab the tabs and pull it upwards (Fig. 31).
English
10
Содержание
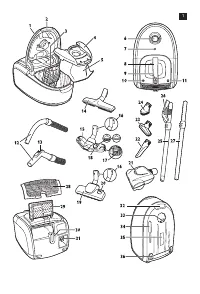
- 87 Перед первым использованием; Извлеките прибор и аксессуары из коробки.; Подготовка прибора к работе
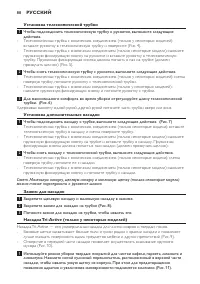
- 88 установка телескопической трубки; повернув трубку, потяните рукоятку с телескопической трубки.; установка дополнительных насадок; телескопическую трубку в насадку и слегка поверните трубку.; Зажим для насадок; Закрепите щелевую насадку и маленькую насадку в зажиме.
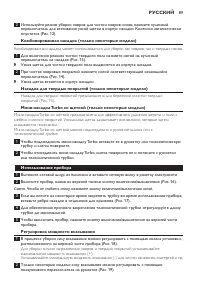
- 89 комбинированная насадка (только некоторые модели); Узкая щетка втянется в корпус насадки.; насадка для твердых покрытий (только некоторые модели); всасываются пылесосом.; использование прибора; трубки до минимальной.; регулировка мощности всасывания
- 90 Хранение; минимальную длину трубки.; Замена/очистка мешка для пыли; инструкциям в разделе “Замена одноразового мешка для пыли”.
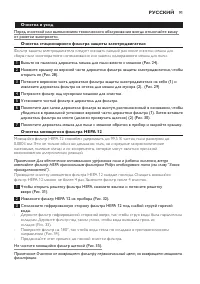
- 91 Очистка и уход; от розетки электросети.; Очистка стационарного фильтра защиты электродвигателя; Потрясите фильтр над мусорным мешком для очистки.; Очистка моющегося фильтра HePa 12; возникновения аллергических реакций.
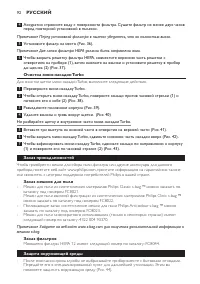
- 92 Очистка мини-насадки turbo; Не разбирайте щетку и внутренние части мини-насадки Turbo.; Заказ принадлежностей
- 93 гарантия и обслуживание; торговую организацию Philips.; Поиск и устранение неисправностей; Мощность всасывания недостаточна.


