Пылесос Electrolux ZP 3520 - инструкция пользователя по применению, эксплуатации и установке на русском языке. Мы надеемся, она поможет вам решить возникшие у вас вопросы при эксплуатации техники.
Если остались вопросы, задайте их в комментариях после инструкции.
"Загружаем инструкцию", означает, что нужно подождать пока файл загрузится и можно будет его читать онлайн. Некоторые инструкции очень большие и время их появления зависит от вашей скорости интернета.


3
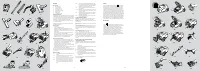
Replacing the motor ilter
Should be done with every 5th replacement of the dust bag,
s-bag ®
1.
Open the lid.
2.
Remove the old ilter (24.).
3.
Insert a new ilter and close the lid.
Replacement of the micro ilter and the non-washable
HEPA ilter *
The ilter must always be replaced with new ones and cannot
be washed. Should be done with every 5th replacement of the
dust bag, s-bag ®
1.
Open and remove the lid (25. ; 26.).
2.
Remove the ilter and replace it with a new one as
shown in the picture (27. ; 29.).
Important: snap on the lower part of the ilter frame rst
then after the upper one. Make sure the sealing is in place.
Cleaning the washable HEPA ilter*
Should be done with every 5th replacement of the dust bag,
s-bag®
1.
Open and remove the lid, then remove the ilter (25. ;
26.).
2.
Rinse the inside (dirty side) of the ilter in warm tap
water. (28.) Tap the ilter frame to remove excess water.
Repeat four times and allow the ilter to dry.
Note: Do not use cleaning agents and avoid touching the
delicate ilter surface.
3
Replace the ilter and lid as shown (27. ; 29.).
Important: snap on the lower part of the ilter frame rst
then after the upper one. Make sure the sealing is in place.
Cleaning the hose and nozzle
The vacuum cleaner stops automatically if the nozzle, tube,
hose or ilters and s-bag® becomes blocked. In such cases,
disconnect from wall socket and allow to cool for 20-30
minutes. Clear blockage and/or replace ilters and s-bag®
and restart.
Cleaning tubes and hose
(30.) Use a cleaning strip or similar to clear the tubes and
hose.
(31.) It may also be possible to remove the obstruction in
the hose by squeezing it. However, be careful in case
the obstruction is caused by glass or needles caught
inside the hose.
Note: The warranty does not cover any damage to the hose
caused by cleaning it.
Cleaning the loor nozzle
(32.) To avoid deterioration of suction power, frequently
clean the carpet/hard loor nozzle. The easiest way to
clean it is by using the hose handle.
Cleaning the turbo nozzle
(certain models only)
(33.) Disconnect the nozzle from the vacuum cleaner tube
and remove entangled threads, etc. by snipping them
away with scissors. Use the hose handle to clean the
nozzle.
(34.) In case the turbo nozzle stops working, open the
cleaning lid and remove any objects that obstructs the
turbine to rotate freely.
Troubleshooting
The vacuum cleaner does not start
1
Check that the cable is connected to the mains.
2
Check that the plug and cable are not damaged.
3
Check for a blown fuse.
The vacuum cleaner stops
1
Check whether the dust bag, s-bag® is full. If so, replace
it with a new one.
2
Is the nozzle, tube or hose blocked?
3
Are the ilters blocked?
Water has entered the vacuum cleaner
It will be necessary to replace the motor at an authorised
Electrolux service centre. Damage to the motor caused by
the penetration of water is not covered by the warranty.
Consumer information
Electrolux decline all responsibility for all damages arising
from any improper use of the appliance or in cases of tam-
pering with the appliance.
This product is designed with the environment in mind. All
plastic parts are marked for recycling purposes. For details
see our web site: www.electrolux.com
Dustbags and accessories!
If you are experiencing diiculties in inding the right
dustbag, ilter or accessories to your new vacummcleaner
- please call our callcentre (you will ind the number in the
warranty folder) or visit our webshop at www.electrolux.
co.uk
* Certain models only


