Пилы дисковые Makita M5802 - инструкция пользователя по применению, эксплуатации и установке на русском языке. Мы надеемся, она поможет вам решить возникшие у вас вопросы при эксплуатации техники.
Если остались вопросы, задайте их в комментариях после инструкции.
"Загружаем инструкцию", означает, что нужно подождать пока файл загрузится и можно будет его читать онлайн. Некоторые инструкции очень большие и время их появления зависит от вашей скорости интернета.


8 ENGLISH
CAUTION:
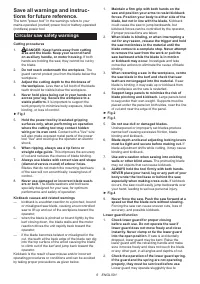
Switch can be locked in "ON" posi-
tion for ease of operator comfort during extended
use. Apply caution when locking tool in "ON"
position and maintain firm grasp on tool.
For tool with lock-off button
To prevent the switch trigger from being accidentally
pulled, a lock-off button is provided. To start the tool,
press the lock-off button and pull the switch trigger.
Release the switch trigger to stop.
WARNING:
NEVER defeat the lock-off button
by taping down or some other means.
A switch with
a negated lock-off button may result in unintentional
operation and serious personal injury.
WARNING:
NEVER use the tool if it runs when
you simply pull the switch trigger without press-
ing the lock-off button.
A switch in need of repair
may result in unintentional operation and serious
personal injury. Return tool to a Makita service center
for proper repairs BEFORE further usage.
NOTICE:
Do not pull the switch trigger hard
without pressing in the lock-off button.
This can
cause switch breakage.
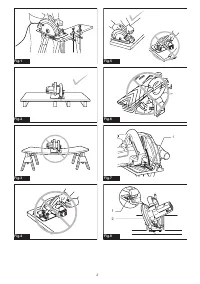
ASSEMBLY
CAUTION:
Always be sure that the tool is
switched off and unplugged before carrying out
any work on the tool.
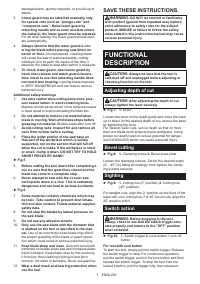
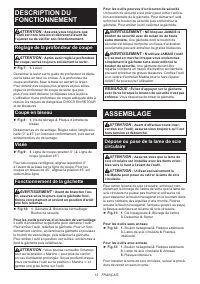
Removing or installing circular saw
blade
CAUTION:
Be sure the circular saw blade is
installed with teeth pointing up at the front of the
tool.
CAUTION:
Use only the Makita wrench to
install or remove the circular saw blade.
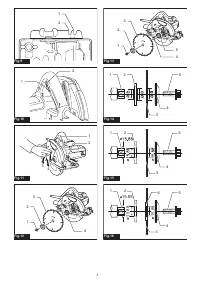
To remove the circular saw blade, press the shaft lock
fully so that the circular saw blade cannot revolve and
use the wrench to loosen the hex bolt counterclockwise.
Then remove the hex bolt, ring (country specific), outer
flange and circular saw blade.
►
Fig.11:
1.
Hex wrench
2.
Shaft lock
3.
Loosen
4.
Tighten
For tool without the ring
►
Fig.12:
1.
Hex bolt
2.
Outer flange
3.
Circular saw
blade
4.
Inner flange
For tool with the ring
►
Fig.13:
1.
Hex bolt
2.
Outer flange
3.
Circular saw
blade
4.
Ring
5.
Inner flange
To install the circular saw blade, follow the removal
procedure in reverse.
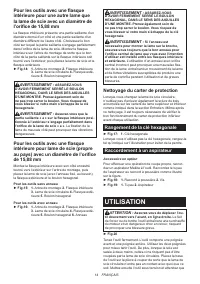
For tool with the inner flange for
other than 15.88 mm hole-diameter
saw blade
The inner flange has a certain diameter protrusion on
one side of it and a different diameter protrusion on the
other side. Choose a correct side on which protrusion
fits into the saw blade hole perfectly. Mount the inner
flange onto the mounting shaft so that the correct side
of protrusion on the inner flange faces outward and then
place saw blade and outer flange.
►
Fig.14:
1.
Mounting shaft
2.
Inner flange
3.
Circular
saw blade
4.
Outer flange
5.
Hex bolt
WARNING:
BE SURE TO TIGHTEN THE HEX
BOLT CLOCKWISE SECURELY. Also be careful
not to tighten the bolt forcibly. Slipping your hand
from the hex wrench can cause a personal injury.
WARNING:
Make sure that the protrusion "a"
on the inner flange that is positioned outside fits
into the saw blade hole "a" perfectly.
Mounting the
blade on the wrong side can result in the dangerous
vibration.
For tool with the inner flange for a
15.88 mm hole-diameter saw blade
(country specific)
Mount the inner flange with its recessed side facing
outward onto the mounting shaft and then place saw
blade (with the ring attached if needed), outer flange
and hex bolt.
For tool without the ring
►
Fig.15:
1.
Mounting shaft
2.
Inner flange
3.
Circular
saw blade
4.
Outer flange
5.
Hex bolt
For tool with the ring
►
Fig.16:
1.
Mounting shaft
2.
Inner flange
3.
Circular
saw blade
4.
Outer flange
5.
Hex bolt
6.
Ring
WARNING:
BE SURE TO TIGHTEN THE HEX
BOLT CLOCKWISE SECURELY. Also be careful
not to tighten the bolt forcibly. Slipping your hand
from the hex wrench can cause a personal injury.
WARNING:
If the ring is needed to mount the
blade onto the spindle, always be sure that the
correct ring for the blade's arbor hole you intend
to use is installed between the inner and the outer
flanges.
Use of the incorrect arbor hole ring may
result in the improper mounting of the blade causing
blade movement and severe vibration resulting in
possible loss of control during operation and in seri
-
ous personal injury.
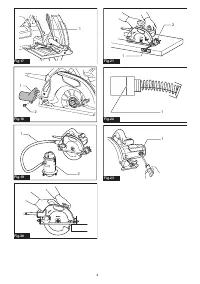
Blade guard cleaning
When changing the circular saw blade, make sure to
also clean the upper and lower blade guards of accu
-
mulated sawdust as discussed in the Maintenance
section. Such efforts do not replace the need to check
lower guard operation before each use.
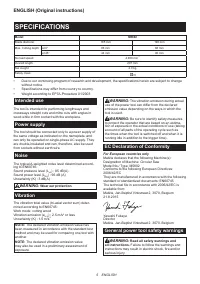
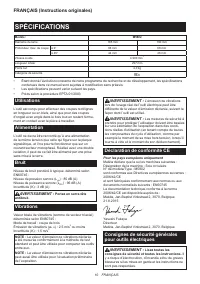
Характеристики

Остались вопросы?Не нашли свой ответ в руководстве или возникли другие проблемы? Задайте свой вопрос в форме ниже с подробным описанием вашей ситуации, чтобы другие люди и специалисты смогли дать на него ответ. Если вы знаете как решить проблему другого человека, пожалуйста, подскажите ему :)


