
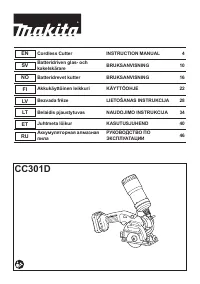
Пилы дисковые Makita CC301DWAE - инструкция пользователя по применению, эксплуатации и установке на русском языке. Мы надеемся, она поможет вам решить возникшие у вас вопросы при эксплуатации техники.
Если остались вопросы, задайте их в комментариях после инструкции.
"Загружаем инструкцию", означает, что нужно подождать пока файл загрузится и можно будет его читать онлайн. Некоторые инструкции очень большие и время их появления зависит от вашей скорости интернета.


8 ENGLISH
ASSEMBLY
CAUTION:
Always be sure that the tool is
switched off and the battery cartridge is removed
before carrying out any work on the tool.
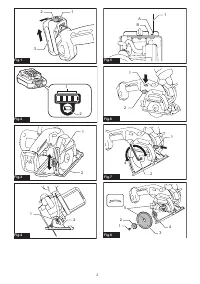
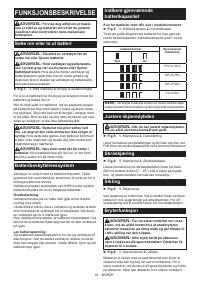
Installing or removing diamond
wheel
CAUTION:
Use only the Makita wrench to
install or remove the diamond wheel.
CAUTION:
When installing the diamond
wheel, be sure to tighten the bolt securely.
CAUTION:
Always install the diamond wheel
so that the arrow on the diamond wheel points in
the same direction as the arrow on the diamond
wheel case.
Otherwise the wheel rotates in reverse,
it may cause personal injury.
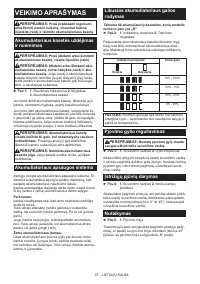
►
Fig.7:
1.
Shaft lock
2.
Hex wrench
3.
Tighten
4.
Loosen
►
Fig.8:
1.
Hex bolt
2.
Outer flange
3.
Diamond wheel
4.
Inner flange
5.
Arrow
To remove the diamond wheel, press the shaft lock fully
so that the diamond wheel cannot revolve and use the
hex wrench to loosen the hex bolt counterclockwise. Then
remove the hex bolt, outer flange and diamond wheel.
To install the diamond wheel, follow the removal pro-
cedure in reverse. Make sure the diamond wheel is
installed so that the arrow on the wheel points in the
same direction as the arrow on the diamond wheel
case.
BE SURE TO TIGHTEN THE HEX BOLT SECURELY.
►
Fig.9:
1.
Hex bolt
2.
Outer flange
3.
Diamond wheel
4.
Inner flange
5.
Protrusion (bigger side)
NOTE:
If an inner flange is removed by chance,
install the inner flange so that its protrusion (bigger
side) faces inside as shown in the figure.
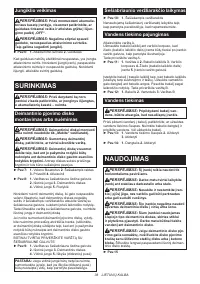
Hex wrench storage
►
Fig.10:
1.
Hex wrench
When not in use, store the hex wrench as shown in the
figure to keep it from being lost.
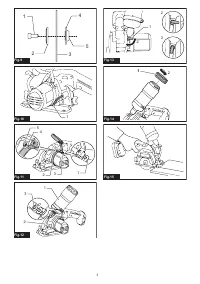
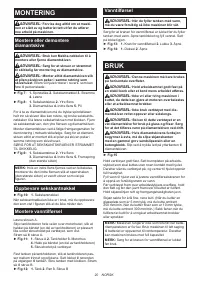
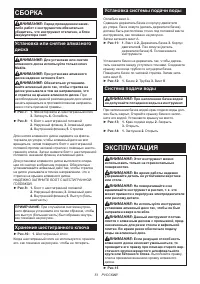
Installing water supply
Loosen the screw A.
Slide the tank holder all the way over the motor housing
so that the notch of the band (part of the tank holder)
is positioned just below the screw head of the tool as
illustrated.
Then tighten the screw A.
►
Fig.11:
1.
Screw A
2.
Tank holder
3.
Motor housing
4.
Notch of the band (part of the tank holder)
5.
Screw head of the tool
Attach the tank on the tank holder so that the tank
holder fits between the step and dots. Connect the cap
on the tube end to the mouth of the tank. Turn the tank
clockwise. Then tighten the screw B.
►
Fig.12:
1.
Tank
2.
Tube
3.
Screw B
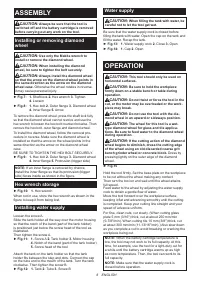
Water supply
CAUTION:
When filling the tank with water, be
careful not to let the tool get wet.
Be sure that the water supply cock is closed before
filling the tank with water. Open the cap on the tank and
fill the water. Recap the tank.
►
Fig.13:
1.
Water supply cock
2.
Close
3.
Open
►
Fig.14:
1.
Cap
2.
Open
OPERATION
CAUTION:
This tool should only be used on
horizontal surfaces.
CAUTION:
Be sure to hold the workpiece
firmly down on a stable bench or table during
operation.
CAUTION:
Do not twist or force the tool in the
cut, or the motor may be overloaded or the work-
piece may break.
CAUTION:
Do not use the tool with the dia-
mond wheel in an upward or sideways position.
CAUTION:
The wheel for this tool is a wet-
type diamond wheel for glass and tile applica-
tions. Be sure to feed water to the diamond wheel
during operation.
CAUTION:
If the cutting action of the diamond
wheel begins to diminish, dress the cutting edge
of the wheel using an old discarded coarse grit
bench grinder wheel or concrete block.
Dress by
pressing lightly on the outer edge of the diamond
wheel.
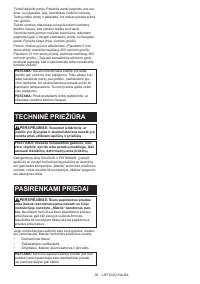
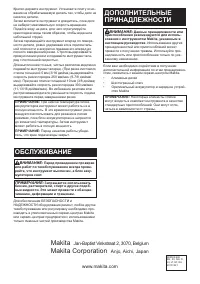
►
Fig.15
Hold the tool firmly. Set the base plate on the workpiece
to be cut without the wheel making any contact.
Then turn the tool on and wait until the wheel attains
full speed.
Feed water to the wheel by adjusting the water supply
cock to obtain a gentle flow of water.
Move the tool forward over the workpiece surface,
keeping it flat and advancing smoothly until the cutting
is completed. Keep your cutting line straight and your
speed of advance uniform.
For fine, clean cuts, cut slowly. (When cutting glass
plate 5 mm (3/16") thick, cut at about 250 mm/min
(9-7/8"/min). When cutting tile 10 mm (3/8") thick, cut
at about 300 mm/min (11-13/16"/min).) Also slow down
as you complete a cut to avoid breaking or cracking the
workpiece being cut.
NOTE:
When the battery cartridge temperature is
low, the tool may not work to its full capacity. At this
time, for example, use the tool for a light-duty cut for
a while until the battery cartridge warms up as high
as room temperature. Then, the tool can work to its
full capacity.
NOTE:
Make sure that the water supply cock is
closed before operation.
Характеристики

Остались вопросы?Не нашли свой ответ в руководстве или возникли другие проблемы? Задайте свой вопрос в форме ниже с подробным описанием вашей ситуации, чтобы другие люди и специалисты смогли дать на него ответ. Если вы знаете как решить проблему другого человека, пожалуйста, подскажите ему :)


