Пилы дисковые Bosch GKS 10,8 V-LI - инструкция пользователя по применению, эксплуатации и установке на русском языке. Мы надеемся, она поможет вам решить возникшие у вас вопросы при эксплуатации техники.
Если остались вопросы, задайте их в комментариях после инструкции.
"Загружаем инструкцию", означает, что нужно подождать пока файл загрузится и можно будет его читать онлайн. Некоторые инструкции очень большие и время их появления зависит от вашей скорости интернета.


18
| English
1 609 92A 2CZ | (14.7.16)
Bosch Power Tools
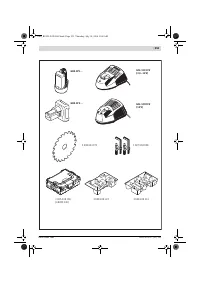
Selecting a Saw Blade
An overview of recommended saw blades can be found at the
end of this manual.
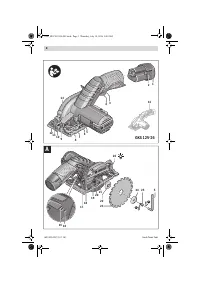
Removal of the Saw Blade (see figure A)
For changing the cutting tool, it is best to place the machine
on the face side of the motor housing.
– Press the spindle lock button
6
and keep it pressed.
The spindle lock button 6 may be actuated only when
the saw spindle is at a standstill.
Otherwise, the power
tool can be damaged.
– With the hex key
5
, unscrew the clamping bolt
25
turning
in rotation direction
.
– Tilt back the retracting blade guard
21
and hold firmly.
– Remove the clamping flange
24
and the saw blade
23
from
the saw spindle
20
.
Mounting the Saw Blade (see figure A)
For changing the cutting tool, it is best to place the machine
on the face side of the motor housing.
– Clean the saw blade
23
and all clamping parts to be assem-
bled.
– Tilt back the retracting blade guard
21
and hold firmly.
– Place the saw blade
23
onto the mounting flange
22
. The
cutting direction of the teeth (direction of arrow on the saw
blade) and the direction-of-rotation arrow on the retract-
ing blade guard
21
must correspond.
– Mount the clamping flange
24
and screw in the clamping
bolt
25
turning in rotation direction
. Observe correct
mounting position of mounting flange
22
and clamping
flange
24
.
– Press the spindle lock button
6
and keep it pressed.
– With the hex key
5
, tighten the clamping bolt
25
turning in
rotation direction
. The tightening torque is between
6 – 9 Nm, which corresponds to hand tight plus ¼ turn.
Dust/Chip Extraction
Before any work on the power tool, remove the battery.
Dust from materials such as lead-containing coatings,
some wood types, minerals and metal can be harmful to
one’s health. Touching or breathing-in the dust can cause
allergic reactions and/or lead to respiratory infections of
the user or bystanders.
Certain dust, such as oak or beech dust, is considered car-
cinogenic, especially in connection with wood-treatment
additives (chromate, wood preservative). Materials con-
taining asbestos may only be worked by specialists.
– To achieve a high level of dust extraction, use a suitable
dust extractor together with this power tool.
– Provide for good ventilation of the working place.
– It is recommended to wear a P2 filter-class respirator.
Observe the relevant regulations in your country for the
materials to be worked.
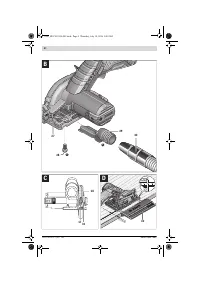
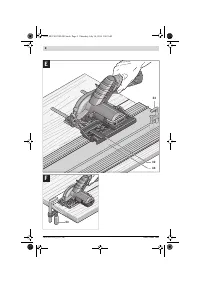
Mounting the Extraction Adapter (see figure B)
Fasten the extraction adapter
29
to the base plate
7
with the
fastening screw
28
.
A vacuum hose with a diameter of 19 mm can be connected to
the extraction adapter
29
.
The extraction adapter may not be mounted when no
external dust extraction is connected.
Otherwise the ex-
traction channel can become clogged.
Do not connect a dust bag to the extraction adapter.
Otherwise the extraction system can become clogged.
To ensure optimum extraction, the extraction adapter
29
must be cleaned regularly.
External Dust Extraction
Connect the vacuum hose
30
to a vacuum cleaner (accesso-
ry). An overview for connecting to various vacuum cleaners
can be found at the end of this manual.
The vacuum cleaner must be suitable for the material being
worked.
When vacuuming dry dust that is especially detrimental to
health or carcinogenic, use a special vacuum cleaner.
Operation
Operating Modes
Before any work on the power tool, remove the battery.
Adjusting the Cutting Depth (see figure C)
Adjust the cutting depth to the thickness of the work-
piece.
Less than a full tooth of the blade teeth should be
visible below the workpiece.
Loosen wing bolt
17
. For a smaller cutting depth, pull the ma-
chine from the base plate
7
; for a larger cutting depth, push
the machine toward the base plate
7
. Adjust the desired cut-
ting depth at the cutting-depth scale
18
. Tighten wing bolt
17
again.
When setting the cutting depth, use the reference mark
31
to
the side of the cutting-depth scale
18
.
Adjusting the Cutting Angle
It is best to place the machine on the face side of the blade
guard
13
.
Loosen wing bolt
10
. Tilt the saw sidewards. Adjust the de-
sired setting at the scale
9
. Tighten wing bolt
10
again.
When setting the mitre angle, use the reference mark
27
(up-
per edge of the holder).
Note:
For bevel cuts, the cutting depth is smaller than the set-
ting indicated on the cutting-depth scale
18
.
Cutting Marks
The 0 ° cutting mark
12
indicates the position of the saw blade
for right-angled cuts. The 45 ° cutting mark
11
indicates the
position of the saw blade for 45 ° cuts.
Starting Operation
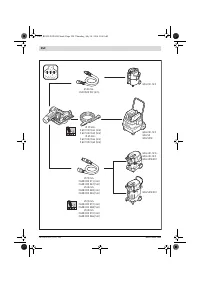
Inserting the battery
Use only original Bosch lithium-ion batteries with the
voltage listed on the nameplate of your power tool.
Using other batteries can lead to injuries and pose a fire
hazard.
Insert the charged battery
1
from the front into the base of the
power tool. Push the battery completely into the base until
the red stripe can no longer be seen and the battery is secure-
ly locked.
OBJ_BUCH-2920-001.book Page 18 Thursday, July 14, 2016 8:44 AM
Содержание
- 135 Указания по безопасности
- 138 Описание продукта и услуг; Применение по назначению
- 139 Данные по шуму и вибрации; Сборка; Зарядка аккумулятора; Установка/смена пильного диска
- 140 Отсос пыли и стружки; Работа с инструментом; Режимы работы
- 141 Включение электроинструмента
- 142 Техобслуживание и сервис; Техобслуживание и очистка
- 143 Транспортировка; Українська; Вказівки з техніки безпеки; Загальні застереження для електроприладів
Характеристики

Остались вопросы?Не нашли свой ответ в руководстве или возникли другие проблемы? Задайте свой вопрос в форме ниже с подробным описанием вашей ситуации, чтобы другие люди и специалисты смогли дать на него ответ. Если вы знаете как решить проблему другого человека, пожалуйста, подскажите ему :)


