
Обогреватели Timberk T-IR2000-A12SI - инструкция пользователя по применению, эксплуатации и установке на русском языке. Мы надеемся, она поможет вам решить возникшие у вас вопросы при эксплуатации техники.
Если остались вопросы, задайте их в комментариях после инструкции.
"Загружаем инструкцию", означает, что нужно подождать пока файл загрузится и можно будет его читать онлайн. Некоторые инструкции очень большие и время их появления зависит от вашей скорости интернета.


IM2022
15
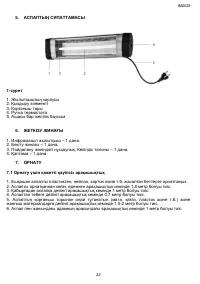
NOTE:
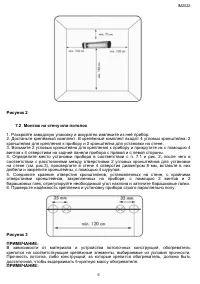
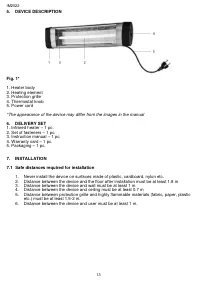
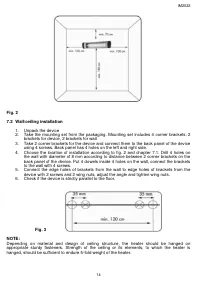
This device can be installed on a portable tripod stand (not included). Mounting the device on a
rack depends on the portable rack mounting kit. Familiarize yourself with the design of the
device and the mounting brackets of the portable stand you wish to purchase.
8. CONNECTION TO ELECTRIC MAINS
1. The heater is designed for connection to the single-phase 220V~, 50 Hz electric mains
equipped with a grounding loop.
2. Before connection, make sure that specifications of the electric mains meet the parameters
indicated on the appliance nameplate.
3. Connect the heater to electric mains using the power cord with plug
4. Electrical outlet must be properly grounded. The outlet must be rated at least 10 A for models
with a maximum power of up to 2000 W, and at least 16 A for models with a maximum power of
2500 W and 3000 W. The electrical socket and plug must always be kept dry to prevent leakage
of electric current. Regularly check that the electrical plug is firmly connected to the outlet.
Check in the following order: insert the electrical plug into the socket. After half an hour of
operation, turn off the device and remove the plug from the socket, check with your hand if the
plug has warmed up. If the plug has become hotter than 50°C, replace the outlet with another
one to avoid damage, accidents, or fire due to poor electrical contact. This should be done by a
specialist.
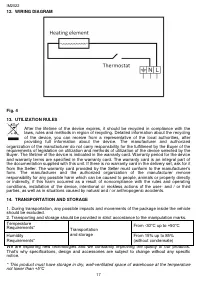
9. OPERATION OF THE DEVICE
1. Connect the power plug to the outlet
2. Turn the thermostat knob clockwise to the end, heating element of the device will heat
up and start heating.
3. After room temperature reaches the desired level, turn thermostat knob
counterclockwise, the device will turn off the heating element.
4. To turn of the device turn the thermostat know counterclockwise and unplug the device
5. In order to exclude the burnt smell keep the device clean, do not allow it to become
dusty
WARNING!
Slight crackles may be heard during operation at the moment of heating or cooling down, is not a
malfunction.
NOTE:
Change of color on the side of the device directed to ceiling is not a defect. Change of color of
the radiating parts is also not a defect.
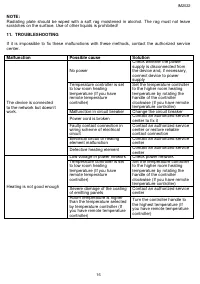
10. MAINTANANCE
WARNING:
See “Safeguards”
1. Before carrying out maintenance work on cleaning the device, turn off the device,
disconnect it from the mains and let the device cool down.
2. If body of the device is dirty, wipe the dust with a damp cloth
3. Wipe the device with a soft, slightly damp cloth/cloth. The fabric must not leave fluff on
the surface of the appliance.
4. It is not recommended to use detergents, including products with abrasive compositions
5. In the process of cleaning, please do not damage the surface of the heater with sharp
objects (hard sponge, sandpaper, etc.). Scratches on a painted surface can lead to rust
formation.
6. 7. Turn on and use the device again on
ly after completing all the “Safeguards”; also
make sure that the surface of the appliance is completely dry.


