Настольные часы VITEK VT-3520 BK - инструкция пользователя по применению, эксплуатации и установке на русском языке. Мы надеемся, она поможет вам решить возникшие у вас вопросы при эксплуатации техники.
Если остались вопросы, задайте их в комментариях после инструкции.
"Загружаем инструкцию", означает, что нужно подождать пока файл загрузится и можно будет его читать онлайн. Некоторые инструкции очень большие и время их появления зависит от вашей скорости интернета.


ENGLISH
7
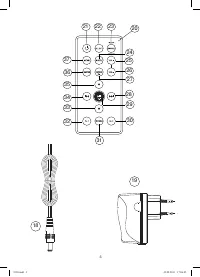
2. Press the “SNOOZE/SLEEP” (10) button. The “90SLP” symbols will start flashing on the display
that means that the clock radio will automatically switch off in 90 minutes.
3. Set the required time of automatic switching off (with step in10 minutes) by pressing the (10)
“SNOOZE/SLEEP” button again. After the unit returns to the current operation mode, the “SLP”
symbols will appear on the display.
4. To switch off the timer, press the “SNOOZE/SLEEP” (10) button again until “OFF” appears on the
display (13) or switch off the unit pressing the on/off button (1).
Volume control
Use the “VOL+” (11) and “VOL” (12) buttons to set the desired volume level.
“AUX IN” jack (16)
You can listen to sound from an external device via the speakers of the clock radio.
To connect an external device use the “AUX IN” jack (16).
1. Connect the external device to the jack using a special audio cable 3,5 Jack-Jack (not supplied).
2. Connect the unit to the mains and press the on/off button (1).
3. Consequently pressing the (6) “FUNCTION” button select the operating mode “AUX”, the corre-
sponding symbol will appear on the display of the unit.
Radio stations receipt
1. Connect the unit to the mains and press the on/off button (1).
2. Consequently pressing the (6) “FUNCTION” button select the “RADIO” mode.
3. Use the (7) and the (9) buttons to tune to the desired radio station.
Manual setting:
consequently press the (7) and (9) buttons to select the desired radio station with
step 0,05 MHz in FM mode.
Automatic search:
hold the (7) and (9) buttons pressed for more than 1 second. The tuner will start
scanning and will automatically stop scanning when the nearest strong signal from the radio station
is found.
1. To cancel the radio mode press the (6) “FUNCTION” button, by selecting another operation mode,
or switch off the unit pressing the on/off button. (1).
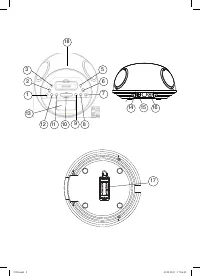
Antenna (14)
Select the position of the antenna (14), which suits for qualitative receipt.
Programming of radio stations
You can tune and store settings for 20 radio stations in the FM band.
1. Tune to the radio station which you want to program.
2. Press and hold the (2) “SET.MEM” button until the flashing symbol of the radio station appears.
3. Consequently pressing the (7) and (9) buttons to select the radio station number, under which you
want to store the radio station.
4. Press the (2) “SET.MEM” button once again to store the settings, which you have made.
5. Repeat points 1–4 for all radio stations, which frequencies you want to store in memory.
6. To select the preliminary programmed radio stations in the radio mode consequently press the
“
/M+” (8) button on the body of the unit or the “
/M+” (29) and “REPEAT M-“(27) on the
remote control panel (20).
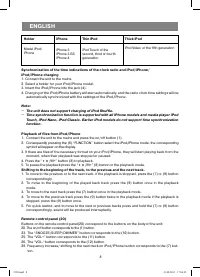
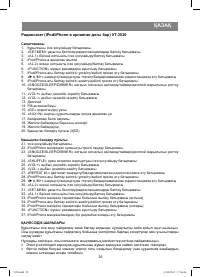
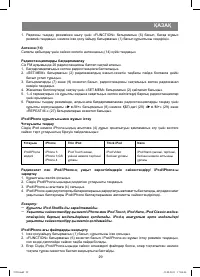
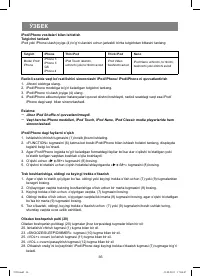
Operating with iPod/iPhone Holder selection
To ensure proper installation of your iPod or iPhone in the jack (4), use one of the four holders ac-
cording to the table:
3520.indd 7
3520.indd 7
23.08.2011 17:06:45
23.08.2011 17:06:45
Содержание
- 12 Не разрешайте детям использовать прибор в качестве игрушки.; Подключение питания; та питания «ААА» (элементы питания не входят в комплект поставки).
- 13 устанавливайте элементы питания, соблюдая полярность; Включение/выключение будильников
- 14 Повтор сигнала будильника; Через 9 минут сигнал будильника повторится.; Таймер; означает автоматическое отключение радиочасов через 90 минут.; Регулировка уровня громкости; на дисплее устройства появится соответствующий символ.; Прием радиостанций
- 15 Программирование радиостанций; хотите сохранить радиостанцию.; Держатель; Устройство не под держивает зарядку iPod Shuffle.; Воспроизведение файлов с iPod/iPhone; при этом на дисплее появятся соответствующий символ.
- 16 Переход к началу трека, предыдущему и следующему треку.; радиостанции «; Навигация в меню iPod/iPhone
- 17 Регулирование громкости; Перед чисткой отключите устройство от сети.; ХРАНЕНИЕ; Срок службы прибора – 3 года
- 39 RUS


