Мясорубки VITEK VT-3607 ST - инструкция пользователя по применению, эксплуатации и установке на русском языке. Мы надеемся, она поможет вам решить возникшие у вас вопросы при эксплуатации техники.
Если остались вопросы, задайте их в комментариях после инструкции.
"Загружаем инструкцию", означает, что нужно подождать пока файл загрузится и можно будет его читать онлайн. Некоторые инструкции очень большие и время их появления зависит от вашей скорости интернета.


6
ENGLISH
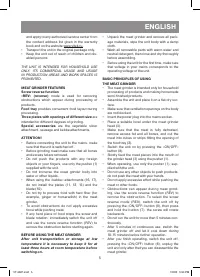
MEAT PROCESSING
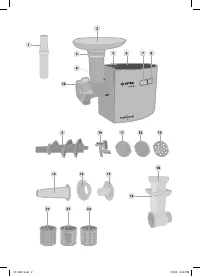
1.
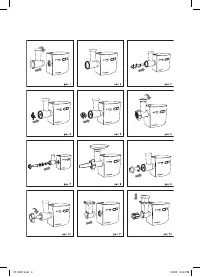
Install the meat grinder head (3) into the setting
place (4) and turn it counterclockwise until it is
fixed (pic. 1, 2).
2.
Install the screw (9) into the meat grinder head
body (3) (pic. 3).
3.
Install the crossed blade (10) (pic. 4).
4.
Select one of the plates (11, 12 or 13) and set it
over the blade, matching the ledges on the plate
with the grooves on the meat grinder head body
(3), tighten the nut (14) (pic. 5, 6).
Attention!
•
Face the blade cutting side to the plate. If the
blade is installed improperly, it will not grind the
food products.
•
Coarser (11, 12) plates suit for processing
raw meat, vegetables, dried fruit, cheese,
fish, etc.
•
Fine cutting plate (13) is for processing raw
and cooked meat, fish, etc.
5.
Place the food tray (2) on the meat grinder head
body (3).
6.
Insert the power plug into the mains socket.
7.
Switch the unit on by pressing the «ON/OFF»
button (8).
8.
During the operation use only the pusher (1).
Notes:
–
For better meat processing, cut it in cubes or
stripes. Defrost frozen meat thoroughly.
–
During the operation use only the pusher sup-
plied with the unit; do not use any other objects,
never push the meat with your fingers.
9.
After you finish operating, switch the meat
grinder off, pressing the «ON/OFF» button (8),
and unplug the unit; only after that you can dis-
assemble it.
10.
To remove the meat grinder head, press the lock
button (5), turn the meat grinder head (3) clock-
wise and remove it.
11.
To disassemble the meat grinder head, unscrew
the nut (14) and take out the installed plate (11,
12 or 13), the blade (10) and the screw (9) from
the meat grinder head body.
AUTO SWITCH-OFF FUNCTION
The meat grinder is equipped with an auto switch-
off function in case of motor unit overheating.
•
In case of overheating of the motor unit, the
automatic thermal switch will be on, and the
meat grinder will be switched off.
•
In this case unplug the unit immediately.
•
Let the meat grinder cool down for approximately
50-60 minutes before switching it on again.
•
Plug the meat grinder into the mains, switch it
on, if the meat grinder can not be switched on,
this may mean that it is otherwise damaged. In
this case contact the authorized service center
for meat grinder repair.
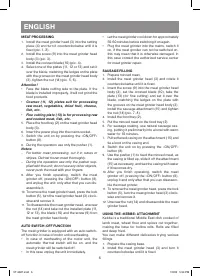
SAUSAGE FILLING
1.
Prepare minced meat.
2.
Install the meat grinder head (3) and rotate it
counterclockwise until it is fixed.
3.
Insert the screw (9) into the meat grinder head
body (3), set the crossed blade (10), take the
plate (13) (for fine cutting) and set it over the
blade, matching the ledges on the plate with
the grooves on the meat grinder head body (3),
install the sausage attachment (15) and tighten
the nut (14) (pic. 7, 8).
4.
Install the food tray (2).
5.
Put the minced meat on the food tray (2).
6.
For sausage making, use natural sausage cas-
ing, putting it preliminarily into a bowl with warm
water for 10 minutes.
7.
Pull softened casing on the attachment (15) and
tie a knot on the casing end.
8.
Switch the unit on by pressing the «ON/OFF»
button (8).
9.
Use the pusher (1) to feed the minced meat, as
the casing is filled up, slide it off the attachment
(15) as necessary, and wet the casing with water
if it becomes dry.
10.
After you finish operating, switch the meat
grinder off, pressing the «ON/OFF» button (8),
unplug it and only after that you can disassem-
ble the meat grinder.
11.
To remove the meat grinder head, press the lock
button (5), turn the meat grinder head (3) clock-
wise and remove it.
12.
Unscrew the nut (14) and disassemble the meat
grinder head.
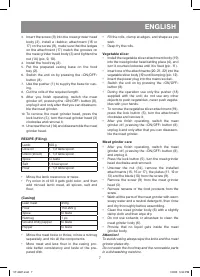
USING THE «KEBBE» ATTACHMENT
Kebbe is a traditional Middle East dish cooked of
lamb meat, wheat flour and spices cut together,
making the base for hollow rolls. Rolls are filled
and deep fried.
You can make different delicacies trying various
fillings.
1.
Prepare the casing base.
2.
Install the meat grinder head (3) and turn it
counterclockwise until it is fixed.
VT-3607.indd 6
7/2/20 5:34 PM
Характеристики

Остались вопросы?Не нашли свой ответ в руководстве или возникли другие проблемы? Задайте свой вопрос в форме ниже с подробным описанием вашей ситуации, чтобы другие люди и специалисты смогли дать на него ответ. Если вы знаете как решить проблему другого человека, пожалуйста, подскажите ему :)


