Мясорубки Saturn ST-FP7098 - инструкция пользователя по применению, эксплуатации и установке на русском языке. Мы надеемся, она поможет вам решить возникшие у вас вопросы при эксплуатации техники.
Если остались вопросы, задайте их в комментариях после инструкции.
"Загружаем инструкцию", означает, что нужно подождать пока файл загрузится и можно будет его читать онлайн. Некоторые инструкции очень большие и время их появления зависит от вашей скорости интернета.


4
the end. Please pick them out and throw
away, do not eat them.
♦
To avoid jamming, do not force to
operate the unit with excessive pres-
sure.
♦
When the circuit breaker activates, do
not switch on.
♦
Never try to replace the parts and
repair the unit by yourself.
♦
This appliance is not intended for use
by persons (including children) with
reduced physical, sensory or mental
capabilities, or lack of experience and
knowledge, unless they have been given
supervision or instruction concerning
use of the appliance by a person re-
sponsible for their safety. Not recom-
mended for usage by children till the
age of 14.
♦
Children should be supervised to en-
sure that they do not play with the ap-
pliance.
♦
If the supply cord is damaged, it must
be replaced by the manufacturer, its
service agent or similarly qualified per-
son in order to avoid a hazard.
♦
Service life – 2 years
For The First Time
♦
Check that voltage indicated on the
rating label corresponds the mains volt-
age in your home.
♦
Wash all parts (except body) in warm
soapy water.
♦
Before plugging in, ensure the "ON/O/
R" switch is turned to "O" position.
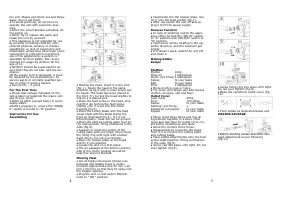
Instruction For Use
Assembling
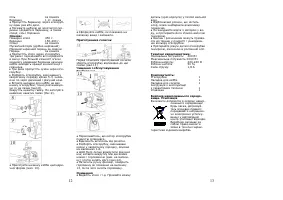
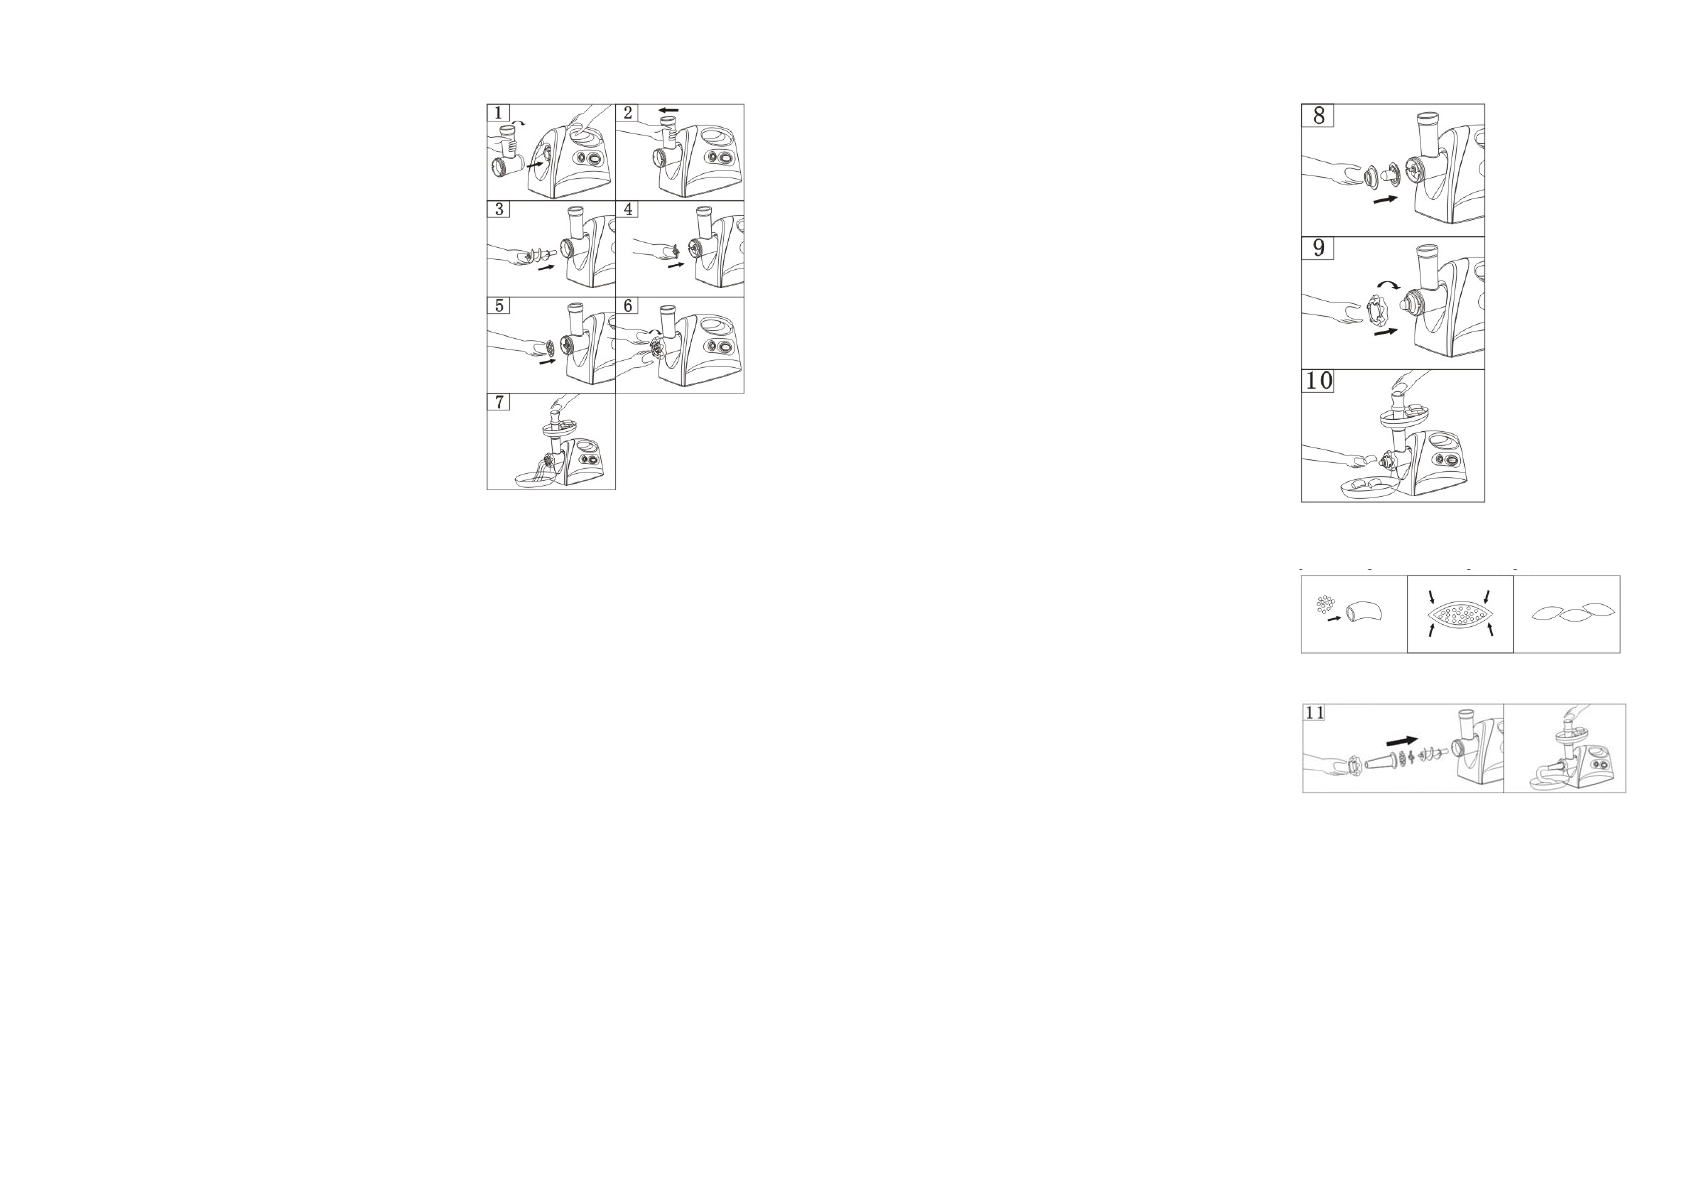
♦
Holding the head, insert it in the inlet
(fig. 1). Route the head in the same
direction as fig.2 until a small sound can
he heard. The head has been placed in
the inlet. Try to rock the head slightly to
ensure ii is placed well.
♦
Place the feed screw in the head, long
end first .by turning the feed screw
slightly until it is set into the motor
housing (fig.3).
♦
Place the culling blade onto the feed
screw shaft with the blade facing the
front as illustrated (fig.4). If ii is not
fitted properly, meat will not be ground.
♦
Place the desired cutting plate next 10
(he culling blade, filling profusions in the
slots (fig.5).
♦
Support or press the center of the
culling plate with one finger (then screw
the fixing ring until tight with another
hand (fig.6). Do not over tighten.
♦
Place the hopper plate on the head
and fix it into position.
♦
Locate the unit on a firm place.
♦
The air passage at the bottom and the
side of the motor housing
should be
kept free and not blocked.
Mincing Meat
♦
Cut all foods into pieces (Sinew-less,
boneless and fatless meat is recom-
mended, approximate size:20 mm x 20
mm x 60 mm) so that they fit easily into
the hopper opening.
♦
Plug the unit on and switch ON/0/R
knob to " ON " position.
5
♦
Feed foods into the hopper plate. Use
for it only the food pusher (fig.7).
♦
After use switch the unit off and un-
plug it from the power supply.
Reverse Function
♦
In case of jamming switch the appli-
ance off by turning the "ON /R" switch
to "R" position and "ON/O/R" switch to
"R" position.
♦
Feed screw will be rotating in the op-
posite direction, and the head will get
empty.
♦
If it doesn't work, switch the unit off
and clean it.
Making Kebbe
Recipe
Stuffing
Mutton
100g
Olive oil
1 tablespoon
Onion (cut finely)1 tablespoon
Spices
to your taste
Salt
to your taste
Flour
1
tablespoon
♦
Mince mutton once or twice.
♦
Fry onion until brown and add minces
mutton, all spice, salt and flour.
Outlet Cover
Lean meat
450g
Flour
150-200g
Spices
to
your
taste
Nutmeg (cut finely)
1
Powdered red pepper
to your taste
Pepper
to
your
taste
♦
Mince meat three times and mix all
ingredients together in a bowl. More
meat and less flour for outlet cover cre-
ate better consistency and taste.
♦
Grind the mixture three times.
♦
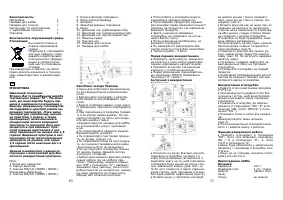
Disassemble by reversing the steps
from 5-3 to remove the cutting plate
and cutting blade.
♦
Place kebbe attachments onto the feed
screw shaft together, fitting protrusions
in the slots (fig.8).
♦
Screw cap into place until tight. Do not
over tighten (fig.9).
♦
Screw fixing ring into place until tight.
Do not over tighten (fig.9).
♦
Make the cylindrical outlet cover (fig.
10).
♦
Form kebbe as illustrated below and
MAKING SAUSAGE
♦
Before starting please assemble sau-
sage attachment as per following
(fig.11)

