
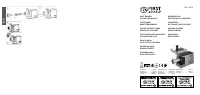
Мясорубки FIRST FA-5140-5 - инструкция пользователя по применению, эксплуатации и установке на русском языке. Мы надеемся, она поможет вам решить возникшие у вас вопросы при эксплуатации техники.
Если остались вопросы, задайте их в комментариях после инструкции.
"Загружаем инструкцию", означает, что нужно подождать пока файл загрузится и можно будет его читать онлайн. Некоторые инструкции очень большие и время их появления зависит от вашей скорости интернета.

2
3
ENGLISH
ENGLISH
MEAT GRINDER
INSTRUCTION MANUAL
Please read carefully and keep the instruction
well
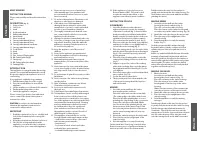
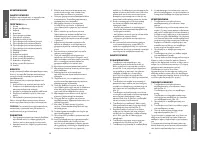
DESCRIPTION
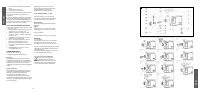
(fig. A)
1. Hopper plate
2. Store box
3. Head
4. Keyboard switch
5. Kubble attachment
6. Hand shank
7. Wave box head
8. Sausage attachment (block)
9. Sausage attachment (fine)
10. Sausage attachment (medium)
11. Sausage attachment (large)
12. Food Pusher
13. Head
14. Snake
15. Fan- sharped Cutting plate
16. Ø8 Cutting plate(large)
17. Fixing ring
18. Ø4 Cutting plate(medium)
19. Cutting blade
INTRODUCTION
This appliance is equipped with a thermostat
system. This system will automatically cut off
the power supply to the appliance in case of
overheating.
If you appliance suddenly stops running:
1. Pull the mains plug out of the socket.
2. Press the switch button to turn off the
appliance.
3. Let the appliance cool down for 60 minutes.
4. Put the mains plug in the socket.
5. Switch the appliance on again.
Please contact your dealer of an authorized
service center if the thermostat system is
activated too often.
CAUTION:
In order to avoid a hazardous
situation, this appliance must never be
connected to a time switch.
IMPORTANT
1. Read these instructions for use carefully and
look at the illustrations before using the
appliance.
2. Keep these instructions for future reference.
3. Check if the voltage indicated on the
appliance corresponds to the local mains
voltage before you connect the appliance.
4. Never use any accessories of parts from
other manufacture.Your guarantee will
become invalid if such accessories or parts
have been used.
5. Do not use the appliance if the mains cord,
the plug or other parts are damaged.
6. If the mains cord of this appliance is
damaged, it muse always be replaced by
manufacture or a service center authorized,
in order to avoid hazardous situations.
7. Thoroughly clean the parts that will come
into contact with food before you use the
appliance for the first time.
8. Unplug the appliance immediately after use.
9. Never use you finger or an objection to push
ingredients down the feed tube while the
appliance is running. Only the pusher is to
be used for this purpose.
10. Keep the appliance out of the reach of
children.
11. Never let the appliance run unattended.
12. Switch the appliance off before detaching
and install any accessory.
13. Wait until moving parts have stopped
running before you remove the parts of the
appliance.
14. Never immerse the motor unit in the water
or any other liquid, nor rinse it under the tap.
Use only a moist cloth to clean the motor
unit.
15. Do not attempt to grind bones, nuts or other
hard items.
16. Never reach into the cutter housing. Always
use the pusher.
17. After 10 minutes continuous use, allow a
10 minutes rest before next use.
18. Accessories shall include instructions for
their safe use.
19. It shall warn of potential injury from misuse.
20. This appliance can be used by children aged
from 8 years and above if they have been
given supervision or instruction concerning
use of the appliance in a safe way and if they
understand the hazards involved. Cleaning
and user maintenance shall not be made
by children unless they are aged from 8
years and above and supervised. Keep
the appliance and its cord out of reach of
children aged less than 8 years.
21. This appliance is intended to be used in
household and similar applications such as:
– staff kitchen areas in shops, offices and
other working environments;
– farm houses;
– by clients in hotels, motels and other
residential type environments;
– bed and breakfast type environments.
22. If the appliance is locked, please press
Reversal button (REV). The meat locked
in cutter housing is untrodden, so the
appliance can renew its usual condition.
INSTRUCTION FOR USE
ASSEMBLING
1. Insert the head pass in the direction
indicated by the arrow into the entrance
of the wave box head (fig. 1), then hold the
head pass with your left hand and pull the
handle counter clockwise in place with your
right hand. If the head clockwise rotation
does not move, the head is locked. (fig. 2)
2. Place the snake into the head, long end first,
and turn to feed the screw slightly until it is
set into the motor housing (fig. 3).
3. Place the cutting blade onto the snake shaft
with the blade facing the front as illustrated
(fig. 4). If it is not fitted properly, meat will
not be grinded.
4. Place the desired cutting plate next to the
cutting blade, fitting protrusions in the slot
(fig. 5).
5. Support or press the center of the cutting
plate with one finger then screw the fixing
ring tight with another hand (fig. 6). Do not
over tighten.
6. Place the hopper plate on the head and fix it
into position. (fig. 7/8)
7. Locate the unit on a firm place.
8. The air passage at the bottom and the side
of the motor housing should be kept free
and not blocked.
MINCER
1. Insert the worm shaft into the cutter
housing, the plastic end first.
Place the cutter unit onto the worm shaft.
(The cutting edges should be at the front)
Place the medium grinding disc or coarse
grinding disc (depending on the consistency
you prefer) onto the worm shaft. (Make
sure the notch of the grinding disc fit onto
the projections of the mincer head.) Turn
the screw ring in the direction of the arrow
on the cutter housing until it is properly
fastened.
2. Attach the cutter housing to the motor unit.
3. Place the tray on the upright part of the
cutter housing.
4. Now the appliance is ready for mincing.
Cut the meat into 10cm-long, 2cm-thick strips.
Remove bones, pieces of gristle and sinews as
much as possible. (Never use frozen meat!)
Put the meat in the tray. Use the pusher to
gently push the meat into the cutter hosing. (For
steak tartare, mince the meat with the medium
grinding disc twice.)
MAKING KEBBE
1. Insert the worm shaft into the cutter
housing, the plastic end first. (fig. 9)
Place the cone in the cutter housing.
Place the former on the cutter housing and
screw the ring on the cutter housing. (fig. 10)
2. Attach the cutter housing to the motor unit.
3. Place the tray on the upright part of the
cutter housing.
4. Now the appliance is ready for making
kebbe. (fig. 11)
Feed the prepared kebbe mixture through
the kebbe maker. Cut the continuous hollow
cylinder into the desired lengths and user as
required.
Kebbe is a traditional Middle Eastern dish made
primarily of lamp and bulgur wheat which are
minced together to form a paste the mixture is
extruded through the kebbe maker and cut into
short lengths. The tubes can then be stuffed
with a minced meat mixture, the ends pinched
together and then deep fried.
MAKING SAUSAGES
1. Mince the meat
Insert the worm shaft into the cutter
housing, the plastic end first. (fig. 12)
Place the separator in the cutter housing.
Place the sausage horn on the cutter
housing and screw the ring on the cutter
housing.
(Make sure the notches of the separator fit
onto the projections of the mincer head.)
2. Attach the cutter housing to the motor unit.
3. Place the tray on the upright part of the
cutter housing.
4. Now the appliance is ready for making
sausages.
Put the ingredients in the tray. Use the pusher
to gently push the meat into the cutter housing.
Put the sausage skin in lukewarm water for
10 minutes. Then slide the wet skin onto the
sausage horn. Push the (seasoned) minced meat
into the cutter housing. If the skin gets stuck
onto the sausage horn, wet it with some water.


