Мультиварки VITEK VT-4218 BK - инструкция пользователя по применению, эксплуатации и установке на русском языке. Мы надеемся, она поможет вам решить возникшие у вас вопросы при эксплуатации техники.
Если остались вопросы, задайте их в комментариях после инструкции.
"Загружаем инструкцию", означает, что нужно подождать пока файл загрузится и можно будет его читать онлайн. Некоторые инструкции очень большие и время их появления зависит от вашей скорости интернета.


9
ENGLISH
10.
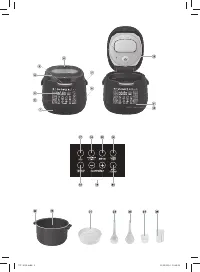
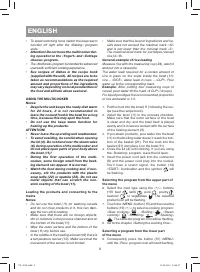
Use the buttons (19) «+/-» to select the cook-
ing program.
Setting the cooking time and temperature
Note: This function is not available for «Rice»
program; go to the step «Setting the delayed
start
»
.
Temperature setting is available in «Pizza»,
«Roasting» and «Baking» programs.
11.
Press the «t°/TIME» button (17) and set the
cooking time using the buttons (19) «+/-» (time
format «00:00»).
12.
For «Roasting», «Pizza» and «Baking» pro-
grams:
Touch the «t°/TIME» button (17) and set
the cooking temperature using the buttons (19)
«+/-».
Setting the «Multicook» program
13.
Press the MULTICOOK button (20), the button
(20) illumination and the first cooking step indi-
cator will light up.
14.
Use the buttons (19) «-/+» to set the cooking
temperature.
15.
Press the «t°/TIME» button (17). Use the but-
tons «+/-» (19) to set the cooking time.
16.
Press the «MULTICOOK» button (20) to switch
to the next cooking step (the corresponding
symbol will light up).
17.
Repeat steps 2-4 for setting the required num-
ber of cooking steps.
Setting the delayed start function
Notes:
If you want to start cooking immediately, go to the
step «Switching the cooking mode on».
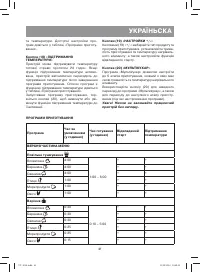
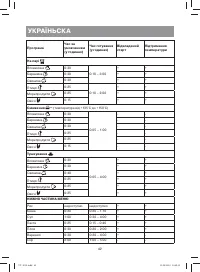
See the list of programs with available delayed
start function in the table «Cooking programs».
18.
Touch the «DELAYED START» button (16), the
hour digits will be flashing on the display (3).
Use the «-/+» buttons (19) to set the cooking
end time in hours.
19.
Touch the «DELAYED START» button (16), the
minutes digits will be flashing. Use the «+/-»
buttons (19) to set the time in minutes.
Switching the cooking mode on
20.
Touch the «START» button (14). If you set the
delayed start function and switch the unit on,
the unit will be operating in standby mode.
Once the delay time is over, the illumination
of the symbol
bottom sector will light up.
When the cooking program is finished, the sym-
bol
will be colored fully.
21.
To switch the unit off while in the delayed start
mode or during cooking, press the «START»
button (14).
Keep warm function
Notes: If the keep warm function is available for
the selected cooking program, the «KEEP WARM»
button (18) illumination will be on.
See the list of programs with the keep warm func-
tion in the table «Cooking programs».
22.
To switch the keep warm function off, press the
«KEEP WARM» button (18) during cooking, the
button illumination will go out.
23.
To switch the keep warm function on again,
press the button (18) again.
Changing cooking time and temperature
during cooking
You can change the cooking time during the
unit operation in any program (except for «Rice»
program) and the cooking temperature in
«Roasting», «Pizza», «Baking» and «Multicook»
programs. You can change the settings in
«Multicook» program for current cooking step
only.
24.
Press the «t°/TIME» button (17) and set the
cooking time using the buttons (19) «+/-».
25.
For «Roasting», «Pizza», «Baking» and
«Multicook» programs:
Press the «t°/TIME»
button (17) and set the cooking temperature
using the buttons (19) «+/-».
26.
New settings will be automatically saved in
5 seconds.
End of cooking
27.
Sound signals will inform you that the cooking
is finished.
28.
If the keep warm function is available for the
selected program and it has not been disabled,
the unit will be automatically switched to the
keep warm mode. The symbol «b» will be shown
on the display (3).
29.
To switch the keep warm mode off, press the
«START» button (14).
30.
Unplug the unit.
31.
Open the lid (4) by pressing the button (5). Put
on potholders and remove the bowl (11), taking
it by the handles (12).
MORE TIPS
«Yogurt» Program
–
Pour milk and leaven into the cups (25) (see the
recipe book).
VT-4218.indd 9
11.08.2014 14:40:27


