Мультиварки VITEK VT-4218 BK - инструкция пользователя по применению, эксплуатации и установке на русском языке. Мы надеемся, она поможет вам решить возникшие у вас вопросы при эксплуатации техники.
Если остались вопросы, задайте их в комментариях после инструкции.
"Загружаем инструкцию", означает, что нужно подождать пока файл загрузится и можно будет его читать онлайн. Некоторые инструкции очень большие и время их появления зависит от вашей скорости интернета.


8
ENGLISH
•
To avoid scorching food, switch the keep warm
function off right after the «Baking» program
ends.
•
Attention! Do not move the multicooker dur-
ing operation in the «Yogurt» and «Cottage
cheese» program.
•
The «Multicook» program is intended for advanced
users with sufficient cooking experience.
•
See recipes of dishes in the recipe book
(supplied with the unit). All recipes are to be
taken as recommendations as the required
amount and proportions of the ingredients
may vary depending on local peculiarities of
the food and altitude above sea level.
USING THE MULTICOOKER
Notes:
•
Despite the unit keeps the ready dish warm
for 24 hours, it is not recommended to
leave the cooked food in the bowl for a long
time, because this may spoil the food.
•
Do not use the keep warm function for
heating up the products.
AT TENTION!
•
Never leave the operating unit unattended.
•
To avoid scalding, be careful when opening
the lid (4). Do not bend over the steam valve
(6) during operation of the multicooker and
do not place open parts of your body above
the bowl (11)!
•
During the first operation of the multi-
cooker, some foreign smell from the heat-
ing element can appear. It is normal.
•
Watch the food during cooking and, if nec-
essary, stir the products with the plastic
soup ladle (22) or spatula (23). Do not use
metal objects that can scratch the non-
stick coating of the bowl (11).
Loading the products and connecting to the
mains
Notes:
•
Do not use the bowl (11) for washing cereals
and do not chop products in it, this can dam-
age the non-stick coating;
•
Make sure that there are no foreign objects,
dirt or moisture in the process chamber and on
the bottom of the bowl (11);
•
Wipe the outer surface and the bottom of the
bowl (11) dry before use.
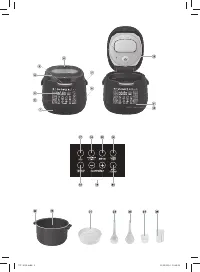
•
In the middle of the heating element (9) there is
a temperature sensor (10). Make sure that the
movement of the sensor is not limited.
•
Make sure that the level of ingredients and liq-
uids does not exceed the maximal mark «10»
and is not lower than the minimal mark «2».
The maximal level mark for porridges (except
rice) is «8».
General example of rice loading
Measure rice with the measuring cup (24), wash it
and put into a casserole.
The water level required for a certain amount of
rice is given on the scale inside the bowl (11):
rice – «RICE», water level in cups – «CUP». Pour
water up to the corresponding mark.
Example: After putting four measuring cups of
cereal, pour water till the mark «4 CUP» (4 cups).
For liquid porridges the recommended proportion
of rice and water is 1:3.
1.
Put the food into the bowl (11) following the rec-
ipe (see the recipe book).
2.
Install the bowl (11) in the process chamber.
Make sure that the outer surface of the bowl
is clean and dry, and the bowl itself is placed
evenly and is in secure contact with the surface
of the heating element (9).
3.
If you steam products, pour water into the bowl
(11) so that boiling water doesn’t reach the bot-
tom of the basket (21). Put the food into the
basket (21) and place it on the bowl (11).
4.
Close the lid (4) until clicking. If you are using
the «Roasting» program, leave the lid open.
5.
Insert the power cord jack into the connector
(8) and the power cord plug into the socket.
You’ll hear a sound signal, the button (14)
«START» illumination and the symbol
will
be flashing.
Selecting the program from the upper part of
the menu
6.
Select the food type using the «+/-» buttons
(19): beef
, lamb
, pork
, poultry
,
seafood
or vegetables
. The selected
product icon will be flashing.
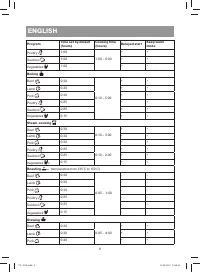
7.
Touch the «MENU» button (15) and then use the
buttons (19) «+/-» to select a cooking program:
«Slow cooking»
, «Boiling»
, «Steam
cooking»
, «Roasting»
or «Stewing»
. The selected program icon will be flashing.
8.
Go to the chapter «Setting the cooking time».
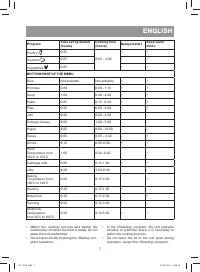
Selecting a program from the lower part
of the menu
9.
Consequently press the button (15) «MENU»
until the «Rice» program icon will start flashing.
VT-4218.indd 8
11.08.2014 14:40:27


