
Мультиметры BENNING MM 5-2 044071 - инструкция пользователя по применению, эксплуатации и установке на русском языке. Мы надеемся, она поможет вам решить возникшие у вас вопросы при эксплуатации техники.
Если остались вопросы, задайте их в комментариях после инструкции.
"Загружаем инструкцию", означает, что нужно подождать пока файл загрузится и можно будет его читать онлайн. Некоторые инструкции очень большие и время их появления зависит от вашей скорости интернета.


02/ 2020
BENNING MM 5-1/ 5-2
29
In these cases, the BENNING MM 5-1/ MM 5-2 must be switched off immediately,
removed from the measuring points and secured to prevent it from being used again.
9.2 Cleaning
Clean the outside of the unit with a clean dry cloth. (Exception: any type of
special cleaning cloth). Never use solvents or abrasives to clean the testing unit.
Ensure that the battery compartment and the battery contacts have not been
contaminated by electrolyte leakage.
If any electrolyte or white deposits are seen near to the battery or in the battery
compartment, remove them with a dry cloth, too.
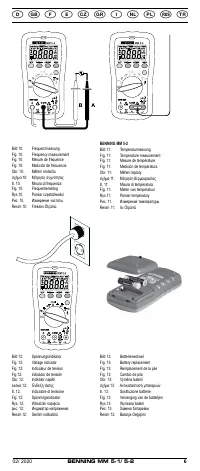
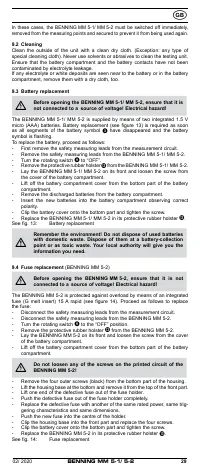
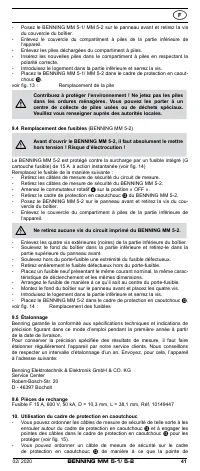
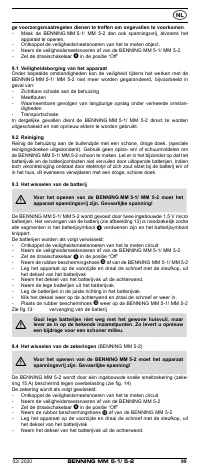
9.3 Battery replacement
Before opening the BENNING MM 5-1/ MM 5-2, ensure that it is
not connected to a source of voltage! Electrical hazard!
The BENNING MM 5-1/ MM 5-2 is supplied by means of two integrated 1.5 V
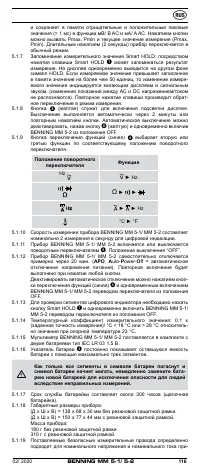
micro (AAA) batteries. Battery replacement (see figure 13) is required as soon
as all segments of the battery symbol
3
have disappeared and the battery
symbol is flashing.
To replace the battery, proceed as follows:
- First remove the safety measuring leads from the measurement circuit.
- Remove the safety measuring leads from the BENNING MM 5-1/ MM 5-2.
- Turn the rotating switch
to “OFF”.
-
Remove the protective rubber holster
M
from the BENNING MM 5-1/ MM 5-2.
- Lay the BENNING MM 5-1/ MM 5-2 on its front and loosen the screw from
the cover of the battery compartment.
- Lift off the battery compartment cover from the bottom part of the battery
compartment.
- Remove the discharged batteries from the battery compartment.
- Insert the new batteries into the battery compartment observing correct
po larity.
- Clip the battery cover onto the bottom part and tighten the screw.
- Replace the BENNING MM 5-1/ MM 5-2 in its protective rubber holster
M
.
See fig. 13:
Battery replacement
Remember the environment! Do not dispose of used batteries
with domestic waste. Dispose of them at a battery-collection
point or as toxic waste. Your local authority will give you the
information you need.
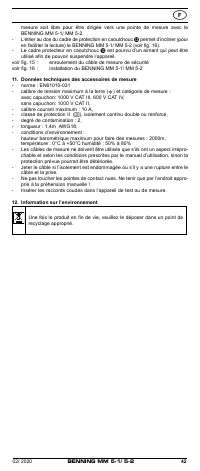
9.4 Fuse replacement
(BENNING MM 5-2)
Before opening the BENNING MM 5-2, ensure that it is not
connected to a source of voltage! Electrical hazard!
The BENNING MM 5-2 is protected against overload by means of an inte grated
fuse (G melt insert) 15 A rapid (see figure 14). Proceed as follows to replace
the fuse:
- Disconnect the safety measuring leads from the measurement circuit.
- Disconnect the safety measuring leads from the BENNING MM 5-2.
- Turn the rotating switch
to the “OFF” position.
- Remove the protective rubber holster
M
from the BENNING MM 5-2.
- Lay the BENNING MM 5-2 on its front and loosen the screw from the cover
of the battery compartment.
- Lift off the battery compartment cover from the bottom part of the battery
compartment.
Do not loosen any of the screws on the printed circuit of the
BENNING MM 5-2!
- Remove the four outer screws (black) from the bottom part of the housing.
- Lift the housing base at the bottom and remove it from the top of the front part.
- Lift one end of the defective fuse out of the fuse holder.
- Push the defective fuse out of the fuse holder completely.
- Replace the defective fuse with another of the same rated power, same trig-
gering characteristics and same dimensions.
- Push the new fuse into the centre of the holder.
- Clip the housing base into the front part and replace the four screws.
- Clip the battery cover onto the bottom part and tighten the screw.
- Replace the BENNING MM 5-2 in its protective rubber holster
M
.
See fig. 14:
Fuse replacement


