Материнские платы GIGABYTE GA M52LT D3P rev 3 1 - инструкция пользователя по применению, эксплуатации и установке на русском языке. Мы надеемся, она поможет вам решить возникшие у вас вопросы при эксплуатации техники.
Если остались вопросы, задайте их в комментариях после инструкции.
"Загружаем инструкцию", означает, что нужно подождать пока файл загрузится и можно будет его читать онлайн. Некоторые инструкции очень большие и время их появления зависит от вашей скорости интернета.


Unique Features
- 62 -
Available functions in EasyTune 6 may differ by motherboard model. Grayed-out area(s) indicates that the item is
not configurable or the function is not supported.
Incorrectly doing overclock/overvoltage may result in damage to the hardware components such as CPU, chipset,
and memory and reduce the useful life of these components. Before you do the overclock/overvoltage, make sure
that you fully know each function of EasyTune 6, or system instability or other unexpected results may occur.
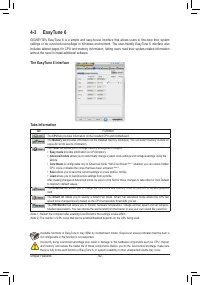
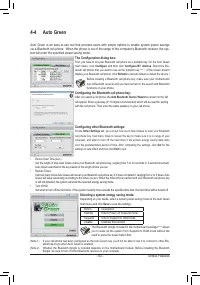
4-3 EasyTune 6
GIGABYTE's EasyTune 6 is a simple and easy-to-use interface that allows users to fine-tune their system
settings or do overclock/overvoltage in Windows environment. The user-friendly EasyTune 6 interface also
includes tabbed pages for CPU and memory information, letting users read their system-related information
without the need to install additional software.
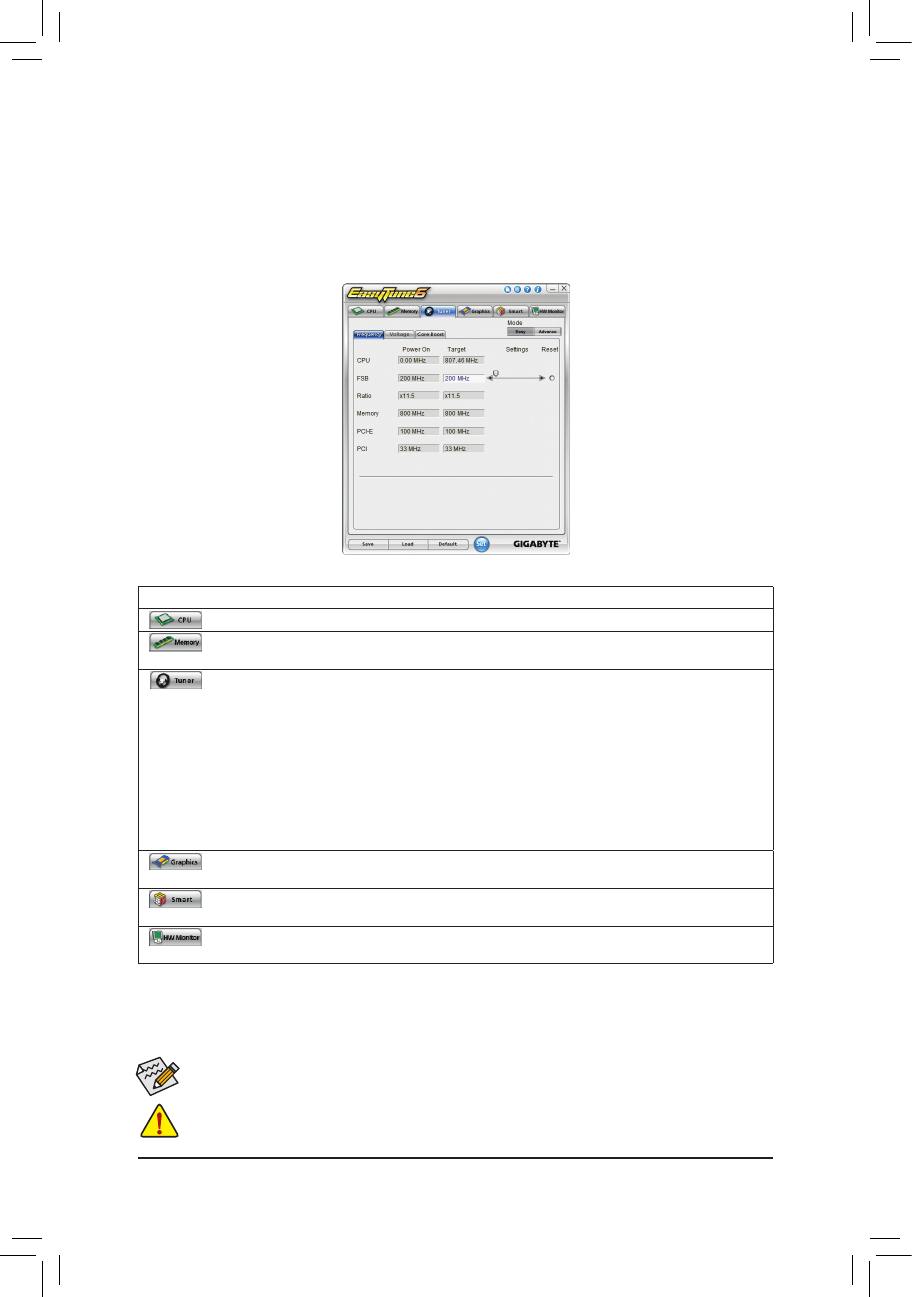
The EasyTune 6 Interface
Tabs Information
(Note 1) Restart the computer after enabling Core Boost for the settings to take effect.
(Note 2) The number of CPU cores that can be enabled/disabled depends on the CPU being used.
Tab
Function
The
CPU
tab provides information on the installed CPU and motherboard.
The
Memory
tab provides information on the installed memory module(s). You can select memory module on
a specific slot to see its information.
The
Tuner
tab allows you to change memory settings and voltages.
Easy mode
•
provides information on CPU/memory.
•
Advanced mode
allows you to individually change system clock settings and voltages settings using the
sliders.
Core Boost
•
is configurable only in Advanced mode. With Core Boost
(Note 1)
enabled, you can unlock hidden
CPU cores or disable the cores that have been activated
(Note 2)
.
Save
•
allows you to save the current settings to a new profile (.txt file).
Load
•
allows you to load previous settings from a profile.
After making changes in Advanced mode, be sure to click Set for these changes to take effect or click Default
to restore to default values.
The
Graphics
tab allows you to change the core clock and memory clock for your ATI or NVIDIA graphics
card.
The
Smart
tab allows you to specify a Smart Fan mode. Smart Fan Advanced mode allows the CPU fan
speed to be changed linearly based on the CPU temperature thresholds you set.
The
HW Monitor
tab allows you to monitor hardware temperature, voltage and fan speed and set tempera-
ture/fan speed alarm. You can choose the alert sound from the buzzer or use your own sound file (.wav file).


