Машинки для стрижки Philips QG3080/10 - инструкция пользователя по применению, эксплуатации и установке на русском языке. Мы надеемся, она поможет вам решить возникшие у вас вопросы при эксплуатации техники.
Если остались вопросы, задайте их в комментариях после инструкции.
"Загружаем инструкцию", означает, что нужно подождать пока файл загрузится и можно будет его читать онлайн. Некоторые инструкции очень большие и время их появления зависит от вашей скорости интернета.
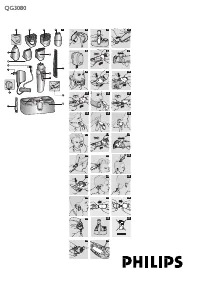

ends when you shape the contours round the
ears (Fig. 24).
3
To contour the nape hairline, turn the appliance
and hold it with the trimming attachment pointing
downwards. (Fig. 25)
4
To contour the sideburns, turn the appliance and
hold it with the trimming attachment pointing
downwards. (Fig. 26)
Shaving
Shaving with the micro shaver attachment
Before using the micro shaver attachment, always
check it for damage or wear. If the foil or cutter
is damaged or worn, do not use the attachment
as injury may occur. Replace the foil or the cutter
before using the attachment again.
1
Put the micro shaver attachment on the
groomer (Fig. 27)
2
Use the micro shaver attachment to shave along
contoured edges to remove any stubble while
creating a smooth well-defined beard line.
Gently press the micro shaver attachment onto the skin.
Do not press too hard.
Cleaning
Do not use water or a moist cloth to clean this
appliance.
Make sure the appliance is switched off and
disconnected from the mains before you start
cleaning it.
1
Remove the comb and/or any attachment.
2
QG3080 only: Separate the top part of the micro
shaver attachment from its body (Fig. 28).
The shaving foil is very delicate and should not be
handled.
If the shaving foil becomes damaged, replace the
attachment.
Do not clean the foil with the brush, as this may cause
damage.
3
Blow and/or shake out any hair that may have
accumulated in the attachment.
4
Clean the outside and inside of the attachment
with the brush supplied. (Fig. 29)
Do not use abrasives, scourers or liquids such as alcohol,
petrol or acetone to clean the appliance.
5
Place the attachment back onto the appliance.
Storage
Store the appliance and attachments in the stand to
prevent damage. (Fig. 30)
Replacement
Worn or damaged attachments should only be replaced
with original Philips replacement attachments, which are
available from your dealer or an authorised Philips ser vice
centre.
If you have any difficulties obtaining replacement
attachments for your appliance, contact the Philips
Customer Care Centre in your countr y or consult the
worldwide guarantee leaflet.
Environment
Do not throw the appliance away with the normal
household waste at the end of its life, but hand
it in at an official collection point for recycling.
By doing this you will help to preserve the
environment (Fig. 31).
The built-in rechargeable batter y contains substances
that may pollute the environment. Always remove the
batter y before discarding the appliance or handing it in at
an official collection point. Dispose of the batter y at an
official collection point for batteries. If you have trouble
removing the batter y, you can also take the appliance to
a Philips ser vice centre, which will remove the batter y for
you and will dispose of it in an environmentally safe way.
Disposal of the battery
1
Remove the powerplug from the wall socket and
pull the appliance plug out of the appliance.
2
Let the appliance run until the motor stops.
,
,
,
,
,
,
,
3
Insert a screwdriver in the groove next to the shaft
at the top of the appliance.Turn the screwdriver to
separate the two housing halves. (Fig. 32)
4
Lift the battery out of the housing by means of a
screwdriver. Twist the connecting wires until they
break (Fig. 33).
Do not connect the appliance to the mains again after
the battery has been removed.
Guarantee & service
If you need information or if you have a problem, please
visit the Philips website at
www.philips.com
or contact
the Philips Customer Care Centre toll-free at 1-866-800-
9311. You may also contact an Authorized Philips Ser vice
Location near you. Please see the enclosed leaflet.
Table 1. Beard trimmer
Setting
Remaining hair length (mm)
1
2mm
2
4mm
3
6mm
4
8mm
5
10mm
6
12mm
7
14mm
8
16mm
9
18mm
4203.000.5736.1
3/9


