Машинки для стрижки Philips QG3080/10 - инструкция пользователя по применению, эксплуатации и установке на русском языке. Мы надеемся, она поможет вам решить возникшие у вас вопросы при эксплуатации техники.
Если остались вопросы, задайте их в комментариях после инструкции.
"Загружаем инструкцию", означает, что нужно подождать пока файл загрузится и можно будет его читать онлайн. Некоторые инструкции очень большие и время их появления зависит от вашей скорости интернета.

ENGLISH
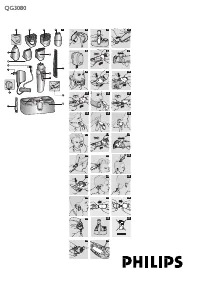
General description (Fig. 1)
A
2D Contour Tracking beard trimmer comb
B
Trimming attachment
C
Hair length selector
D
Release button
E
On/off slide
F
Socket for appliance plug
G
Cleaning brush
H
Barber’s comb
I
Charging light
J
Powerplug
K
Appliance plug
L
Nose/ear/eyebrow attachment
M
Charging stand with storage facility
N
Precision attachment
O
Hair clipper comb (non-flexible)
P
Micro shaver
Important
Read these instructions for use carefully before using the
appliance and save them for future reference.
Check if the voltage indicated on the powerplug
corresponds to the local mains voltage before you
connect the appliance.
Only use the powerplug supplied to charge the
appliance. Do not cut off the powerplug to replace
it with another plug, as this will cause a hazardous
situation.
If the powerplug is damaged, always have it replaced
by one of the original type in order to avoid a
hazard.
Make sure the appliance, the charging stand and the
powerplug do not get wet.
Charge, use and store the appliance at a
temperature between 15
c
C and 35
c
C.
This appliance is only intended for trimming and
grooming the human beard, moustache, sideburns,
nose hair, ear hair and eyebrows.
Do not use the appliance when one of the
attachments is damaged or broken, as this may
cause injury.
Do not place the beard trimmer comb or the hair
clipper comb on the precision attachment.
This appliance is not intended for use by persons
(including children) with reduced physical, sensory
or mental capabilities, or lack of experience and
knowledge, unless they have been given supervision
or instruction concerning use of the appliance by a
person responsible for their safety.
Children should be supervised to ensure that they
do not play with the appliance.
Noise level: Lc = 64 dB [A]
Electromagnetic fields (EMF)
This Philips appliance complies with all standards
regarding electromagnetic fields (EMF). If handled
properly and in accordance with the instructions in this
instruction manual, the appliance is safe to use according
to scientific evidence available today.
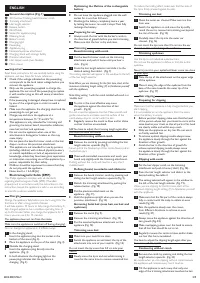
Charging
Charge the appliance fully before you star t using it for the
first time or after a long period of disuse.
It will take approx. 10 hours to fully charge the batter y. A
fully charged appliance has a cordless operating time of
up to 35 minutes. When you charge the appliance for 3
hours, you can use it for 15 minutes.
The appliance does not run from the mains.
Make sure the appliance is switched off during charging!
You can charge the appliance in 2 different ways:
1
In the charging stand:
Insert the appliance plug into the socket in the
bottom of the stand (Fig. 2).
Place the appliance on the pin of the stand. (Fig. 3)
2
Outside the charging stand:
Insert the appliance plug directly into the
appliance. (Fig. 4)
In both situations the charging light on the
powerplug indicates that the appliance is
charging. (Fig. 5)
,
,
,
,
,
,
,
,
,
,
,
,
,
,
,
Optimising the lifetime of the rechargeable
battery
Do not leave the appliance plugged into the wall
socket for more than 24 hours.
Discharge the battery completely twice a year
by letting the motor run until it stops. Then fully
recharge the battery.
Preparing for use
Always comb the hair with the barber’s comb in
the direction of growth before you start trimming.
Make sure that the hair is dry and clean.
Trimming
Beard trimming with comb
1
Put the beard trimmer comb on the trimming
attachment and push it home until you hear a
click. (Fig. 6)
2
Press the hair length selector and slide it to the
desired setting. See table I. (Fig. 7)
The setting selected will appear in the window to the left
of the hair length selector.
Note:When you are trimming for the first time, start at the
maximum trimming length setting (9) to familiarise yourself
with the appliance.
Note:Using setting 1 with the comb installed will result in a
‘stubble look’.
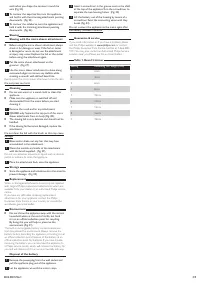
3
To trim in the most effective way, move
the appliance against the direction of hair
growth. (Fig. 8)
Do not move the appliance too fast. Make smooth and
gentle movements and make sure the surface of the
comb always stays in contact with the skin.
Regularly remove the comb to blow and/or shake
out hair that has accumulated.
NB: You have to adjust the trimming length again after
you have removed the comb!
Beard trimming without comb
1
Remove the comb by pressing and sliding the hair
length selector upwards (Fig. 9).
Never pull at the flexible top of the comb. Always pull at
the bottom par t.
2
Make well-controlled movements and touch your
beard only slightly with the trimming attachment.
Cutting without the comb will result in a ver y shor t
stubble beard.
Defining beard, moustache and sideburns
1
Remove the beard trimmer comb by pressing and
sliding the hair length selector upwards (Fig. 9).
2
Detach the trimming attachment by pushing the
release button. (Fig. 10)
3
Put the precision attachment on the
appliance. (Fig. 11)
Hold the appliance upright when you use the
precision attachment. (Fig. 12)
Grooming facial hair (nose hair, ear hair and
eyebrows)
1
Remove the comb (Fig. 9).
2
Remove the trimming attachment. (Fig. 10)
3
Put the nose/ear/eyebrow attachment on the
appliance (Fig. 13).
Trimming nose hair
1
Make sure your nostrils are clean.
2
Switch the appliance on and insert the tip of the
attachment into one of your nostrils. (Fig. 14)
Do not insert the tip more than 0.5 cm into your
nostril.
3
Slowly move the tip in and out while turning it
round at the same time to remove unwanted hair.
,
,
,
,
,
,
To reduce the tickling effect, make sure that the side of
the tip is firmly pressed against the skin.
Trimming ear hair
1
Clean the outer ear channel. Make sure it is free
from wax.
2
Switch the appliance on and move the tip softly
round the ear to remove hairs sticking out beyond
the rim of the ear. (Fig. 15)
3
Carefully insert the tip into the outer ear
channel. (Fig. 16)
Do not insert the tip more than 0.5 cm into the ear
channel as this could damage the eardrum.
Trimming eyebrows
Use the tip to cut individual eyebrow hairs.
Do not use the appliance to define or trim the entire
eyebrow.
Never try to trim your eyelashes.Never come too close
to your eyes!
1
Place the tip of the attachment on the upper edge
of the eyebrow.
2
Move it along the edge of the eyebrow from the
base of the nose towards the outer tip of the
eyebrow. (Fig. 17)
Hair clipping
Preparing for clipping
Make sure that the appliance is fully charged before you
star t clipping.
It is not possible to run the appliance from the mains
when the batter y is empty.
Before you start clipping, make sure that the head
of the person whose hair you intend to cut is at the
same level as your chest so that all parts of his head
are clearly visible and within easy reach.
Only use the appliance on dry hair. Do not use it
on freshly washed hair.
To achieve optimal clipping results, always move
the appliance slowly through the hair against the
direction of hair growth.
Comb the hair in the direction of growth.To
achieve optimal clipping results, always move
the appliance slowly through the hair against the
direction of hair growth.
Clipping with comb
1
Put the hair clipper comb on the trimming
attachment and push it home (‘click’) (Fig. 18).
2
Press the hair length selector and slide it to the
desired setting. See table 2.
3
The setting selected will appear in the window to
the left of the hair length selector (Fig. 19).
When you are clipping for the first time, star t at the
maximum clipping length setting (9) to familiarize yourself
with the appliance.
4
Make sure that the flat part of the comb is always
fully in contact with the scalp to obtain an even
result (Fig. 20).
5
Pass the appliance slowly over the crown
from different directions to achieve an even
result (Fig. 21).
6
Always move the appliance against the direction of
hair growth (Fig. 22).
7
Make overlapping passes over the head to ensure
that all hair that should be cut is cut.
8
Regularly remove the comb to blow and/or shake
out hair that has accumulated.
You have to adjust the clipping length again after you
have removed the comb!
Contouring without comb
1
Remove the comb by pressing and sliding the hair
length selector upwards. (Fig. 23)
Be careful when you are clipping without comb because
the appliance will remove ever y hair it touches.
2
Tilt the appliance in such a way that only one
edge of the trimming attachment touches the hair
,
,
,
,
4203.000.5736.1
2/9


