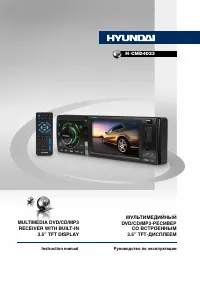
Магнитолы Hyundai Electronics H-CMD4023 - инструкция пользователя по применению, эксплуатации и установке на русском языке. Мы надеемся, она поможет вам решить возникшие у вас вопросы при эксплуатации техники.
Если остались вопросы, задайте их в комментариях после инструкции.
"Загружаем инструкцию", означает, что нужно подождать пока файл загрузится и можно будет его читать онлайн. Некоторые инструкции очень большие и время их появления зависит от вашей скорости интернета.


12
13
Operation
Operation
OFF. Or press and hold BND/NP/SUB button
on the panel to switch on or off the subwoofer
output. After you have reached your desired
effect, leave the unit idle in order for the new
setting to take effect.
An external amplifier is required to
operate the subwoofer.
AUX in jack
AUX-in jack is intended for connecting
external audio equipment to amplify the
sound. If connection is made correctly, the
audio signal from the external source will be
translated through the acoustics of the head
unit. This enables to adjust the volume and
quality of the sounding. For example, you can
connect an MP3-player to listen to tracks using
the car acoustic system.
Radio operations
Touch screen
In Radio mode touchable interface is
available enabling you to perform various
operations. The touch menu consists of two
pages. Touch icon in the right bottom part
of the screen to switch between two pages.
Band select
Press repeatedly BND/NP/SUB button on
the panel or BAND button on the RC or touch
repeatedly BND icon on the screen to select your
desired radio band in Radio mode: FM1, FM2,
FM3, AM1 (MW1), AM2 (MW2). In each set of
the bands you can store up to 6 preset stations,
making total 30 preset memory stations.
Auto/Manual tuning
• Manual tuning: Press PREVIOUS/NEXT
buttons on the panel or on the RC or touch
repeatedly and icons on the screen to
manually adjust the radio frequency.
• Auto tuning: Press and hold PREVIOUS/
NEXT buttons on the panel or on the RC or
touch and icon on the screen, the radio
will seek to the next up or down strong and
clear frequency station automatically. Repeat
this action to seek for other desired stations.
To stop automatic search, press NEXT or
PREVIOUS button on the panel or on the RC
or touch and icon on the screen.
Programming tuner stations
There are six numbered preset buttons on
the RC (1~6) and six number icons (P1~P6)
in the top of the screen, under which you can
store and recall stations for each band. Select
the needed frequency, then press and hold a
preset button. The station will be saved in the
memory under the corresponding number. To
recall a stored station, press the corresponding
preset button.
Automatic store/preset scan
• Automatic store: Press and hold AUDIO/
TYPE/APS button on the panel or AMS button
on the RC, or touch and hold APS icon on the
screen. SCAN will be displayed. The radio will
automatically store the 6 strongest available
stations to the 6 preset memories of the current
band. To stop auto store, press this button again.
• Preset scan: Press AUDIO/TYPE/APS
button on the panel or AMS button on the RC,
or touch APS icon on the screen. INTRO will
be flashing. The receiver will scan the saved
stations in all bands for 5 seconds.
Mono/Stereo control
(in FM radio mode)
Press repeatedly SELECT button on the
panel or SEL button on the RC until the display
shows ST ON (ST OFF). Press VOL+/VOL-
buttons on the RC or rotate VOLUME regulator
on the panel to select between ST ON/OFF. ST
ON means stereo reception of the signal; ST
OFF means mono reception mode. Or press
STEREO button on the RC or touch MO/ST
icon on the screen to switch stereo reception
on/off. Improvement of reception of distant
stations can be done by selecting mono mode,
which may cut down some reception noise.
Содержание
- 23 Уважаемый покупатель!; Установка/Подключение
- 24 Общая информация
- 25 Утилизация изделия
- 26 • Убедитесь, что источник питания и
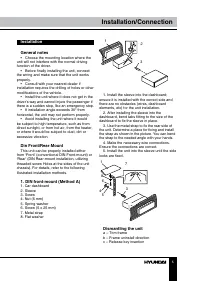
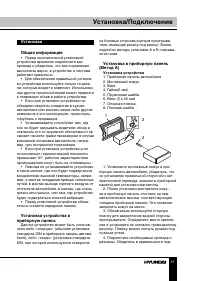
- 27 Установка; Установка устройства
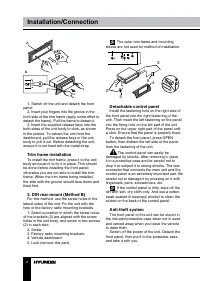
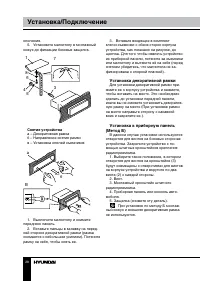
- 28 Снятие устройства; Установка декоративной рамки
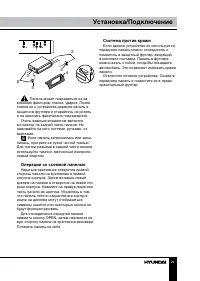
- 29 Операции со съемной панелью
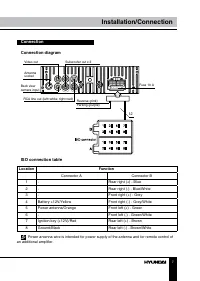
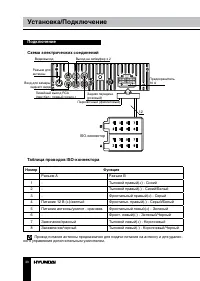
- 30 Подключение; Таблица проводов ISO-коннектора; Номер; Разъем A
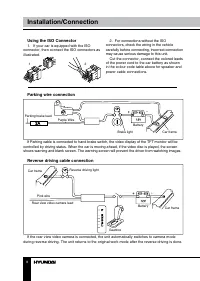
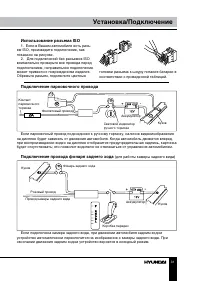
- 31 Использование разъема ISO; Для подключений без разъемов ISO; Подключение парковочного провода
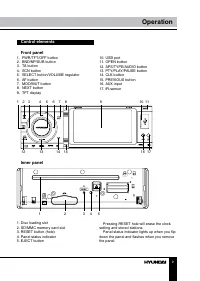
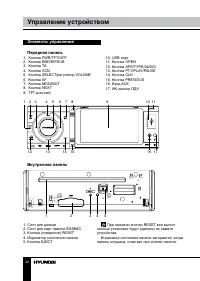
- 32 Элементы управления; При нажатии кнопки RESET все выпол-
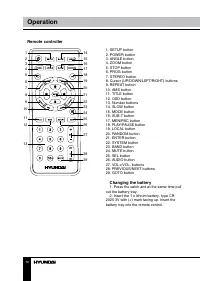
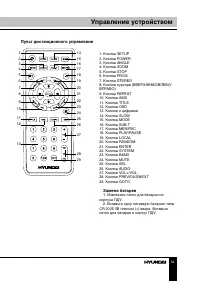
- 33 Пульт дистанционного управления; Извлеките лоток для батареи из
- 34 Основные операции
- 36 Операции с радио
- 38 Когда программа будет найдена, начнется; Дополнительные функции; Для выбора нужной функции нажмите и
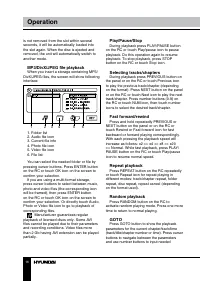
- 39 Воспроизведение дисков/USB; Операция; Загрузка/извлечение диска
- 40 Воспроизведение файлов MP3/
- 42 Выбор аудиоканала
- 43 Системные настройки; Установка языка; Аудио настройки
- 44 Настройте данный параметр с по-; Настройки видео; Настройте нужный параметр изображе-
- 45 Обращение с компакт-дисками
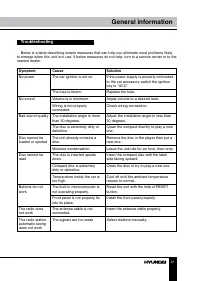
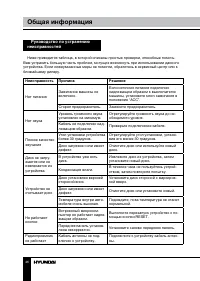
- 46 Руководство по устранению; Неисправность
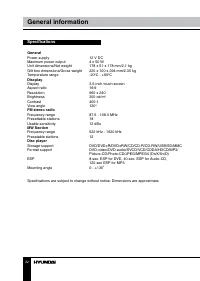
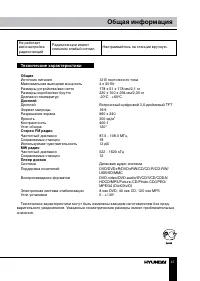
- 47 Технические характеристики; Общие

