
Лобзики Metabo STEB 65 Quick - инструкция пользователя по применению, эксплуатации и установке на русском языке. Мы надеемся, она поможет вам решить возникшие у вас вопросы при эксплуатации техники.
Если остались вопросы, задайте их в комментариях после инструкции.
"Загружаем инструкцию", означает, что нужно подождать пока файл загрузится и можно будет его читать онлайн. Некоторые инструкции очень большие и время их появления зависит от вашей скорости интернета.


ENGLISH
en
10
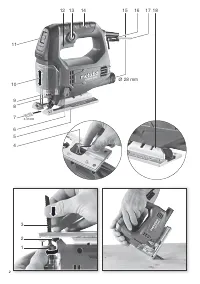
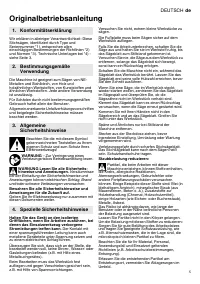
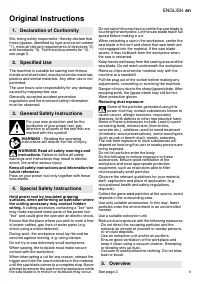
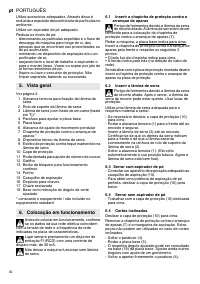
1 Clamping lever for securing the saw blade
2 Saw blade support roller
3 Saw blade (with lock-in shank (T-shank))*
4 Screw for adjusting the footplate
5 Footplate
6 Adjustment lever for pendulum motion
7 Anti-splintering footplate insert *
8 Saw blade clamping fixture
9 Protective rod for preventing unintentional
contact with the saw blade
10 Protective cap
11 Setting wheel for speed adjustment
12 Trigger switch
13 Locking button for continuous activation
14 Handle
15 Extractor connection piece
16 Wrench depot
17 Hexagon spanner
18 Curved support plate indicating preset cutting
angle
* depending on equipment/not in scope of delivery
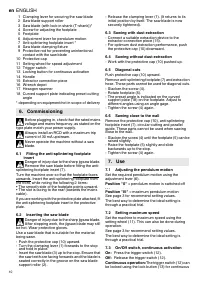
Before plugging in, check that the rated mains
voltage and mains frequency, as stated on the
type plate match your power supply.
Always install an RCD with a maximum trip
current of 30 mA upstream.
Never operate the machine without a saw
blade.
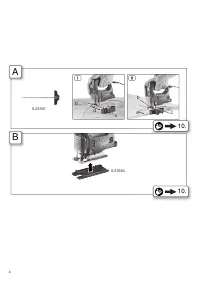
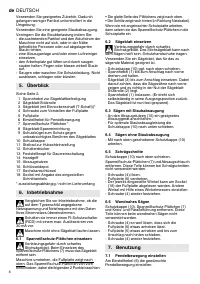
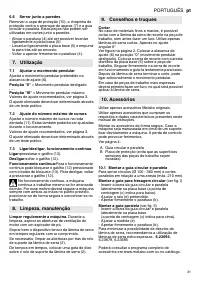
6.1 Fitting the anti-splintering footplate
insert
Danger of injury due to the sharp jigsaw blade.
Remove the saw blade before fitting the anti-
splintering footplate insert (7).
Turn the machine over so that the footplate faces
upwards. Insert the anti-splintering footplate from
the front, while noting the following 2 items:
•
The smooth side of the footplate points upward.
•
The slot is facing to the rear (towards the mains
cable).
If you are working with the protective plate attached, fit
the anti-splintering footplate insert in the protective
plate.
6.2 Inserting the saw blade
Danger of injury due to the sharp jigsaw blade.
After stopping work, the jigsaw blade may still
be hot. Wear protective gloves.
Use a saw blade that is suitable for the material
being sawn.
- Push the protective cap (10) upward.
- Turn the clamping lever (1) forwards to the stop
and hold in place.
- Insert the saw blade (3) up to the stop. Ensure that
the saw teeth are facing forwards and the blade is
seated correctly in the groove on the saw blade
support roller (2).
- Release the clamping lever (1). (It returns to its
initial position by itself. The saw blade is now
securely tightened).
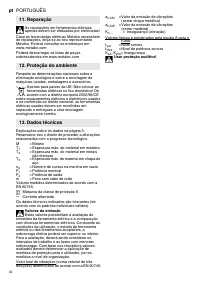
6.3 Sawing with dust extraction
- Connect a suitable extraction device to the
extractor connection piece (15).
- For optimum dust extraction performance, push
the protective cap (10) downward.
6.4 Sawing without dust extraction
- Work with the protective cap (10) pushed up.
6.5 Diagonal cuts
Push protective cap (10) upward.
Remove anti-splintering footplate (7) and extraction
hose. These parts cannot be used for diagonal cuts.
- Slacken the screw (4).
- Rotate footplate (5).
- The preset angle is indicated on the curved
support plate (18) on the footplate. Adjust to
different angles using an angle gage.
- Tighten the screw (4) again.
6.6 Sawing close to the wall
Remove the protective cap (10), anti-splintering
footplate insert (7), circular-cutting and parallel
guide. These parts cannot be used when sawing
close to the wall.
- Slacken the screw (4) until the footplate (5) can be
raised slightly.
- Raise the footplate (5) slightly and slide
backwards up to the stop.
- Tighten the screw (4) again.
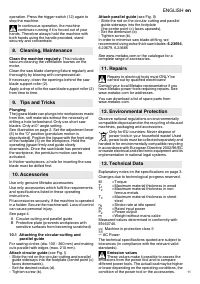
7.1 Adjusting the pendulum motion
Set the required pendulum motion using the
adjustment lever (6).
Position "0"
= pendulum motion is switched off
. . .
Position "III"
= maximum pendulum motion
See page 3 for recommend setting values.
The best way to determine the ideal setting is
through a practical trial.
7.2 Setting maximum speed
Set the machine to maximum speed using the
setting wheel (11). This can also be done during
operation.
See page 3 for recommend setting values.
The best way to determine the ideal setting is
through a practical trial.
7.3 On/Off switch, continuous activation
On:
Press the trigger switch (12).
Off:
Release the trigger switch (12).
Continuous operation:
The trigger switch (12) can
be locked using the lock button (13) for continuous
6. Commissioning
7. Use
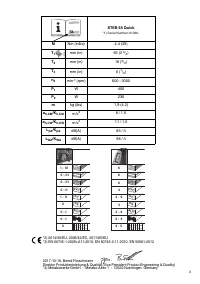
Характеристики

Остались вопросы?Не нашли свой ответ в руководстве или возникли другие проблемы? Задайте свой вопрос в форме ниже с подробным описанием вашей ситуации, чтобы другие люди и специалисты смогли дать на него ответ. Если вы знаете как решить проблему другого человека, пожалуйста, подскажите ему :)

