Кондиционеры Timberk T-AC09-S25 - инструкция пользователя по применению, эксплуатации и установке на русском языке. Мы надеемся, она поможет вам решить возникшие у вас вопросы при эксплуатации техники.
Если остались вопросы, задайте их в комментариях после инструкции.
"Загружаем инструкцию", означает, что нужно подождать пока файл загрузится и можно будет его читать онлайн. Некоторые инструкции очень большие и время их появления зависит от вашей скорости интернета.


20
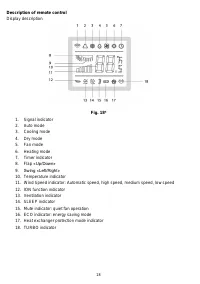
12.
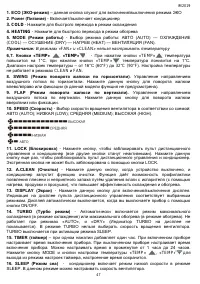
A.CLEAN
- Press when the device is OFF and the air conditioner wi ll start the cleaning
function. This function gives opportunity to prevent fungus appearance and bad smell by drying
moisture from evaporator (using drying, purging and heating the module), which increases the
efficiency of cooling and heating.
13. DISPLAY
- Press this button to turn on/off the display. Indication of the remote control
display is corresponding to selected modes. Display screen is turning off when the button
“ON/OFF” is pressed to power off.
14. TURBO
- Automatic operation of maximum cooling (in cooling mode) or maximum heating
(in heating mode). TURBO is invalid under “AUTO”, “DRY” mode (no TURBO indication and
signal). Fan speed is not indicated on the remote control when TURBO is operating. TURBO
turns off when SLEEP mode is activated.
15. TIMER
- Press to use timer function. Adding one hour each time the button is pressed. This
button sets the time to turn on the device when it’s off, and to turn off the device when it’s on.
Timing ranges from 1h to 24h. Press the MODE button and TEMP
,
buttons to exit the
timing display the time will remain valid
16. SLEEP
- Air conditioner enters low speed mode by default under SLEEP mode. Fan speed
is adjustable
* The appearance of the remote control, as well as the buttons and indicators may differ fro m the image in
the manual, but their functions are identical
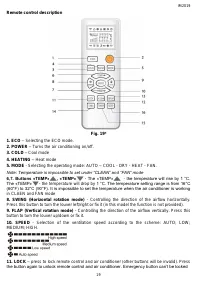
Operation
with remote control
Mounting and replacement of batteries: mount two AAA alkaline batteries, according to polarity
indicated on the remote control. In order to avoid malfunction of the remote control do not insert
used batteries or batteries of various types. If the conditioner is not used for a long time, remove
batteries from the remote control
or else electrolyte may leak and damage the board. In normal
operation of the conditioner average service life of batteries will be about a half-year.
Do not
dispose of batteries in regular garbage bins; they should be disposed of in special bins at
garbage collection points.
Replace batteries, if command receiving is not confirmed with an audio signal, or if the display
does not show a sign of command transfer. When generating commands from the remote control
point an IR emitter at a remote-control signal receiver situated on the indoor unit. Hold the
remote control board at the distance of no more than 8 m from the indoor unit.
The remote control will not work if there are curtains, doors or other objects between it and the
indoor unit. Do not allow water to enter the remote control and do not expose it to direct sunlight
and heat sources; direct the IR emitter to the remote control signal receiver located on the indoor
unit.
10. OPERATING MODES
Automatic operation mode
1. Press the MODE button, select the automatic operation mode.
2. By pressing the SPEED button, you can select the fan speed from
AUTO; LOW; MEDIUM;
HIGH.
3. Press the ON/OFF button, the air-conditioner starts to operate.
4. Press the ON/OFF button again, the air-conditioner stops.
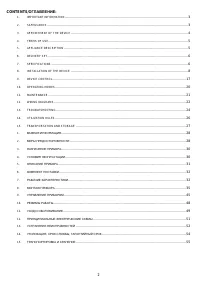
Содержание
- 28 Уважаемый покупатель!; ВАЖНАЯ ИНФОРМАЦИЯ; Просим внимательно ознакомиться; ПРИМЕЧАНИЕ; МЕРЫ ПРЕДОСТОРОЖНОСТИ
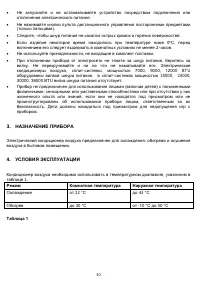
- 30 Не используйте принадлежности, не входящие в комплект поставки.; НАЗНАЧЕНИЕ ПРИБОРА; Режим; Охлаждение
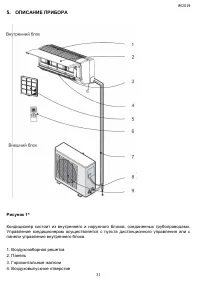
- 31 ОПИСАНИЕ ПРИБОРА; Горизонтальные жалюзи
- 32 КОМПЛЕКТ ПОСТАВКИ; Таблица 2; Вт
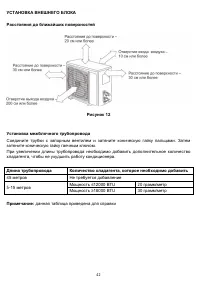
- 35 МОНТАЖ ПРИБОРА; Требования к пространству для установки:
- 36 автоматы отключения.; Требования к заземлению:; Прибор с классом электрозащиты I, должен быть правильно заземлен.
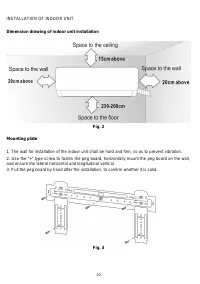
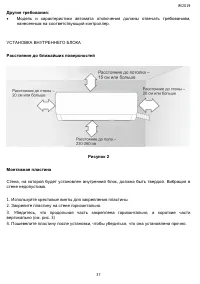
- 37 Рисунок 2; Используйте крестовые винты для закрепления пластины
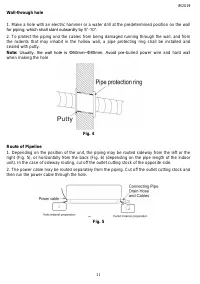
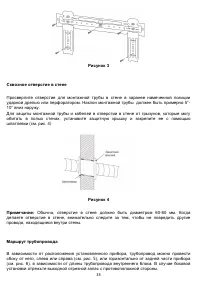
- 38 Обычно, отверстие в стене должно быть диаметром 60-80 мм. Когда
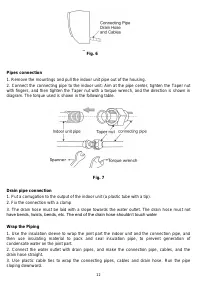
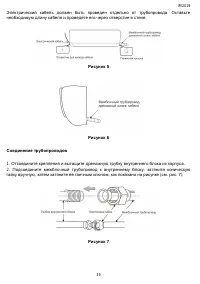
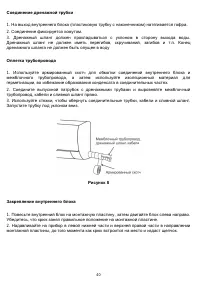
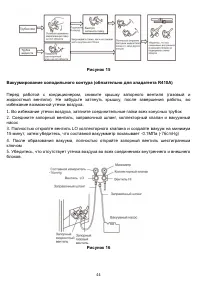
- 40 Соединение дренажной трубки; Соединение фиксируется хомутом.; Оплетка трубопровода; Запустите трубку под уклоном вниз.; Рисунок 8
- 42 ≤5 метров
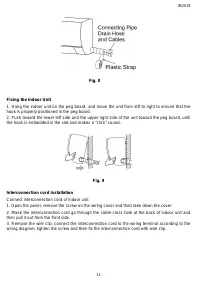
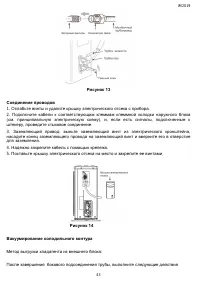
- 43 Соединение проводов; Ослабьте винты и удалите крышку электрического отсека с прибора.
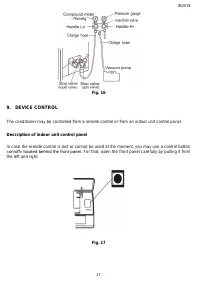
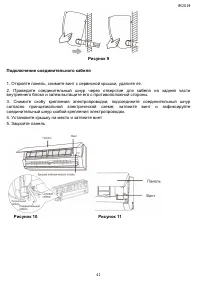
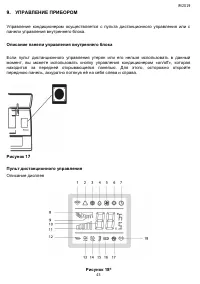
- 45 УПРАВЛЕНИЕ ПРИБОРОМ; Описание панели управления внутреннего блока; Описание дисплея
- 47 В режимах «FAN» и «CLEAN» нельзя настраивать температуру
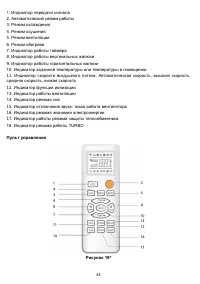
- 48 Работа с пультом дистанционного управления; РЕЖИМЫ РАБОТЫ; в режиме вентилятора настройки температуры не работают; Режим охлаждения/обогрева; . При помощи нажатия кнопок «
- 49 Режим работы вентилятора; в режиме вентилятора температура не настраивается.; УХОД И ОБСЛУЖИВАНИЕ; Чистка внутреннего блока и пульта дистанционного управления
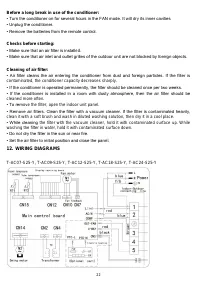
- 50 Предпусковые проверки
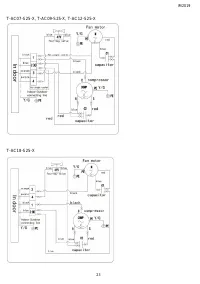
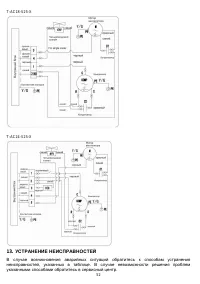
- 51 ПРИНЦИПИАЛЬНЫЕ ЭЛЕКТРИЧЕСКИЕ СХЕМЫ
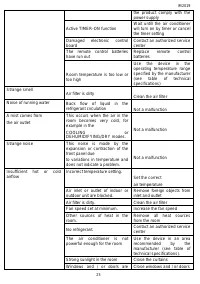
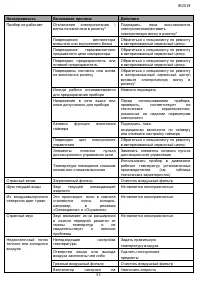
- 52 УСТРАНЕНИЕ НЕИСПРАВНОСТЕЙ
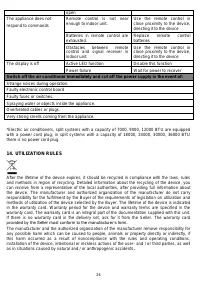
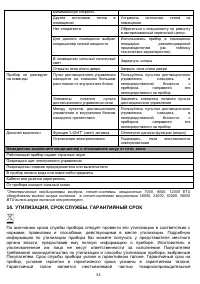
- 54 УТИЛИЗАЦИЯ, СРОК СЛУЖБЫ, ГАРАНТИЙНЫЙ СРОК; талон
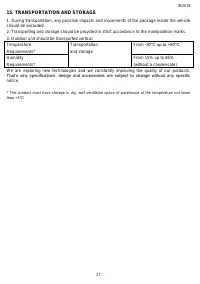
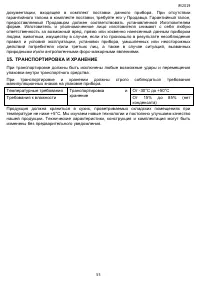
- 55 ТРАНСПОРТИРОВКА И ХРАНЕНИЕ


