Кондиционеры Tesla TT34TP61S - инструкция пользователя по применению, эксплуатации и установке на русском языке. Мы надеемся, она поможет вам решить возникшие у вас вопросы при эксплуатации техники.
Если остались вопросы, задайте их в комментариях после инструкции.
"Загружаем инструкцию", означает, что нужно подождать пока файл загрузится и можно будет его читать онлайн. Некоторые инструкции очень большие и время их появления зависит от вашей скорости интернета.

55
ENG
Step6: Connect Wiring
Step7: Wrap Piping and Cable
Step8: Mount Indoor Unit
1. Choose the right cables size determined by the maximum operating current on the nameplate.
(Check the cables size refer to section INSTALLATION PRECAUTIONS)
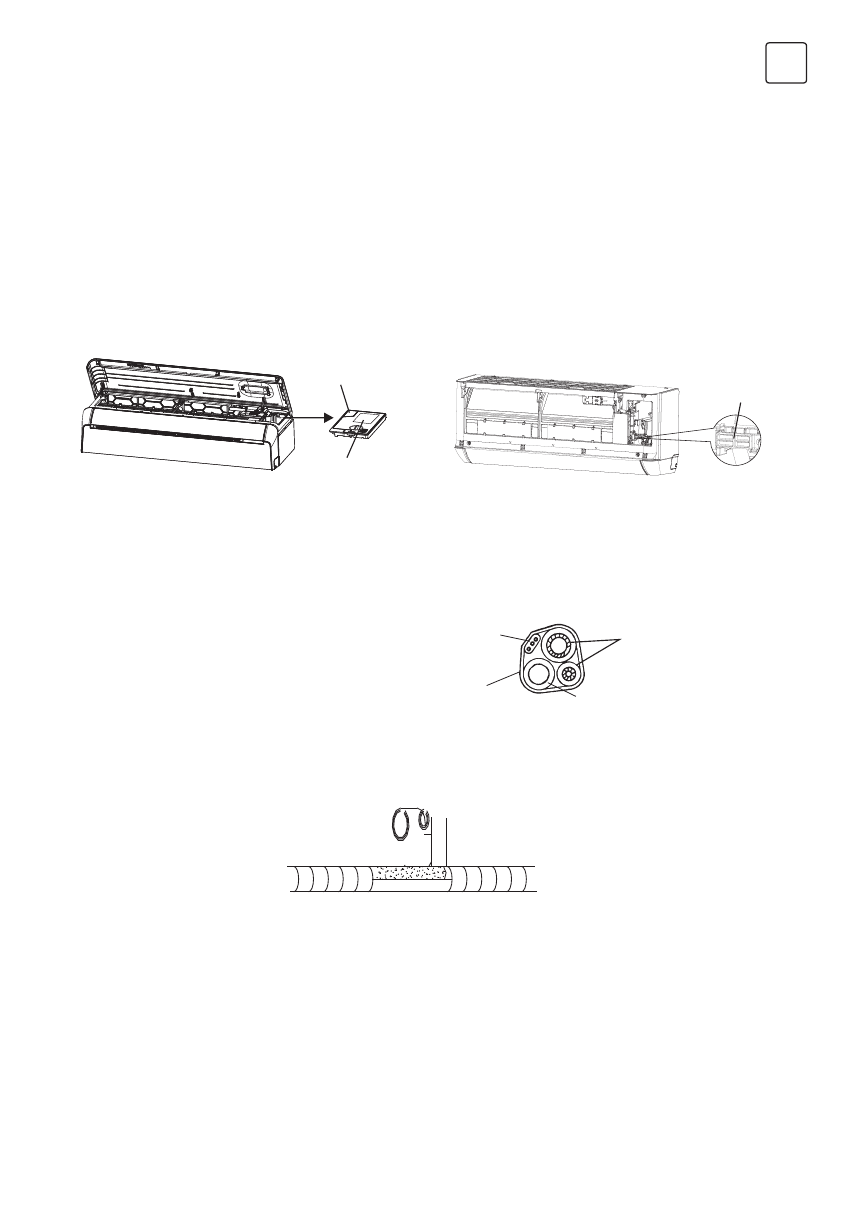
2. Open the front panel of indoor unit.
3. Use a screwdriver, open the electric control box cover, to reveal the terminal block.
4. Unscrew the cable clamp.
5. Insert one end of the cable into the position of control box from the back of the right end of the indoor unit.
6. Connect the wires to corresponding terminal according to the wiring diagram on the electric control box
cover. And make sure that they are well connected.
7. Screw the cable clamp to fasten the cables.
8. Reinstall the electric control box cover and front panel.
Control box cover
Wiring diagram
Cable clamp
After the refrigerant pipes, connecting wires and drainage hose are all installed, in order to save space, protect and
insulate them, it must be bundle with insulating tape before passing them through the wall hole.
1. Arrange the pipes ,cables and
drainage hose well as the following
picture.
2. Using the insulating tape wrap the refrigerant pipes, connecting wires and drainage hose together tightly.
1. Slowly pass the refrigerant pipes, connecting wires and drainage hose wrapped bundle through the wall hole.
2. Hook the top of indoor unit on the mounting plate.
3. Apply slight pressure to the left and right sides of the indoor unit, make sure the indoor unit is hooked firmly.
4. Push down the bottom of indoor unit to let the snaps onto the hooks of the mounting plate, and make sure it
is hooked firmly.
Sometimes, if the refrigerant pips were already embedded in the wall, or if you want to connecting the
pips and wires on the wall, do as below:
(I) Gab both ends of the bottom plate, apply a little outward force to take off the bottom plate.
Note
: (I) Make sure the drainage hose is at the bottom.
(II) void crossing and bending of parts.
Refrigerant piping
Connecting wiring
Insulation tap
Drainage hose
Содержание
- 3 МЕРЫ ПРЕДОСТОРОЖНОСТИ
- 4 ПРАВИЛА БЕЗОПАСНОСТИ
- 5 НАИМЕНОВАНИЯ ДЕТАЛЕЙ; Внутренний блок
- 6 Дисплей внутреннего блока
- 7 ПУЛЬТ УПРАВЛЕНИЯ; Пульт дистанционного управления
- 9 Замена батарей
- 10 HEATING MODE
- 11 Функция SLEEP
- 12 ИНСТРУКЦИЯ ПО ЭКСПЛУАТАЦИИ
- 18 ВАЖНО К ПРОЧТЕНИЮ; Максимальный заряд и необходимая минимальная
- 19 Правила безопасности при установке
- 20 Рекомендуемые инструменты
- 21 Шаг 1: выберите место установки; УСТАНОВКА ВНУТРЕННЕГО БЛОКА
- 22 Шаг 2: Установите монтажную пластину
- 23 Шаг 3: просверлите отверстие в стене
- 24 Шаг 5: Подключите дренажный шланг
- 25 Шаг 6: Подключите проводку
- 26 УСТАНОВКА НАРУЖНОГО БЛОКА
- 27 Шаг 2: Установите дренажный шланг
- 28 Шаг 5: Подключение трубопровода хладагента
- 29 Осмотры перед тестовым запуском
- 30 Тестовый запуск; ТЕХНИЧЕСКОЕ ОБСЛУЖИВАНИЕ
- 32 УСТРАНЕНИЕ НЕПОЛАДОК
- 33 Код ошибки на дисплее
Характеристики
Остались вопросы?Не нашли свой ответ в руководстве или возникли другие проблемы? Задайте свой вопрос в форме ниже с подробным описанием вашей ситуации, чтобы другие люди и специалисты смогли дать на него ответ. Если вы знаете как решить проблему другого человека, пожалуйста, подскажите ему :)


