Кондиционеры Tesla TT34EXC1-1232IA - инструкция пользователя по применению, эксплуатации и установке на русском языке. Мы надеемся, она поможет вам решить возникшие у вас вопросы при эксплуатации техники.
Если остались вопросы, задайте их в комментариях после инструкции.
"Загружаем инструкцию", означает, что нужно подождать пока файл загрузится и можно будет его читать онлайн. Некоторые инструкции очень большие и время их появления зависит от вашей скорости интернета.

52
ENG
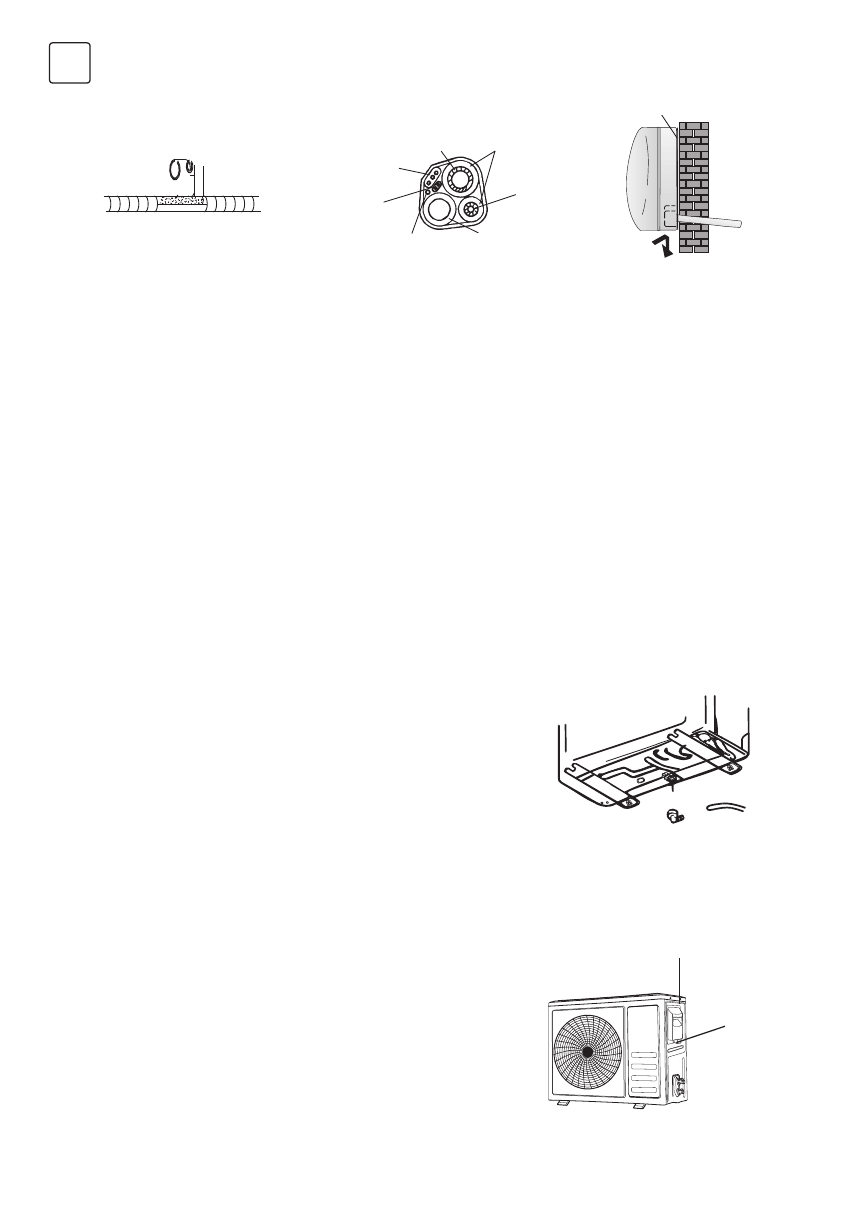
After having connected the pipe according to the instructions, install the connection cables. Now install the drain
pipe. After connection, lag the pipe, cables and drain pipe with the insulating material.
1. Arrange the pipes ,cables and drain hose well.
2. Lag the pipe joints with insulating material , securing it with vinyl tape.
3. Run the bound pipe , Cables and drain pipe through connection cable the wall hole and mount the indoor
unit onto the upper part of the mounting plate securely.
4. Press and push the lower part of the indoor unit tightly against the mounting plate.
• The outdoor unit should be installed on a solid wall and fastened securely.
• The following procedure must be observed before co- nnecting the pipes and connecting cables : decide
which is the best position on the wall and leave enough space to be able to carry out maintenance easily.
• Fasten the support to the wall using screw anchors which are particularly suited to the type of wall;
• Use a larger quantity of screw anchors than normally required for the weight they have to bear to aviod vibration
during operation and remain fastened in the same position for years without the screws becoming loose.
• The unit must be installed following the national regulations.
The condensed water and the ice formed in the outdoor unit during
heating operation can be drained away thro- ugh the drain pipe
1. Fasten the drain port in the 25mm hole placed in the part of the
unit as shown in the picture.
2. Connect the drain port and the drain pipe. Pay attention that
water is drained in a suitable place.
1. Remove the handle on the right side plate of outdoor unit.
2. Connect the power connection cord to the terminal board. Wiring
should fit that of indoor unit.
3. Fix the power connection cord with wire clamp.
4. Confirm if the wire has been fixed properly.
5. An efficient earth connection must be ensured.
6. Recover the handle.
Outdoor unit condensed water drainage (only for heat pump
models)
Electrical connections
Installation of the indoor unit
Covered by vinyl tape
refrigerant
pipe
refrigerant
pipe
Condensed
water drain pipe
Probe cable (for
heat-pump)
connection
cable 1 (for
heat-pump)
connection
cable
insulation
sleeve
Mounting plate
Installation of the outdoor unit
drain port
drain pipe
wiring diagram on
the back of the cover
screw
Содержание
- 2 RUS
- 4 ПРАВИЛА БЕЗОПАСНОСТИ
- 5 НАИМЕНОВАНИЯ ДЕТАЛЕЙ; Внутренний блок
- 6 ДИСПЛЕЙ ВНУТРЕННЕГО БЛОКА; Запуск кнопкой ручного управления
- 7 ПУЛЬТ ДИСТАНЦИОННОГО УПРАВЛЕНИЯ
- 8 Значения символов на жидкокристаллическом дисплее
- 9 Замена батареек
- 10 ИНСТРУКЦИЯ ПО ЭКСПЛУАТАЦИИ; Контроль воздушного потока
- 11 Режим охлаждения
- 12 Функция ECO
- 13 Режим самостоятельной очистки
- 14 Функция I FEEL
- 15 РУКОВОДСТВО ПО УСТАНОВКЕ; ВАЖНО К ПРОЧТЕНИЮ
- 16 Правила безопасности при установке
- 17 Специальные инструменты; Выбор места для установки
- 18 Наружный блок; Установка внутреннего блока
- 19 Крепление монтажной пластины
- 20 Прокладка трасс фреона
- 21 Электрические соединения; Установка наружного блока
- 22 Утечка
- 23 Первый запуск
- 24 ИНФОРМАЦИЯ ДЛЯ МОНТАЖНИКА
- 25 Схема подключения
- 27 ТЕХНИЧЕСКОЕ ОБСЛУЖИВАНИЕ
- 28 УСТРАНЕНИЕ НЕПОЛАДОК
- 29 ИНСТРУКЦИЯ ПО ОБСЛУЖИВАНИЮ
Характеристики
Остались вопросы?Не нашли свой ответ в руководстве или возникли другие проблемы? Задайте свой вопрос в форме ниже с подробным описанием вашей ситуации, чтобы другие люди и специалисты смогли дать на него ответ. Если вы знаете как решить проблему другого человека, пожалуйста, подскажите ему :)


