Кофеварка Philips RI8329 Saeco - инструкция пользователя по применению, эксплуатации и установке на русском языке. Мы надеемся, она поможет вам решить возникшие у вас вопросы при эксплуатации техники.
Если остались вопросы, задайте их в комментариях после инструкции.
"Загружаем инструкцию", означает, что нужно подождать пока файл загрузится и можно будет его читать онлайн. Некоторые инструкции очень большие и время их появления зависит от вашей скорости интернета.


• 9 •
English
4.5 Circuit
Priming
Upon fi rst use, after dispensing steam or when the water tank
is empty, the machine’s circuit must always be primed.
•
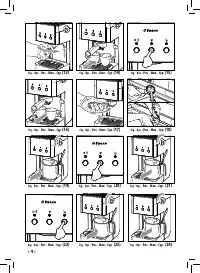
(Fig.5) -
Press the ON/OFF button (14); the indicator light
(15) will turn on to indicate that the machine is on.
•
(Fig.6) -
Place a container under the steam wand. Open
the “hot water/steam” knob (3) by turning it counter-
clockwise.
•
(Fig.7) -
Press the brew button (16).
• Wait until a steady jet of water fl ows out of the steam
wand.
•
(Fig.7) -
Press the brew button (16) again to end the op-
eration.
•
(Fig.8) -
Close the "hot water/steam" knob (3) by turning
it clockwise. Remove the container.
The machine is now ready to brew coff ee and dispense steam.
Please see related chapters for operating details.
4.6 Using the Machine for the First Time
or After a Period of Inactivity
This simple operation ensures optimal brewing and must be
performed:
- At fi rst start-up.
- When the machine remains inactive for a long time (more
than 2 weeks).
Water dispensed during this process must be
emptied into an adequate drain and is not suit-
able for food use. If the container fi lls up during the
cycle, stop dispensing water and empty the container
before resuming the operation.
A
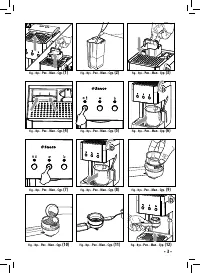
(Fig.2) -
Rinse the tank and fi ll it again with fresh drinking
water.
B
(Fig.6) -
Place a container under the steam wand. Open
the knob (3) slowly by turning it counter-clockwise.
(Fig.7) -
Press the brew button (16).
C Dispense the whole water tank content from the steam/
hot water wand.
(Fig.7) -
Press the brew button (16) again to end the op-
eration.
(Fig.8) -
Close the knob (3) by turning it clockwise.
D
(Fig.2) -
Fill the tank with fresh drinking water.
E
(Fig.12-13) -
Insert the fi lter holder into the brew unit (8)
from the bottom and turn it from left to right until it locks
into place.
F Place a suitable container under the fi lter holder.
G
(Fig.15) -
Press the brew button (16) and dispense all the
water in the tank. Once the water tank is empty, stop dis-
pensing by pressing the brew button (16) again.
At the end, empty the container.
H
(Fig.17) -
Remove the fi lter holder from the unit by turn-
ing it from right to left and rinse it with fresh drinking wa-
ter.
I
The machine is now ready to be used.
5 COFFEE
BREWING
Warning! During the coff ee brewing it is forbid-
den to remove the pressurized fi lter holder by
manually turning it clockwise. Danger of burns!
• During this operation the "machine ready" light (17) may
fl ash. This should be considered a standard operation, not
a fault.
• Before using the machine, make sure that the hot water/
steam knob (3) is closed and that there is enough water in
the machine tank.
•
(Fig.5) -
Press the ON/OFF button (14); the indicator light
(15) will turn on to indicate that the machine is on.
• Wait until the "machine ready" light (17) turns on. The
machine is now ready to brew coff ee.
Accessories for coff ee brewing are placed in
a specially designed seat to make operations
easy and immediate.
If the ground coff ee measuring scoop and/or the fi lters
are required, lift the lid (2) and take what you need
(Fig.29).
If coff ee is NOT brewed after pressing the brew
button (16), press the brew button (16) again
and check the "Troubleshooting" table before remov-
ing the fi lter holder.
•
(Fig.9) -
Insert the fi lter (13) in the pressurized fi lter
holder (11). The fi lter is already inserted when using the
machine for the fi rst time.
•
(Fig.12)
- Insert the pressurized fi lter holder into the brew
unit (8) from the bottom.
•
(Fig.13)
- Turn the fi lter holder from left to right until it
locks into place. Release the grip from the pressurized fi lter
holder handle. The handle is automatically slightly turned
leftwards.


