Кофеварка VITEK VT-1525 BK - инструкция пользователя по применению, эксплуатации и установке на русском языке. Мы надеемся, она поможет вам решить возникшие у вас вопросы при эксплуатации техники.
Если остались вопросы, задайте их в комментариях после инструкции.
"Загружаем инструкцию", означает, что нужно подождать пока файл загрузится и можно будет его читать онлайн. Некоторые инструкции очень большие и время их появления зависит от вашей скорости интернета.

5
ENGLISH
•
Insert the power plug into the mains socket.
Press the button
(9) to switch the coffee
maker on, the indicator (8) will light up red.
•
Press the button
(12) and wait until water
is delivered from the outlet openings of the fil-
ter holder (5) and then press the button
(12)
again. It is necessary for water from the remov-
able tank (16) to start filling the boiler.
•
Make sure that the buttons
(12, 13) are
not pressed. Wait until the unit starts preheating.
Wait until the ready indicator (14) lights up green.
It means that the preheating is over (the water in
the boiler heated up).
•
Press the button
(12), water will start
pouring from the outlet openings of the filter
holder (5).
•
Pour water out for 1 minute and then stop the
water supply by pressing the button
(12). Wait
until water stops pouring from the filter holder (5)
outlet openings and pour it out from the bowl. The
water supply system washing is over.
Washing the cappuccinator pipe
•
After washing the water supply system press
the steam supply button
(13) and wait
until the ready indicator (14) lights up green.
Place a suitable cup under the cappuccina-
tor pipe (18).
•
Switch the steam supply on slowly turning the
knob (15) counterclockwise in the direction of
the symbol “+”.
•
Wait until some water pours from the cappuc-
cinator pipe tip (19), after that steam will go out
more intensively; switch the steam supply off by
setting the steam supply knob (15) to the posi-
tion “-”.
The water supply system and cappuccinator
pipe washing is over.
Note:
When the water supply is switched on for
the first time, a loud sound of the operating pump
and noticeable vibration of the coffee maker body
is possible, but in 20-30 seconds, when the pump
is filled with water, the sound and vibration level will
decrease significantly.
Attention!
When switching the steam supply on,
be careful to avoid burns by hot water drops and
hot steam.
MAKING ESPRESSO
Before making coffee it is recommended to warm
the coffee maker, the filter (6) and the filter holder
(5). Preliminary warming is necessary for making
high-quality ready coffee.
Preheat the cups that you want to use as well; to do
this, place them on the tray (11), while water is
heated in the boiler, the tray (11) heats up too, thus
warming the cups.
Preliminary warming
•
Make sure that the buttons (12, 13) are not
pressed and the steam supply knob (15) is in the
position “-”.
•
Before the operation fill the removable water
tank (16) with water. Pull the removable water
tank (16), disconnect it from the unit and fill with
cold water (the water level should be above the
mark «MIN» but should not exceed the mark
«MAX»). After that install the water intake pipe
(20) into the tank and install the removable tank
(16) back to its place.
•
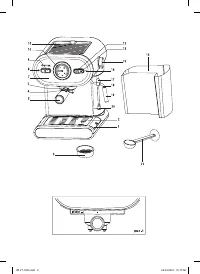
Insert the coffee filter (6) into the filter holder (5).
•
Without adding coffee into the filter (6), attach
the filter holder (5) to the coffee maker boiler; to
do this, place the filter holder handle (3) under
the inscription «
INSERT
» on the coffee maker
body, insert the holder (5) into the boiler and
turn the filter holder handle (3) counterclock-
wise until bumping (in the direction of the “
I
”
mark) (pic. 1).
•
Place a suitable bowl on the tray grid (2). Make
sure that the steam supply control knob (15) is
set to the position «-».
•
Insert the power plug into the mains socket.
Press the button
(9) to switch the coffee
maker on, the indicator (8) will light up red.
Make sure that the buttons
(12, 13) are
not pressed.
•
Press the button
(12). Wait until water is deliv-
ered from the outlet openings of the filter holder
(5) and then press the button
(12) again. It
is necessary for water from the removable tank
(16) to start filling the boiler.
Note: For making high-quality hot drink always
fill the boiler with water before making drinks.
•
When the ready indicator (14) lights up green,
press the button
(12) and water will start
pouring from the outlet openings of the filter
holder (5).
•
Pour the water out for about 20 seconds and
then press the button
(12). Preheating is over.
Making espresso
•
Make sure that there is enough water in the
removable tank (16), the buttons (12, 13) are not
pressed and the steam supply knob (15) is in the
position “-”.
IM VT-1525.indd 5
25.04.2016 15:17:59
Содержание
- 20 Не разрешайте детям играть с
- 21 ПЕРЕД ПЕРВЫМ ИСПОЛЬЗОВАНИЕМ; Промывка системы подачи воды; Промывка тру бки капучинатора
- 22 При первом включении подачи; Предварительный прогрев; Нажмите кнопку; INSERT; » на корпусе кофеварки,
- 23 на менее насыщенный) нажмите кнопку; КАК ПОЛУЧИТЬ ХОРОШИЙ ЭСПРЕССО; ПРИГОТОВЛЕНИЕ К АПУЧИНО; Первая порция пара может
- 24 Чтобы при последующем при-; ПОДОГРЕВ НАПИТКОВ; кнопка подачи пара
- 25 УДАЛЕНИЕ НАКИПИ; ЧИСТК А
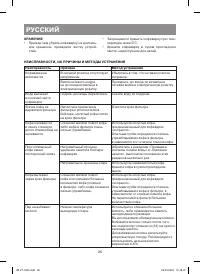
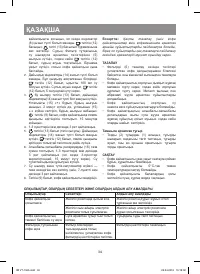
- 26 ХРАНЕНИЕ; Поддон для воды переполнен.
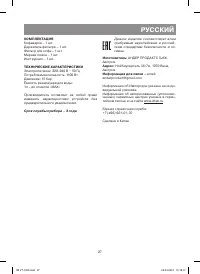
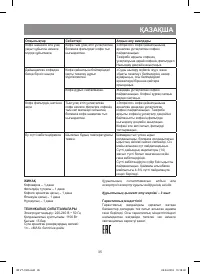
- 27 КОМПЛЕКТАЦИЯ; Срок службы прибора – 3 года; Информация для связи –; Единая справочная служба:
- 44 RUS


