Кофеварка Saturn ST-CM7089 - инструкция пользователя по применению, эксплуатации и установке на русском языке. Мы надеемся, она поможет вам решить возникшие у вас вопросы при эксплуатации техники.
Если остались вопросы, задайте их в комментариях после инструкции.
"Загружаем инструкцию", означает, что нужно подождать пока файл загрузится и можно будет его читать онлайн. Некоторые инструкции очень большие и время их появления зависит от вашей скорости интернета.


6
control button again to the “
S T O P
”
position, make sure the coffee/steam
button is on the higher position which is
the
position and waiting for a
moment, the appliance begins to be
pre-heated until the ready indicator
(green) is illuminated, it shows the pre-
heating is finish. Pressing the pump to
the lower position which is the “
”
position again, and water will flow out.
After water not dropping out any more,
you can pour the water in each
container
out
then
clean
them
thoroughly, now you can start brewing.
Note:
There may be noise and no water
comes out when pump the water on the
first time, it is normal, you should turn
the steam control knob to the opening
position to release the air in the
appliance. After about 20s, the noise
will disappear, and the water will comes
out.
PRE-HEATING
To make a cup of good hot Espresso
coffee, we recommend you preheating
the appliance before making coffee,
including the funnel, filter and cup, so
that the coffee flavor can not be
influenced by the cold parts.
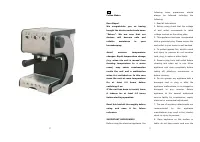
Remove the detachable tank and open
the tank cover to fill it with desired
water, the water level should not exceed
the “MAX” mark in the tank. Then place
the tank into the appliance properly.
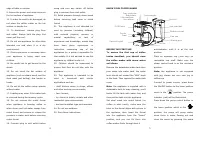
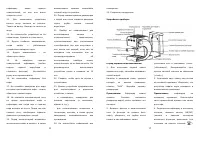
Set steel mesh into metal funnel, make
sure the tube on the funnel aligns with
groove in the appliance, then insert the
funnel into the appliance from the
“Insert” position, and you can fix them
into coffee maker firmly through turn it
anticlockwise until it is at the lock
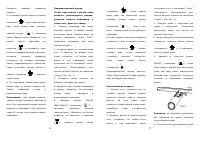
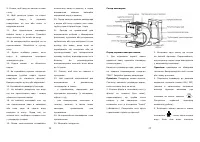
position (See fig. 1).
Place an espresso cup (your cup) on the
cup warming plate for warm and dry for
collecting coffee later.
4. Then connecting the appliance to
power supply source. Make sure the
steam control knob is on the minimum
position.
Press the ON/OFF button to the lower
” position, the
position which is the “
power indicator (red) will be illuminated,
make sure the coffee/steam button is on
the higher position which is the
position. Press down the pump control
button to the lower position which is the
“
” position, when there is water
7
flowing out, close the pump immediately
by pressing the pump control button
again to the higher position of “
S T O P
”.
The purpose of the step is that pump
the water of the tank into the housing.
When the ready indicator (green) is
illuminated, you should press down the
pump control button to the lower
position which is the “
” position
again, there will be hot water flowing
out. When the ready indicator (green) is
extinguished, close the pump by
pressing the pump control button again
to the higher position of “
S T O P
”. The
pre-heating is finished. Before making
coffee, first clean out the water in the
drip tray.
MAKE ESPRESSO COFFEE
Remove the funnel by turning it in
clockwise, add ground coffee to steel
mesh with measuring spoon, a spoon
ground coffee power can make about a
cup of top-grade coffee, then press the
ground coffee powder tightly with the
tamper.
Set steel mesh into metal funnel, make
sure the tube on the funnel aligns with
groove in the appliance, then insert the
funnel into the appliance from the
“Insert” position, and you can fix them
into coffee maker firmly through turn it
anticlockwise until it is at the lock
position (See fig. 1).
Remove the cup from the cup warming
plate. Then place the hot cup (your cup)
on removable cup shelf.
4. At the time, the ready indicator
(green) is illuminated, once the green
lamp is illuminated, you should press
down the pump control button to the
lower position which is the “
”
position, waiting for a moment, there
will be coffee flowing out.
5.You should press and release the
ON/OFF button to the higher position
which is the “
O F F
” position manually
when desired coffee is obtained or the
color of coffee changes weak obviously,
the power indicator and ready indicator
go out and the coffee maker stops
working, your coffee is ready now.

