
Холодильник Liebherr KTPesf 1750 Premium - инструкция пользователя по применению, эксплуатации и установке на русском языке. Мы надеемся, она поможет вам решить возникшие у вас вопросы при эксплуатации техники.
Если остались вопросы, задайте их в комментариях после инструкции.
"Загружаем инструкцию", означает, что нужно подождать пока файл загрузится и можно будет его читать онлайн. Некоторые инструкции очень большие и время их появления зависит от вашей скорости интернета.


- The shelves and door racks can be dis-
mantled for cleaning. Remove the trims
and sides from the glass shelves. Remove
the protective film from the decorative
trims.
- Ensure that no cleaning water penetra-
tes into the electrical components, drain
gulley* or ventilation grilles. Wipe the app-
liance dry.
- Do not damage or remove the type plate on the inside of the
appliance. It is very important for servicing purposes.
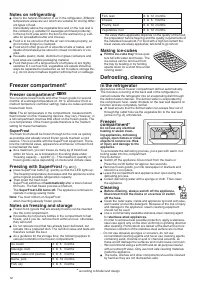
W
Clean the
drain hole
on the rear wall above the vegetable bins
often Fig.
A
, arrow.
If necessary, clean with a thin object, e.g. a cotton swab
or similar.
W
Ensure that none of the wires or other components are dis-
lodged, bent or damaged.
W
Then connect/switch on the appliance.
If the appliance is to be left switched off
for any length of time
,
empty the appliance, disconnect from the mains, clean as de-
scribed above and leave the door open so as to avoid odours.
Troubleshooting
Your appliance is designed and manufactured in such a way as
to provide fault.free operation and a long service life.
Nevertheless, if a fault should occur during operation, please
check whether the fault is due to incorrect operation. In this case
we have to charge you for any costs incurred also within the war-
ranty period.
You can eliminate the following faults yourself by checking the
possible causes:
Fault
possible cause and remedy
Appliance not working, display is unlit
- Is the appliance switched on properly?
- Is the mains plug properly inserted in the socket?
- Is the socket fuse intact?
The interior light does not come on
- Is the refrigerator compartment switched on?
- The bulb is defective. Change the bulb as described in “Inte-
rior light”.
Loud running noise
- Is the appliance standing firmly on the floor, or does the com-
pressor cause nearby items of furniture or objects to vibrate?
If necessary, move the appliance slightly, align by adjusting
the adjustable feet, or move bottles and containers apart.
- The following are normal:
Flow noises, bubbling or dripping, coming from the coolant in
the refrigerating circuit.
A soft clicking sound, this always occurs when the refrige-
ration unit (the motor) switches on or off automatically.
Motor noise; this will be slightly louder for a brief period
when the refrigeration unit switches on. When SuperFrost is
switched on, fresh food is inserted, or when the door is open
for a long time, the refrigerating capacity increases automati-
cally.
Temperature is not cold enough
- Is the temperature controller set correctly? (Set colder as
needed).
- Is the appliance door properly closed?
- Is there sufficient ventilation?
Unblock ventilation grill as needed.
- Is the ambient temperature too hot? (see “Conditions” section)
- Has the appliance been open too often or for too long?
- Wait as needed, whether the required temparture has been
set on its own.
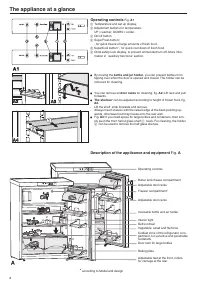
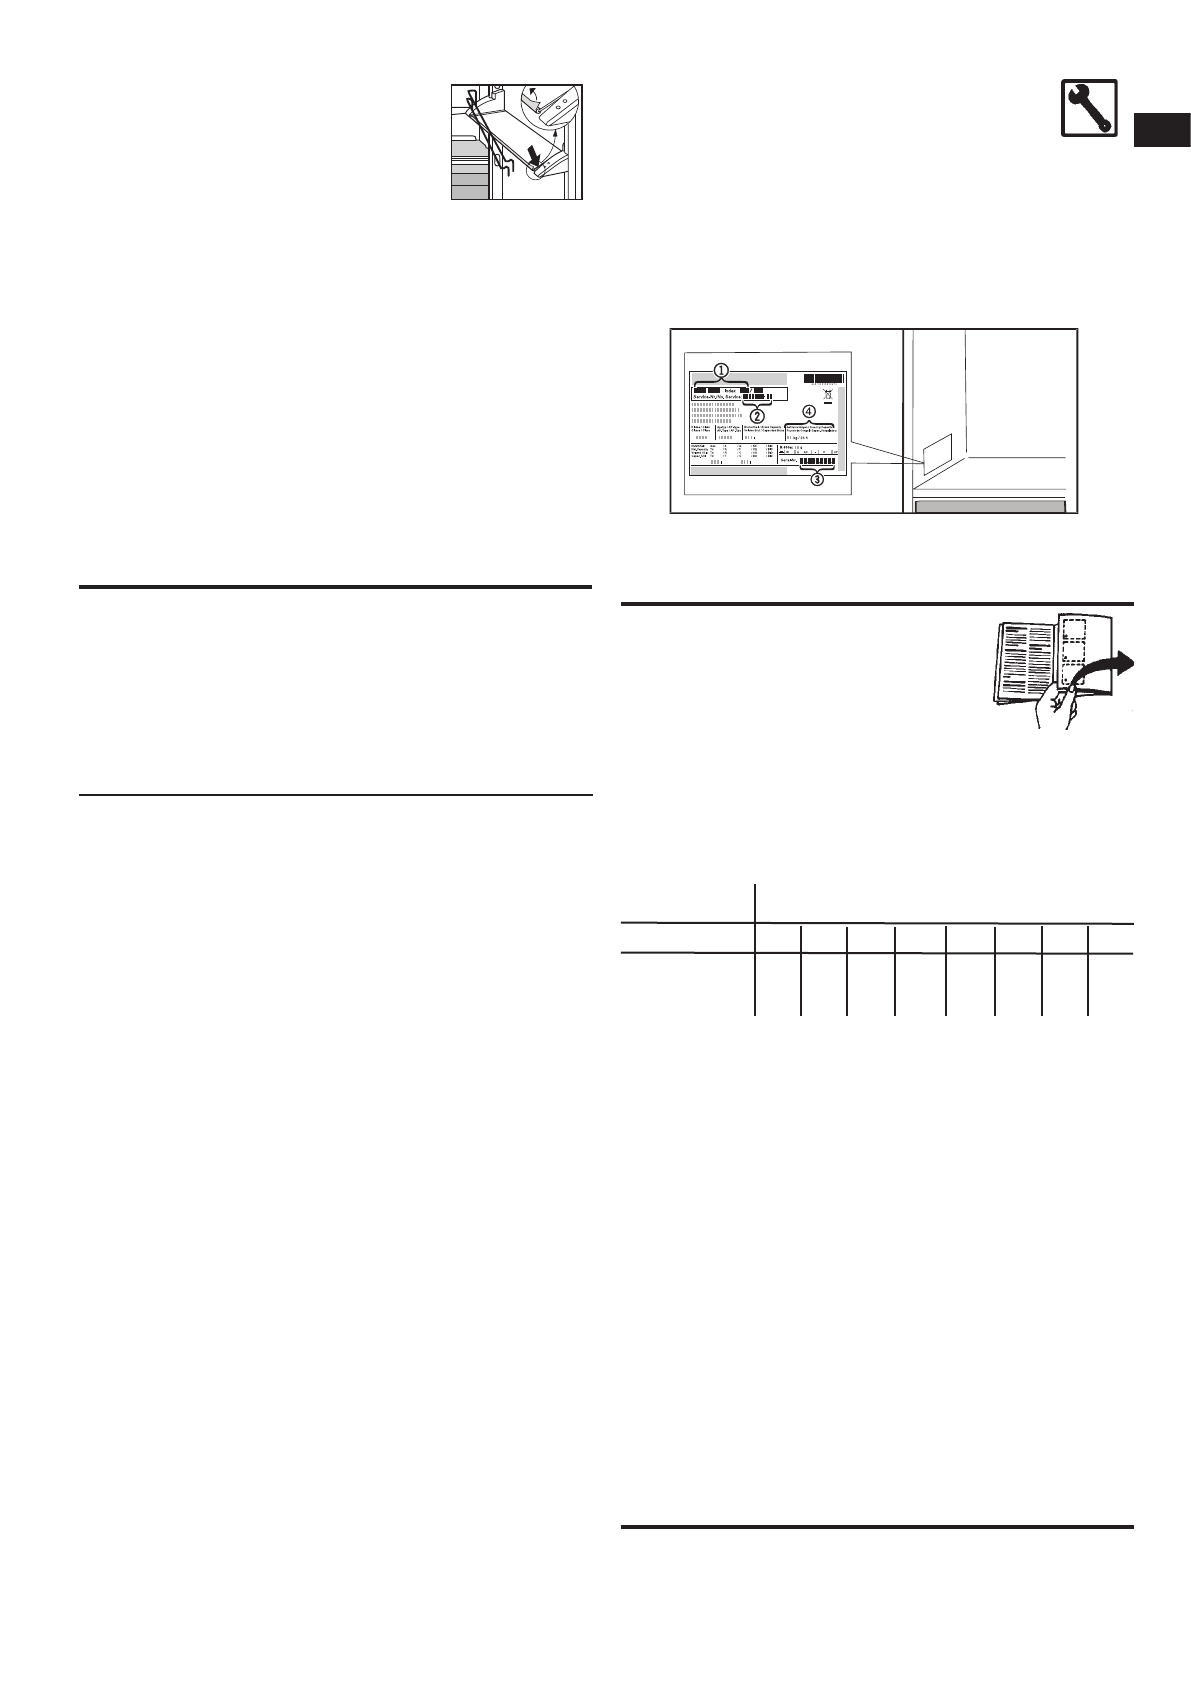
Customer service and type plate
If none of the above causes applies and you cannot
eliminate the fault yourself or if more than one LED is
flashing, please contact your nearest after-sales serv-
ice point (see list attached).
Please state the
Appliance name
1
,
Service
2
,
Appliance number
3
of the rating plate with (see Fig.), and
which LED indicators
are
flashing. This ensures rapid, accurate servicing. The rating plate
is located inside the appliance on the left-hand side.
Instructions for installation and
modification
Before reading, please fold out the refer-
ence page with the illustrations at the
back.
All types and models are subject to continuous improvement and
the manufacturer therefore reserves the right to make modifica-
tions in the shape, equipment and technology.
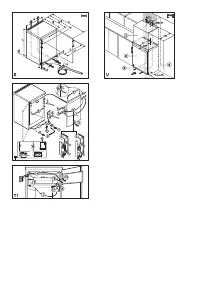
Changing over door hinges
Fig.
T:
You can change over the door hinges if necessary.
Follow the order of the positions illustrated in fig.
T/T1.
Setup Dimensions
The appliance dimensions can be found on the fig
S
below and
in the following table.
Model
Appliance dimensions (mm)
Nominal width
a c c' d e e’ g h
KTP15../17.. 602 613 640 1174 628 657 611 851
KTP(esf)15../17.. 602 597 644 1174 610 657 611 851
Insertion into row of kitchen units
1
top unit
2
refrigerator/freezer
3
Kitchen cupboard
4
wall
Fig.
U
: The appliances can be installed in a row of kitchen units.
To adapt the height of the appliance to the surrounding furniture
a top unit
1
can be added.
When retrofitting with standard kitchen cabinets (max. depth
50 mm), the appliance can be set up directly next to the kitchen
cupboard Fig.
U
3
. The appliance door protrudes 31 mm at the
side and 4 mm in the middle of the appliance against the front
panel of the kitchen cupboard. It can therefore be opened and
closed without any problems.
Important for ventilation:
- On the rear side of the top unit there must be a ventilation duct
of at least 50 mm depth along the entire width of the top unit.
- The area of ventilation underneath the ceiling must be at least
300 cm².
- The larger the ventilation cross section, the more energy the
appliance will be able to save.
If the appliance is installed with the hinge side against a wall
Fig.
U
4
, the distance between the appliance and the wall must
be at least 36 mm. This corresponds with the handle protrusion
when the door is open.
*
according to Model and design
13
GB
Характеристики

Остались вопросы?Не нашли свой ответ в руководстве или возникли другие проблемы? Задайте свой вопрос в форме ниже с подробным описанием вашей ситуации, чтобы другие люди и специалисты смогли дать на него ответ. Если вы знаете как решить проблему другого человека, пожалуйста, подскажите ему :)


