
Холодильник Liebherr KBes 3660 Premium BioFresh - инструкция пользователя по применению, эксплуатации и установке на русском языке. Мы надеемся, она поможет вам решить возникшие у вас вопросы при эксплуатации техники.
Если остались вопросы, задайте их в комментариях после инструкции.
"Загружаем инструкцию", означает, что нужно подождать пока файл загрузится и можно будет его читать онлайн. Некоторые инструкции очень большие и время их появления зависит от вашей скорости интернета.

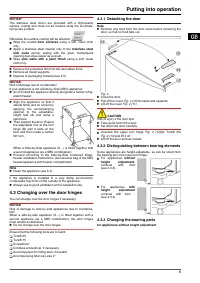
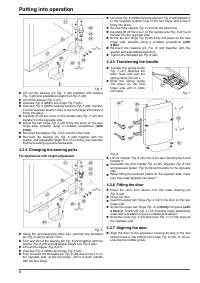
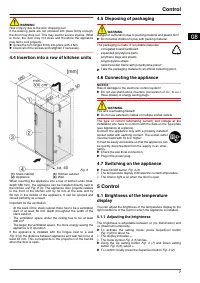
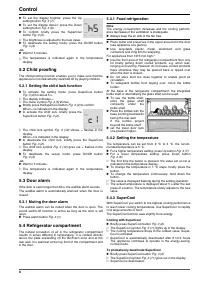
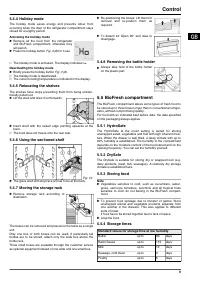
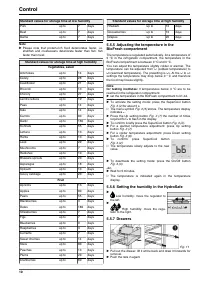
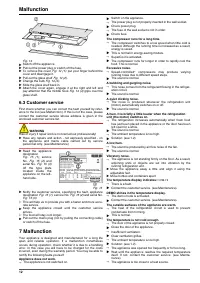
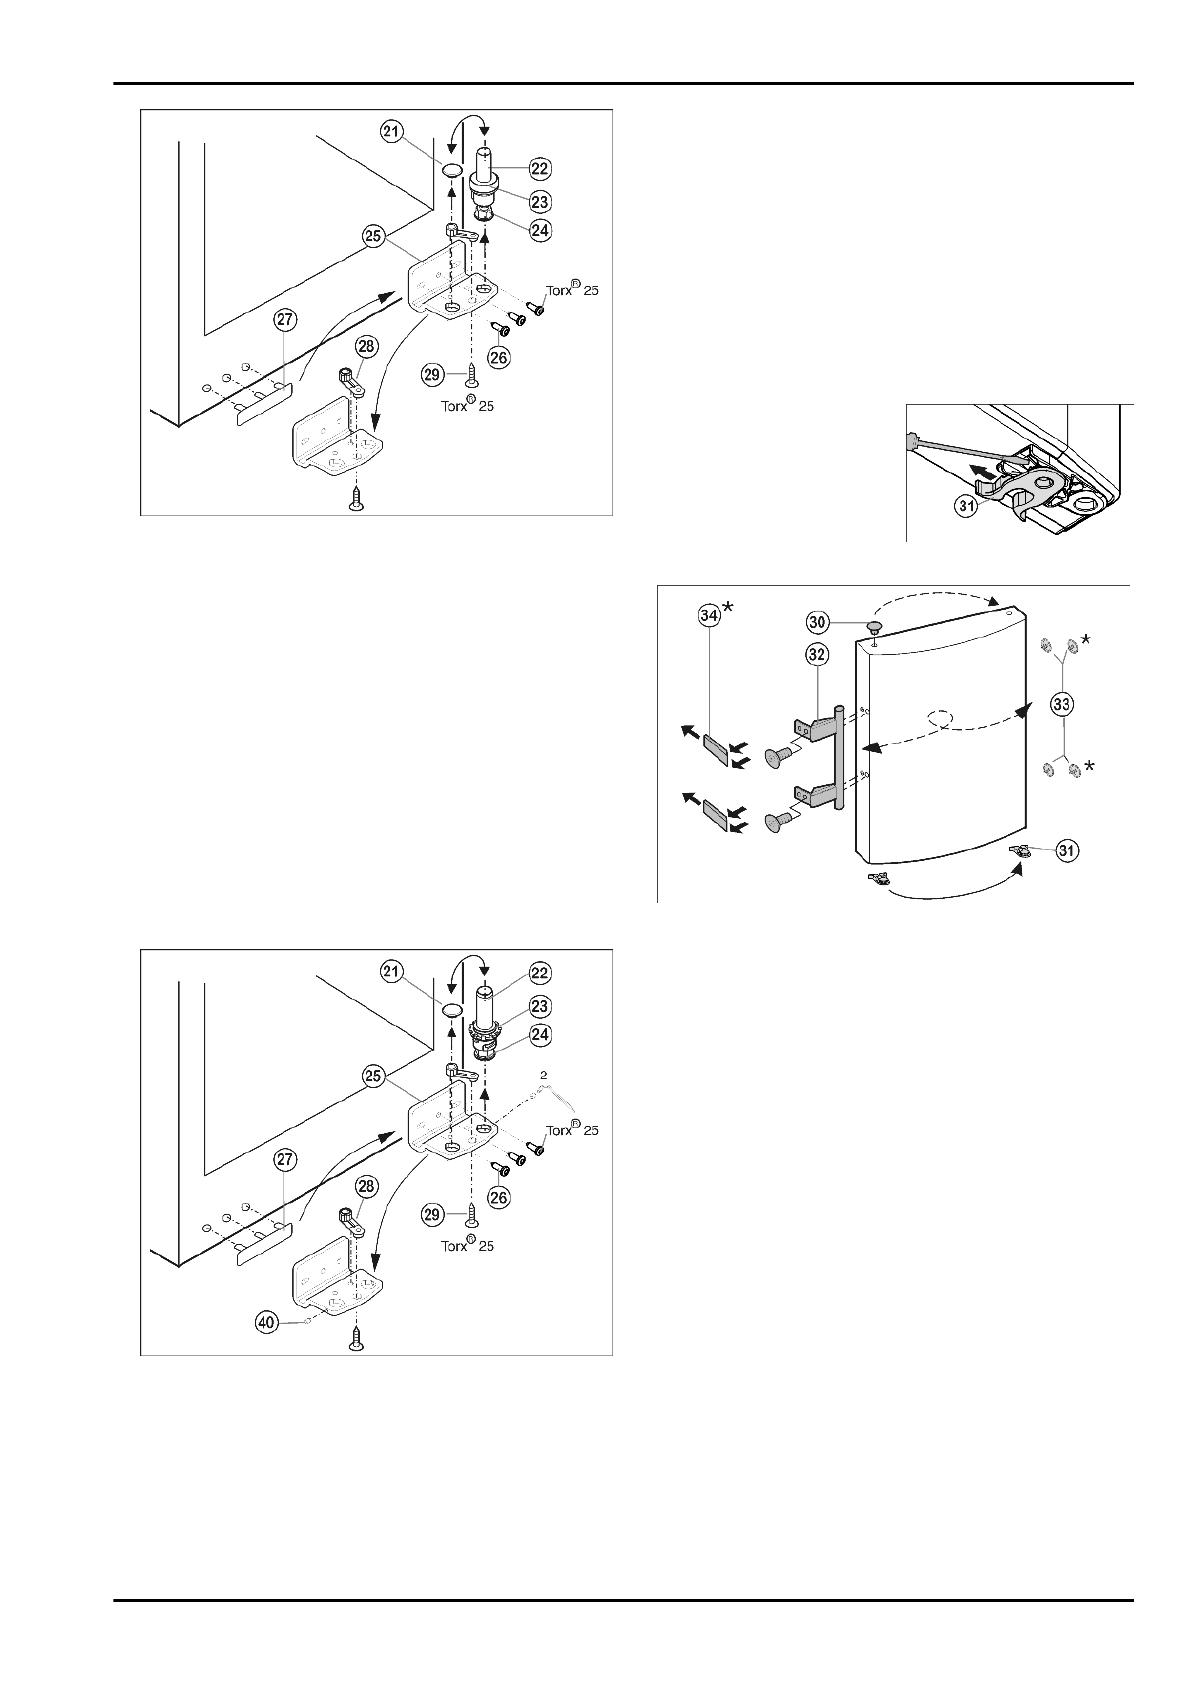
Fig. 5
u
Lift out the bearing pin
Fig. 5 (22) together with washer
Fig. 5 (23) and adjustable-height foot Fig. 5 (24).
u
Lift off the stopper
Fig. 5 (21).
u
Unscrew
Fig. 5 (26)the turn hinge Fig. 5 (25).
u
Unscrew
Fig. 5 (29)the bearing element Fig. 5 (28) , transfer
it to the opposite location hole of the turn hinge and screw it
firmly into place.
u
Carefully lift off the cover on the handle side
Fig. 5 (27) and
transfer it to the opposite side.
u
Screw the turn hinge
Fig. 5 (25) firmly into place on the new
hinge side, possibly using a cordless screwdriver (with
4 Nm).
u
Re-insert the stopper
Fig. 5 (21) into the other hole.
u
Re-insert the bearing pin
Fig. 5 (22) together with the
washer and adjustable-height foot. In so doing, pay attention
that the locating lug points backwards
4.3.4 Changing the bearing parts
For appliances with height adjustment
Fig. 6
u
Using the accompanying Allen key, unscrew the threaded
pin
Fig. 6 (40) by about 1 turn.
u
Turn and lift out the bearing pin
Fig. 6 (22) together with the
washer
Fig. 6 (23) and adjustable-height foot Fig. 6 (24).
u
Lift out the stopper
Fig. 6 (21).
u
Unscrew
Fig. 6 (26)the turn hinge Fig. 6 (25).
u
Fully unscrew the threaded pin
Fig. 6 (40) and screw it in on
the opposite side, at the turn hinge, until it is flush outside
with the turn hinge.
u
Unscrew
Fig. 6 (29)the bearing element Fig. 6 (28) transfer it
to the opposite location hole of the turn hinge and screw it
firmly into place.
u
Re-insert the stopper
Fig. 6 (21) into the other hole.
u
Carefully lift off the cover on the handle side
Fig. 6 (27) and
transfer it to the opposite side.
u
Screw the turn hinge
Fig. 6 (25) firmly into place on the new
hinge side, possibly using a cordless screwdriver (with
4 Nm).
u
Re-insert the bearing pin
Fig. 6 (22) together with the
washer and adjustable-height foot.
u
Tighten the threaded pin
Fig. 6 (40).
4.3.5 Transferring the handle
u
Transfer the spring clamp
Fig. 7 (31): Depress the
latch nose and pull the
spring clamp off over it.
u
Slide the spring clamp
into place on the new
hinge side until it clicks
into place.
Fig. 7
Fig. 8
u
Lift the stopper
Fig. 8 (33) out of the door bearing bush and
transfer it.
u
Dismantle the door handle
Fig. 8 (32), stoppers Fig. 8 (33)
and pressure plates*
Fig. 8 (34) and transfer to the opposite
side.
u
When fitting the pressure plates on the opposite side, make
sure they snap properly into place.*
4.3.6 Fitting the door
u
Place the door from above onto the lower bearing pin
Fig. 6 (22).
u
Close the door.
u
Insert the upper turn hinge
Fig. 4 (12) in the door on the new
hinge side.
u
Screw the upper turn hinge
Fig. 4 (12)firmly into place (with
4 Nm)(2x Torx® 25)
Fig. 4 (13). Possibly make preliminary
holes with a bradawl or use a cordless screwdriver.
u
Snap the cover
Fig. 4 (10) and cover Fig. 4 (11) into place at
the opposite side.
4.3.7 Aligning the door
u
Align the door to the appliance housing by way of the two
oblong holes in the bottom turn hinge
Fig. 6 (25). To do so,
unscrew the middle screw.
Putting into operation
6
Характеристики

Остались вопросы?Не нашли свой ответ в руководстве или возникли другие проблемы? Задайте свой вопрос в форме ниже с подробным описанием вашей ситуации, чтобы другие люди и специалисты смогли дать на него ответ. Если вы знаете как решить проблему другого человека, пожалуйста, подскажите ему :)


