
Газонокосилки FERM LMM1013 - инструкция пользователя по применению, эксплуатации и установке на русском языке. Мы надеемся, она поможет вам решить возникшие у вас вопросы при эксплуатации техники.
Если остались вопросы, задайте их в комментариях после инструкции.
"Загружаем инструкцию", означает, что нужно подождать пока файл загрузится и можно будет его читать онлайн. Некоторые инструкции очень большие и время их появления зависит от вашей скорости интернета.


13
EN
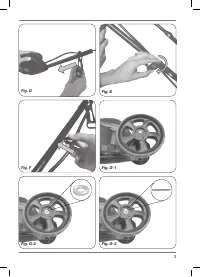
knobs (15) as shown on figure E. Make sure
the on/off switch (2) assembly is on the right
side when standing behind the lawn mower.
3. Fixate the cable to the handle by using the
cable holders (6), as shown on figure F.
Note:
When handle knobs (15) are loosened, the
upper handle (1) can be folded down for storing
the lawn mower. Ensure that the power cable is
not caught.
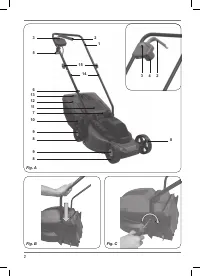
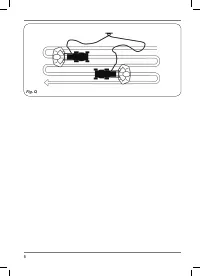
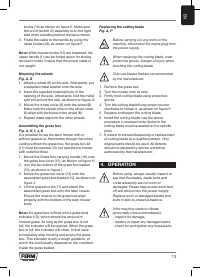
Mounting the wheels
Fig. A, G
1. Attach a wheel (8) on the axle. Afterwards, put
a supplied metal washer onto the axle.
2. Insert the supplied metal split pin in the
opening of the axle. Afterwards, fold the metal
split pin around the axle, as shown on figure G.
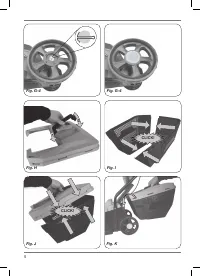
3. Mount the wheel cover (9) onto the wheel (8).
Make sure the plastic pins on the wheel cover
(9) align with the holes of the wheel (8).
4. Repeat these steps for the other wheels.
Assembling the grass box
Fig. A, H, I, J, K
It is possible to use the lawn mower with or
without grass box. Remember though that when
cutting without the grass box, the grass box lid
(11) must be lowered. Do not operate the mower
with outlet lid lifted.
1. Mount the Grass box carrying handle (16) onto
the grass box cover (12), as shown on figure H.
2. Join the two halves of the grass box basket
(10), as shown on figure I.
3. Mount the grass box cover (12) onto the
assembled grass box basket (10), as shown on
figure J.
4. Lift the grass box lid (11) and attach the
assembled grass box onto the lawn mower.
Ensure the indents in the grass box align
properly with the holders of the lawn mower
body.
Note:
the grass box is fitted with a grass level
indicator (13), which shows the amount of
mowed grass. As long as the grass box is not
full, the indicator will be opened. When the grass
box is full, the indicator will close. In that case
immediately stop mowing and empty the grass
box. This indicator is only a rough guideline, of
which the functionality depends on the condition
inside the grass basket.
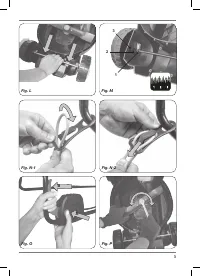
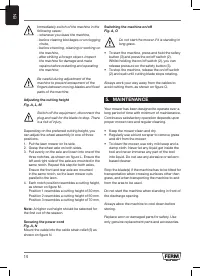
Replacing the cutting blade
Fig. A, P
Before carrying out any work on the
machine, disconnect the mains plug from
the power supply.
When replacing the cutting blade, wear
protective gloves. Danger of injury when
touching the cutting blade.
Only use blades that are recommended
by the manufacturer.
1. Remove the grass box.
2. Turn the mower onto its side.
3. Firmly hold cutting blade using protective
gloves.
4. Turn the cutting blade fixing screw counter-
clockwise to loosen it, as shown on figure P.
5. Replace or sharpen the cutting blade.
6. Install the cutting blade, use the above
procedure in reversed order (holes in the
cutting blade must be seated on the spindle
pins).
7. It is best to entrust sharpening or replacement
of cutting blade to a qualified person. Only
original parts should be used. All defects
should be repaired by service workshop
authorized by the manufacturer.
4. OPERATION
Before using, always visually inspect to
see that the blades, blade bolts and
cutter assembly are not worn or
damaged. Please keep power switched
off and disconnect the power supply.
Replace worn or damaged blades and
bolts in sets to preserve balance.
If the machine starts to vibrate
abnormally (check immediately):
- inspect for damage,
- replace or repair any damaged parts,
- check for and tighten any loose parts.


