
Газонокосилки FERM LMM1013 - инструкция пользователя по применению, эксплуатации и установке на русском языке. Мы надеемся, она поможет вам решить возникшие у вас вопросы при эксплуатации техники.
Если остались вопросы, задайте их в комментариях после инструкции.
"Загружаем инструкцию", означает, что нужно подождать пока файл загрузится и можно будет его читать онлайн. Некоторые инструкции очень большие и время их появления зависит от вашей скорости интернета.


12
EN
conductor size is 1.5 mm². When using a cable
reel always unwind the reel completely.
2. MACHINE INFORMATION
Intended use
This product is designed for lawnmowing in
domestic environments. The lawn mower is
intended for private gardens at home. The lawn
mower may not be used to trim bushes, hedges or
shrubs, to cut scaling vegetation, planted roofs, or
balcony-grown grass, to clean (vacuum) dirt and
debris off walkways, or to chop up tree or hedge
clippings. Moreover, the lawn mower may not be
used as a power cultivator to level out high areas
such as molehills. The equipment is to be used
only for its prescribed purpose. Any other use is
deemed to be a case of misuse.
Technical specifications
Model No.
LMM1013
Voltage 230V
Frequency 50Hz
Power
1300 W
No load speed
3400/min
Cutting width
320 mm
Cutting height
30/50/70mm
Grass box capacity
30 L
Weight
8.5 kg
Protection level
IPX4
Sound pressure level (Lpa)
71.4dB(A), K=2.35dB(A)
Sound power level (Lwa)
91.4dB(A), K=2.35dB(A)
Vibration value
<2.5m/s², K=1.5m/s²
Vibration level
The vibration emission level stated in this
instruction manual has been measured in
accordance with a standardized test given in
EN60335; it may be used to compare one tool
with another and as a preliminary assessment of
exposure to vibration when using the tool for the
applications mentioned.
- Using the tool for different applications, or with
different or poorly maintained accessories,
may significantly increase the exposure level.
- The times when the tool is switched off or
when it is running but not actually doing the
job, may significantly reduce the exposure
level.
Protect yourself against the effects of vibration by
maintaining the tool and its accessories, keeping
your hands warm, and organizing your work
patterns.
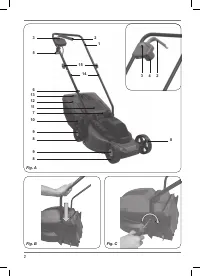
Description
The numbers in the text refer to the diagrams on
pages 2-5.
1. Upper handle
2. On/off switch
3. Safety button
4. Power socket
5. Cable strain relief
6. Cable holder
7. Carrying handle
8. Wheel
9. Wheel cover
10. Grass box basket
11. Grass box lid
12. Grass box cover
13. Grass level indicator
14. Lower handle
15. Knob for handle
16. Grass box carrying handle
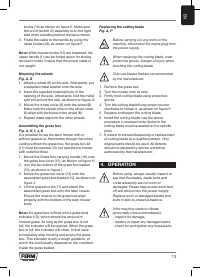
3. ASSEMBLY
Before assembly, always switch off the
machine and remove the mains plug from
the mains.
Assembling the lower handle
Fig. A, B, C
1. Insert the lower handle (14) into the intended
hole of the lawn mower body, as shown on
figure B. Ensure the hole in the lower handle
(14) aligns with the hole in the lawn mower
body.
2. Insert the screw in the hole and tighten by
turning clockwise, as shown on figure C.
3. Repeat these steps for the other lower handle
(14).
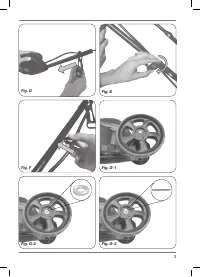
Assembling the upper handle
Fig. A, D, E, F
1. Put the cable strain relief (5) on the right side of
the upper handle (1) as shown on figure D.
2. Attach the upper handle (1) to the lower handle
(14), using the supplied bolts and handle


