
Электропилы Einhell PXC GE-LC 18 Li Kit - инструкция пользователя по применению, эксплуатации и установке на русском языке. Мы надеемся, она поможет вам решить возникшие у вас вопросы при эксплуатации техники.
Если остались вопросы, задайте их в комментариях после инструкции.
"Загружаем инструкцию", означает, что нужно подождать пока файл загрузится и можно будет его читать онлайн. Некоторые инструкции очень большие и время их появления зависит от вашей скорости интернета.


GB
- 26 -
•
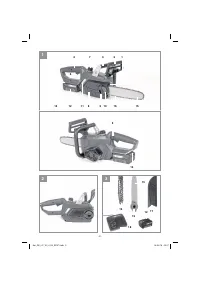
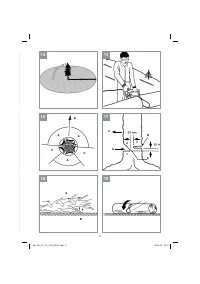
Insert the cutter rail and chain as shown in the
mounting in the chainsaw. At the same time
guide the chain around the chain wheel (Fig.
6b/6c/Item B).
•
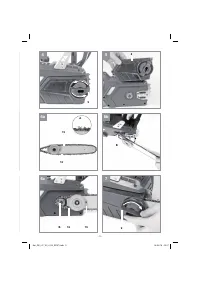
Attach the chain wheel cover and secure it
with the fixing screw (Fig. 7). Caution: Do not
fully tighten the fixing screw until after adjus-
ting the chain tension (refer to point 5.2).
5.2 Tensioning the saw chain
Warning!
Always disconnect the mains plug
before performing any checks or adjustments. Al-
ways wear protective gloves when working on the
chainsaw to protect yourself against injury.
•
Undo the fixing screw of the chain wheel co-
ver a few turns (Fig. 4).
•
Adjust the chain tension with the chain tensio-
ning screw (Fig. 8/ Item 10). Turning the screw
clockwise increases the tension, turning it
counter-clockwise decreases the chain ten-
sion. The saw chain is correctly tensioned if it
can be lifted around 3-4 mm in the middle of
the cutter rail (Fig. 9).
•
Tighten the fixing screw of the chain wheel
cover (Fig. 7).
Danger!
All of the chain links must lie proper-
ly in the guide groove of the cutter rail.
Notes on tensioning the chain:
The saw chain must be properly tensioned to
ensure safe operation. You can tell that the chain
tension is perfect if the saw chain can be lifted
by around 3-4 mm in the middle of the cutter rail.
As the saw chain heats up during cutting and
thus changes in length, please check the chain
tension every 10 minutes and adjust it again as
required. This applies in particular to new saw
chains. When you have
fi
nished working slacken
the chain again, as the chain will shorten when it
cools down. This will prevent the chain from being
damaged.
5.3 Saw chain lubrication
Warning!
Always pull out the battery before per-
forming any checks or adjustments. Always wear
protective gloves when working on the chainsaw
to protect yourself against injury.
Notice!
Never operate the chain if it is not lub-
ricated with saw chain oil. Use of the chainsaw
without saw chain oil or if the oil level is below
the “min” mark (Fig. 10/ Item B) will damage the
chainsaw.
Notice!
Be aware of the temperature conditions:
di
ff
erent lubricants with completely di
ff
erent
viscosities are required at di
ff
erent ambient tem-
peratures. At lower temperatures you will need
low viscosity oils in order to achieve a su
ffi
cient
lubricating
fi
lm. However, if the same low viscosity
oil is used during the summer it will become even
thinner due to the ambient temperatures alone,
and as a result the lubricating
fi
lm could break
down, causing the chain to overheat and become
damaged. In addition, the chain oil would burn
and produce unnecessary pollutants.
Filling the oil tank:
•
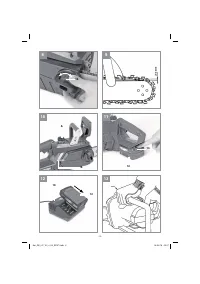
Place the chainsaw on a flat surface.
•
Clean the area around the oil tank cover (Fig.
10/Item A) and then clean the oil tank cover.
•
Fill the tank with saw chain oil. In the process,
make sure that no dirt enters the tank, as this
could cause the oil nozzle to become blo-
cked.
•
Close the oil tank cover.
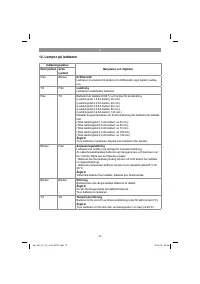
5.4 Charging the Li battery pack (Fig. 11-12)
The battery is protected from exhaustive dischar-
ge. An integrated protective circuit automatically
switches o
ff
the equipment when the battery is
fl
at.
Warning!
Do not actuate the On/O
ff
switch any
more if the protective circuit has tripped. This may
damage the battery.
1. Remove the battery pack from the handle,
pressing the pushlock button (13) downwards
to do so.
2. Check that your mains voltage is the same as
that marked on the rating plate of the battery
charger. Insert the power plug of the charger
(18) into the socket outlet. The green LED will
then begin to
fl
ash.
3. Push the battery pack onto the battery char-
ger.
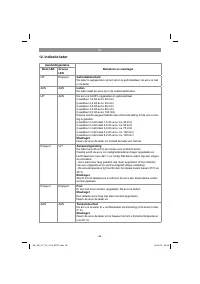
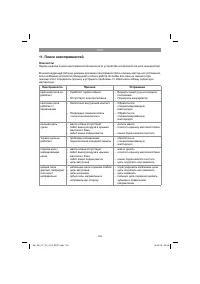
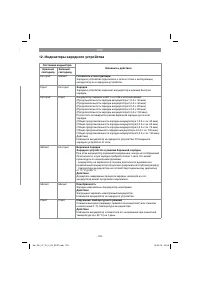
In section 12 (Charger indicator) you will
fi
nd a
table with an explanation of the LED indicator on
the charger.
If the battery pack fails to charge, check for the
following:
•
voltage at the power socket
•
whether there is good contact at the charging
contacts of the charging unit
If the battery pack still fails to charge, send
•
the charger and charging adapter
•
and the battery pack
to our customer service center.
Anl_GE_LC_18_Li_Kit_SPK7.indb 26
Anl_GE_LC_18_Li_Kit_SPK7.indb 26
04.04.16 09:28
04.04.16 09:28
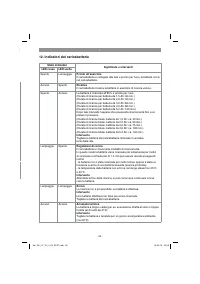
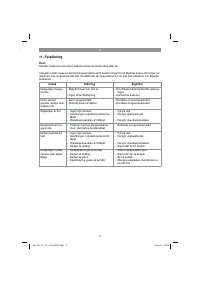
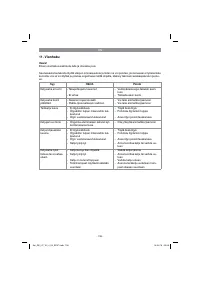
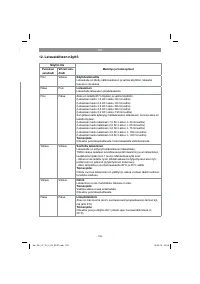
Характеристики

Остались вопросы?Не нашли свой ответ в руководстве или возникли другие проблемы? Задайте свой вопрос в форме ниже с подробным описанием вашей ситуации, чтобы другие люди и специалисты смогли дать на него ответ. Если вы знаете как решить проблему другого человека, пожалуйста, подскажите ему :)


