
Дрели Bosch GSB 13 RE - инструкция пользователя по применению, эксплуатации и установке на русском языке. Мы надеемся, она поможет вам решить возникшие у вас вопросы при эксплуатации техники.
Если остались вопросы, задайте их в комментариях после инструкции.
"Загружаем инструкцию", означает, что нужно подождать пока файл загрузится и можно будет его читать онлайн. Некоторые инструкции очень большие и время их появления зависит от вашей скорости интернета.


English |
13
u
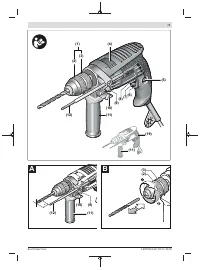
Before carrying out any work, make sure that the wing
bolt
(10)
is tightened.
Loss of control can cause per-
sonal injury.
You can swivel the auxiliary handle
(11)
to any angle for a
safe work posture that minimises fatigue.
Turn the wing bolt for adjusting the auxiliary handle
(10)
an-
ticlockwise and swivel the auxiliary handle
(11)
into the re-
quired position. Then retighten the wing bolt
(10)
by turning
it clockwise.
Setting the Drilling Depth (see figure A)
You can use the depth stop
(12)
to set the required drilling
depth
X
.
Press the button for depth stop adjustment
(9)
and insert
the depth stop into the auxiliary handle
(11)
.
Pull the depth stop
(12)
far enough out that the distance
between the drill bit tip and the edge of the depth stop
(12)
corresponds to the required drilling depth
X
.
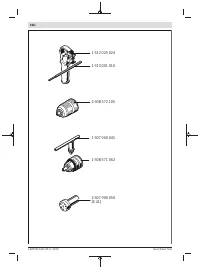
Changing the Tool
Keyless Chuck (see figure B)
Hold the rear sleeve
(3)
of the keyless chuck
(1)
firmly and
turn the front sleeve
(2)
in the rotational direction
➊
until
the tool can be inserted. Insert the tool.
Hold the rear sleeve
(3)
of the keyless chuck
(1)
and firmly
tighten the front sleeve
(2)
by hand in the rotational direc-
tion
➋
until it stops clicking. This will automatically lock the
drill chuck.
The lock will disengage again if you turn the front sleeve
(2)
in the opposite direction to remove the tool.
Keyed Chuck (see figure C)
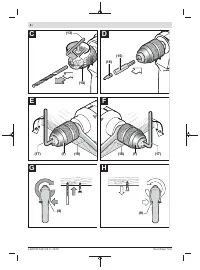
u
Wear protective gloves when changing tools.
The drill
chuck may heat up significantly when it is used for long
periods.
Open the keyed chuck
(14)
by turning it until the tool can be
inserted. Insert the tool.
Insert the drill chuck key
(13)
into the corresponding holes
of the keyed chuck
(14)
and clamp the tool evenly.
Screwdriving tools (see figure D)
You should always use a universal bit holder
(15)
when using
screwdriver bits
(16)
. Only use screwdriver bits that fit the
screw head.
For screwdriving, make sure the "drilling/impact drilling" se-
lector switch
(4)
is always set to the "drilling" symbol.
Changing the drill chuck
Removing the Drill Chuck (see figure E)
To remove the keyless chuck
(1)
, clamp a hex key
(17)
in
the keyless chuck
(1)
and position an open-ended spanner
(18)
(width across flats: 14 mm) against the spanner flat of
the drive spindle.
Place the power tool on a firm surface, e.g. a work bench.
Hold the open-ended spanner
(18)
in place and loosen the
keyless chuck
(1)
by turning the hex key
(17)
in the rota-
tional direction
➊
. A tightly seated keyless chuck can be
loosened with a light blow on the long shaft of the hex key
(17)
. Remove the hex key from the keyless chuck and com-
pletely unscrew the keyless chuck from the power tool.
The keyed chuck
(14)
is removed in the same manner as the
keyless chuck.
Fitting the Drill Chuck (see figure F)
To fit the keyless chuck/keyed chuck, perform the same
steps in reverse order.
The drill chuck must be tightened using a tight-
ening torque of approx. 30–35 Nm.
Dust/Chip Extraction
Dust from materials such as lead-containing coatings, some
wood types, minerals and metal can be harmful to one’s
health. Touching or breathing-in the dust can cause allergic
reactions and/or lead to respiratory infections of the user or
bystanders.
Certain dust, such as oak or beech dust, is considered carci-
nogenic, especially in connection with wood-treatment ad-
ditives (chromate, wood preservative). Materials containing
asbestos may only be worked by specialists.
– Provide for good ventilation of the working place.
– It is recommended to wear a P2 filter-class respirator.
Observe the relevant regulations in your country for the ma-
terials to be worked.
u
Avoid dust accumulation at the workplace.
Dust can
easily ignite.
Operation
Starting Operation
u
Pay attention to the mains voltage. The voltage of the
power source must match the voltage specified on the
rating plate of the power tool. Power tools marked
with 230 V can also be operated with 220 V.
u
Products that are only sold in AUS and NZ:
Use a resid-
ual current device (RCD) with a nominal residual current
of 30 mA or less.
Setting the Rotational Direction (see figures G–H)
The rotational direction switch
(8)
is used to change the ro-
tational direction of the power tool. However, this is not pos-
sible while the on/off switch
(6)
is being pressed.
Right rotation:
To drill and to drive in screws, press the ro-
tational direction switch
(8)
through to the left stop.
Left Rotation:
To loosen and unscrew screws and nuts,
press the rotational direction switch
(8)
through to the right
stop.
Setting the Operating Mode
Drilling and screwdriving
Set the selector switch
(4)
to the "drilling"
symbol.
Bosch Power Tools
1 609 92A 53D | (05.11.2020)
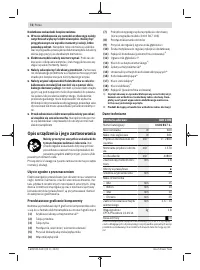
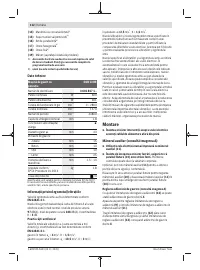
Характеристики

Остались вопросы?Не нашли свой ответ в руководстве или возникли другие проблемы? Задайте свой вопрос в форме ниже с подробным описанием вашей ситуации, чтобы другие люди и специалисты смогли дать на него ответ. Если вы знаете как решить проблему другого человека, пожалуйста, подскажите ему :)


