
Вытяжки Smeg KDV907X - инструкция пользователя по применению, эксплуатации и установке на русском языке. Мы надеемся, она поможет вам решить возникшие у вас вопросы при эксплуатации техники.
Если остались вопросы, задайте их в комментариях после инструкции.
"Загружаем инструкцию", означает, что нужно подождать пока файл загрузится и можно будет его читать онлайн. Некоторые инструкции очень большие и время их появления зависит от вашей скорости интернета.


20
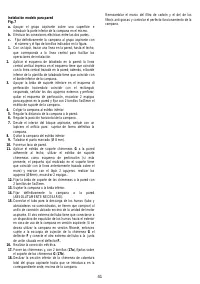
centre line printed on the drilling template must
correspond to the centre line drawn on the wall, and the
bottom edge of the drilling template must correspond to
the bottom edge of the hood.
3.
Place the lower support bracket on the perforation
diagram making it coincide with the traced triangle, mark
the two external holes and perforate. Remove the
perforation diagram, insert two wall-dowels and fix the
support bracket of the hood with two 5x45 mm screws.
4.
Hang the hood onto the lower bracket.
5.
Adjust the distance of the hood from the wall.
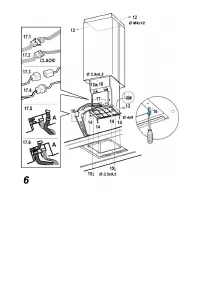
6.
Adjust the horizontal position of the hood.
7.
Using a pencil mark the cooker hood permanent drill hole
inside the suction group.
8.
Remove the hood from the lower bracket.
9.
Drill at the point marked (Ø8mm).
10.
Insert 1 wall screw anchor.
11.
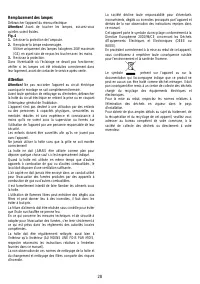
Apply the flues support bracket
G
to the wall adherent to
the ceiling, use the flues support bracket as a perforation
diagram (if present, the small slot on the support must
coincide with the line drawn previously on the wall) and
mark two holes with a pencil. Make the holes (Ø8mm),
and insert 2 dowels.
12.
Fix the chimney support bracket to the wall using two
5x45mm screws.
13.
Hook the hood onto the bottom bracket.
14.
Fix the hood into its final position on the wall
(ABSOLUTELY ESSENTIAL).
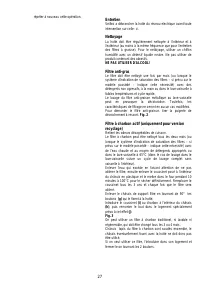
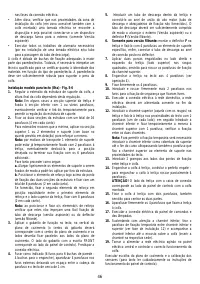
15.
Connect a pipe (pipe and pipe clamps not provided, to be
purchased separately) for discharge of fumes to the
connection ring located over the suction motor unit.
If the hood is to be used in ducting version, the other end
of the pipe must be connected to a device expelling the
fumes to the outside. If the hood is to be used in filter
version, then fix the deflector
F
to the chimney support
bracket
G
and connect the other extremity of the pipe to
the connection ring placed on the deflector
F
.
16.
Connect the electricity.
17.
Apply the chimney stacks and fasten them at the top to
the chimney support
G
(17b) using 2 screws (17a)
18.
Slide the bottom section of the chimney down until it
completely covers the suction unit and slots into the
housing provided on top of the hood.
Remount the carbon filter frame and the fat/s filter/s and check
the perfect functioning of the hood.
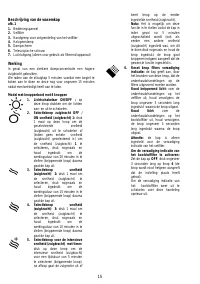
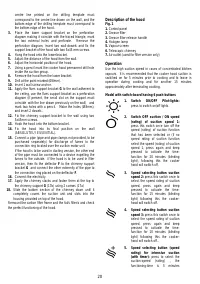
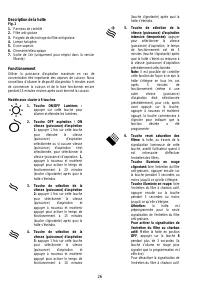
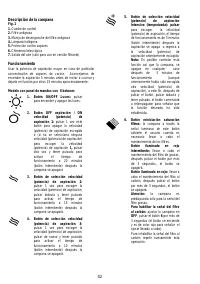
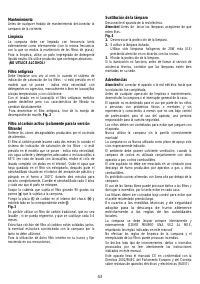
Description of the hood
Fig. 1
1.
Control panel
2.
Grease filter
3.
Grease filter release handle
4.
Halogen lamp
5.
Vapour screen
6.
Telescopic chimney
7.
Air outlet (used for filter version only)
Operation
Use the high suction speed in cases of concentrated kitchen
vapours. It is recommended that the cooker hood suction is
switched on for 5 minutes prior to cooking and to leave in
operation during cooking and for another 15 minutes
approximately after terminating cooking.
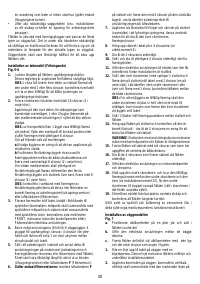
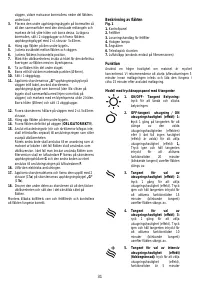
Model with switch-board having 6 push-buttons
1.
Switch ON/OFF Pilot-lights:
press to switch on/off lights.
2.
Switch OFF suction / ON speed
(rating) of suction speed 1:
press this switch once turn off the
speed (rating) of suction function
that has been selected or (if no
speed rating of suction function
select the speed (rating) of suction
speed 1, press again and keep
pressed to activate the time-
function for 20 minutes (blinking
light), following this the cooker
hood will swittch off.
3. Speed selecting button suction
speed 2:
press this switch once to
select the speed rating of suction
speed, press again and keep
pressed to activate the time-
function for 15 minutes (blinking
light) following this the cooker-
hood will switch off.
4. Speed selecting button suction
speed 3:
press this switch once to
select the speed rating of suction
speed, press again and keep
pressed to activate the time-
function for 10 minutes (blinking
light) following this the cooker-
hood will switch off..
5. Speed selecting button (speed
rating) for intensive suction
(with timer):
press to select the
suction-speed (rating) , the
functioning-time is 5 minutes
Характеристики

Остались вопросы?Не нашли свой ответ в руководстве или возникли другие проблемы? Задайте свой вопрос в форме ниже с подробным описанием вашей ситуации, чтобы другие люди и специалисты смогли дать на него ответ. Если вы знаете как решить проблему другого человека, пожалуйста, подскажите ему :)


