
Вытяжки Falmec Flipper 85 ix (800) ECP - инструкция пользователя по применению, эксплуатации и установке на русском языке. Мы надеемся, она поможет вам решить возникшие у вас вопросы при эксплуатации техники.
Если остались вопросы, задайте их в комментариях после инструкции.
"Загружаем инструкцию", означает, что нужно подождать пока файл загрузится и можно будет его читать онлайн. Некоторые инструкции очень большие и время их появления зависит от вашей скорости интернета.


17
English
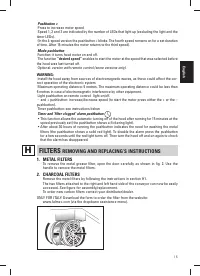
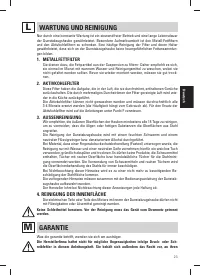
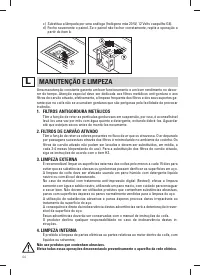
4. CLEANING THE INSIDE OF THE APPLIANCE
The electrical parts or parts of the motor assembly inside the range hood must not be
cleaned using liquids or solvents.
Do not use abrasive products.
All the above operations must be performed after having disconnected the appliance from the
mains power supply.
WARRANTY
M
The new equipment is covered by warranty.
The warranty conditions are provided by the distributor.
The manufacturer is not liable for any inaccuracies in this booklet resulting from printing or
transcription errors. The manufacturer reserves the right to modify its products as it consid-
ers necessary or in the interests of the user, without compromising their essential safety and
operating characteristics.
N
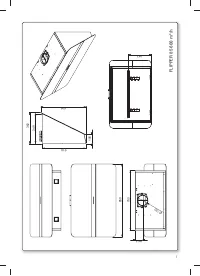
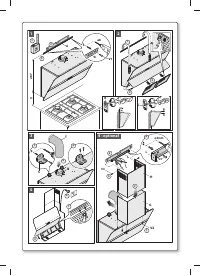
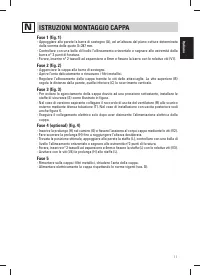
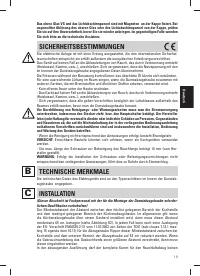
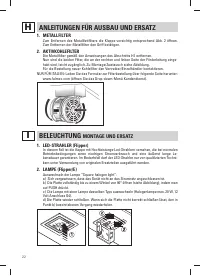
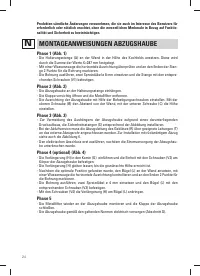
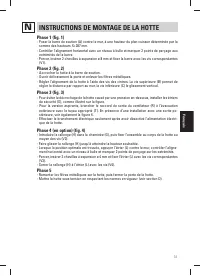
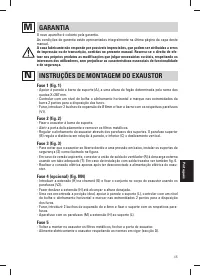
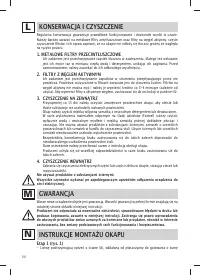
HOOD ASSEMBLY INSTRUCTIONS
Step 1 (fig. 1)
- Place the support bar (A) on the wall at the same height as the cooker, at the same distance
as the sum of the heights X+287 mm.
- Use a spirit level to check the horizontal alignment and draw 2 marks at each end of the bar,
this is where the holes will be drilled.
- Drill the holes, insert 2 expansion plugs (ø 8mm) and fasten the bar with the relative screws
(V1).
Step 2 (fig. 2)
- Couple the hood onto the support bar.
- Gently open the door and remove the metal filters.
- Adjust the alignment of the hood by using the fixing screws. The upper screw (B) adjusts the
distance from the wall, the lower one (C) the vertical scrolling.
Step 3 (fig. 3)
- To prevent the hood from coming out due to the pressure underneath it, install the safety
brackets (S) as shown in the figure.
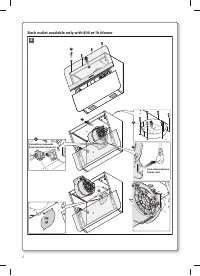
- For the exhaust version, connect the output fitting of the fan (R) to the external discharge with
a suitable pipe (T). In the event of installation with rear outlet, see figure 6 as well.
- Set up the electric connection only after disconnecting the power supply of the hood.
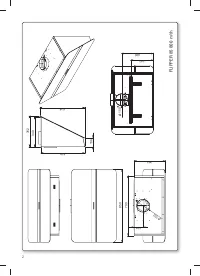
Step 4 (optional) (fig. 4)
- Place extension (H) in the flue (G) and fasten this assembly to the body of the hood using the
screws (V2).
- Slide the extension (H) until it is positioned at the desired height.
- Once you have found the best position, lean the bracket (L) on the wall, verify the horizontal
alignment with a spirit level and mark 2 drilling points at the ends.
- Drill the holes, insert 2 expansion plugs (ø 4mm) and fasten the bracket (L) with the relative
screws (V3).
- Tighten the extension (H) to the bracket (L) using the screws (V4).
Step 5
- Place the metal filters back on the hood and close the hood’s door.
- Power on the hood in accordance with current regulations (sec. D).
Характеристики

Остались вопросы?Не нашли свой ответ в руководстве или возникли другие проблемы? Задайте свой вопрос в форме ниже с подробным описанием вашей ситуации, чтобы другие люди и специалисты смогли дать на него ответ. Если вы знаете как решить проблему другого человека, пожалуйста, подскажите ему :)


