
Вытяжки Elica CLOUD NINE WH/A/120 - инструкция пользователя по применению, эксплуатации и установке на русском языке. Мы надеемся, она поможет вам решить возникшие у вас вопросы при эксплуатации техники.
Если остались вопросы, задайте их в комментариях после инструкции.
"Загружаем инструкцию", означает, что нужно подождать пока файл загрузится и можно будет его читать онлайн. Некоторые инструкции очень большие и время их появления зависит от вашей скорости интернета.


1 9
Use
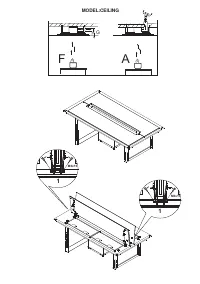
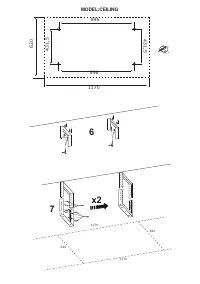
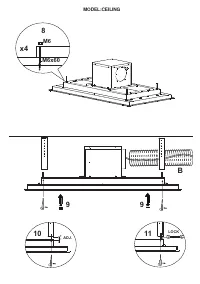
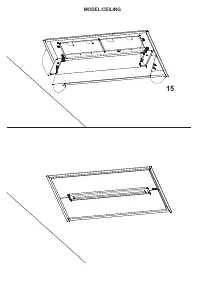
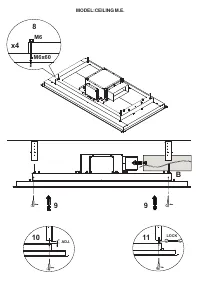
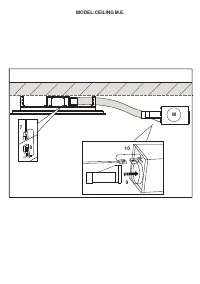
The cooker hood is provided with an upper air exit
B
for
discharging fumes externally for models including chimney
flue
C
(
Suction
Version A-
exhaust pipe not supplied).
If cooking fumes and vapours cannot be externally discharged,
the cooker hood can be used in the
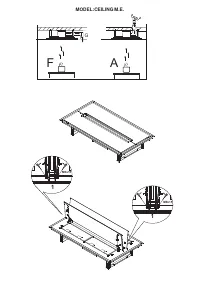
recirculating version
F
: the installation of 1 active charcoal filter F allows the
recirculation of fumes and vapours through the upper grid
G
.
Electrical connection
Operation
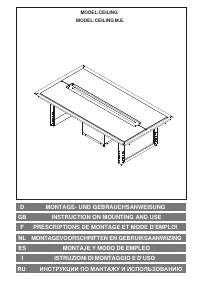
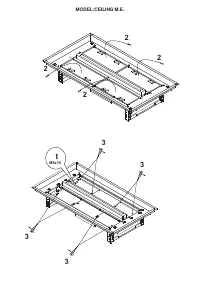
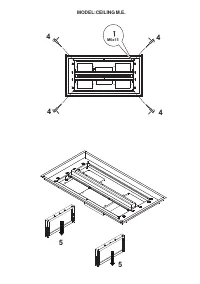
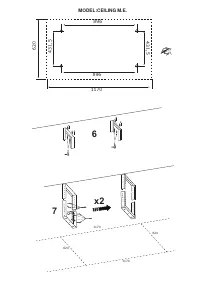
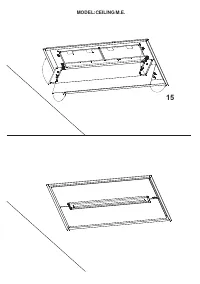
INSTRUCTION ON MOUNTING AND USE
GB
Check also the drawings on the initial pages with the alphabetical
a n d n u m e r i c a l r e f e r e n c e s i n t h e e x p l a n a t o r y t e x t .
C l o s e l y f o l l o w t h e i n s t r u c t i o n s i n t h i s m a n u a l . W e c a n n o t
accept liability for any faults, detriment or fire damage to the
a p p l i a n c e d u e t o n o n - c o m p l i a n c e w i t h t h e m a n u a l ’ s
i n s t r u c t i o n s . I n s t a l l a t i o n a n d e l e c t r i c a l c o n n e c t i o n s m u s t b e
executed by a qualified technician. You should affix the hood
t o a w a l l o f s u ff i c i e n t w e i g h t - b e a r i n g c a p a c i t y, s o n o t t o o n e
made of plasterboard. Do not install it inside a cupboard.
Make sure that there is a power socket near the hood and
that the system has a 30 mA differential. The mains voltage
must be the same as that on the label inside the hood. The
hood has a 1250 mm power cable with or without plug: if it
does have a plug, connect the hood to an accessible
approved socket; or if it does not (connection direct to the
m a i n s ) , f i t a n a p p r o v e d b i p o l a r s w i t c h w i t h a m i n i m u m
contact opening of no less than 3 mm (accessible). This
installation and electrical connection must be executed by a
qualified technician.
Use the high suction speed in cases of concentrated kitchen
vapours. It is recommended that the cooker hood suction is
switched on for 5 minutes prior to cooking and to leave in
operation during cooking and for another 15 minutes
a p p r o x i m a t e l y a f t e r t e r m i n a t i n g c o o k i n g .
For the correct use please carefully read the intructions below.
H o o d i n s t a n d - b y :
L E D L I G H T S W I T C H E D O F F
1 s t s u c t i o n s p e e d ( p o w e r )
- G R E E N L E D L I G H T
2 n d s u c t i o n s p e e d ( p o w e r )
. ORANGE LED LIGHT (amber)
3 r d s u c t i o n s p e e d ( p o w e r )
- R E D L E D L I G H T
4 t h s u c t i o n s p e e d ( p o w e r )
- R E D L E D L I G H T ( F L A S H I N G )
Note:
The 4th suction speed (power) stays on for 5 minutes,
after which the suction motor will position itself on the 2nd
s p e e d .
G r e a s e f i l t e r s n e e d c l e a n i n g :
FLASHING GREEN LED light
(read instructions found under .Reset and configuration for
filter saturation signal.)
C o a l f i l t e r s m u s t b e c l e a n e d o r r e p l a c e d :
F L A S H I N G
ORANGE (amber) LED light (read instructions found under
.Reset and configuration for filter saturation signal.)
U s i n g t h e r e m o t e c o n t r o l
The remote control is able to control all the functions of the
h o o d :
Select the suction speed (power)
Control the central light
Reset e configure the saturation of the filters signal
S e l e c t i n g t h e s u c t i o n s p e e d ( p o w e r ) :
P r e s s t h e „ “ k e y o r t h e „ “ k e y u n t i l y o u s e e t h e s y m b o l
relating to the .Select the suction speed (power). function.
Press the .+. key or the .-. key or the „ “ key respectively to
increase or diminish or switch off (stand-by) the speed
( s u c t i o n p o w e r ) .
C o n t r o l l i n g t h e c e n t r a l l i g h t :
Press the „ “ key or the „ “ key until seeing the symbol
relating to the .Controlling the central light. function on the
r e m o t e c o n t r o l .
The central light can be switched on and off in two ways:
1 .
P r e s s t h e . + . k e y o r t h e . - . k e y r e s p e c t i v e l y t o s w i t c h t h e
central light (ON) or (OFF).
2.
Press the „ “ key to change the state of the light from
( O F F ) t o ( O N ) o r v i c e v e r s a .
R e s e t t i n g a n d c o n f i g u r i n g t h e s a t u r a t i o n o f t h e f i l t e r s
s i g n a l
S w i t c h t h e h o o d o n a t a n y s p e e d ( s e e p a r a g r a p h a b o v e
. S e l e c t i n g t h e s u c t i o n s p e e d ( p o w e r . ) .
Press the „ “ key or the „ “ key until seeing the symbol
relating to the .Resetting and configuration of the saturation of
the filters signal. function on the remote control.
R e s e t t i n g t h e a n t i - f a t f i l t e r s a t u r a t i o n s i g n a l ( G R E E N L E D
F L A S H I N G o n t h e c o n t r o l b a r )
F i r s t p r o c e e d w i t h t h e m a i n t e n a n c e o f t h e f i l t e r a s
d e s c r i b e d i n t h e c o r r e s p o n d i n g p a r a g r a p h .
P r e s s t h e . + . a n d . - . k e y s c o n t e m p o r a n e o u s l y f o r a b o u t 3
seconds. The LED stops flashing, indicating that the resetting
o f t h e s i g n a l h a s b e e n a c c o m p l i s h e d .
R e s e t t i n g t h e c a r b o n f i l t e r s a t u r a t i o n s i g n a l ( O R A N G E
( a m b e r ) L E D F L A S H I N G )
Note!
The reset of the carbon filter saturation signal is
n o r m a l l y d e a c t i v a t e d . To a c t i v a t e i t , s e e u n d e r p a r a g r a p h
.Activating the carbon filter saturation signal..
F i r s t p r o c e e d w i t h t h e m a i n t e n a n c e o f t h e f i l t e r a s
d e s c r i b e d i n t h e c o r r e s p o n d i n g p a r a g r a p h .
P r e s s t h e . + . a n d . - . k e y s c o n t e m p o r a n e o u s l y f o r a b o u t 3
seconds. The LED stops flashing, indicating that the resetting
o f t h e s i g n a l h a s b e e n a c c o m p l i s h e d .
D e a c t i v a t i n g t h e c a r b o n f i l t e r s a t u r a t i o n s i g n a l ( f o r
s p e c i a l a p p l i c a t i o n s )
Switch the hood off (see paragraph above .Selecting the
s u c t i o n s p e e d ( p o w e r ) . ) .
Press the „ “ key or the „ “ key until seeing the symbol
relating to the .Resetting and configuration of the filters
saturation signal. function on the remote control.
P r e s s k e y s . + . a n d . - . c o n t e m p o r a n e o u s l y f o r a b o u t 3
seconds. The LED flashes in GREEN to indicate that the
carbon filter saturation signal has been deactivated.
To reactivate the carbon filter saturation signal, repeat the
o p e r a t i o n . T h e L E D f l a s h e s i n O R A N G E .
M a i n t e n a n c e o f t h e r e m o t e c o n t r o l
C l e a n i n g t h e r e m o t e c o n t r o l :
Clean the remote control with a damp cloth and a neutral
s o l u t i o n o f d e t e r g e n t w i t h o u t a b r a s i v e s u b s t a n c e s .
C h a n g i n g t h e b a t t e r y :
. O p e n t h e b a t t e r y c a s i n g u s i n g a s m a l l s c r e w d r i v e r w i t h a
flat point.
. Change the finished battery with a new one of 12 V type
M N 2 1 / 2 3
In inserting the new battery respect the polarity indicated
on the battery casing!
. Close the battery casing up again.
Характеристики

Остались вопросы?Не нашли свой ответ в руководстве или возникли другие проблемы? Задайте свой вопрос в форме ниже с подробным описанием вашей ситуации, чтобы другие люди и специалисты смогли дать на него ответ. Если вы знаете как решить проблему другого человека, пожалуйста, подскажите ему :)


